
Install Guide


Assigning Dell privileges to existing role
You can edit an existing role to assign the Dell privileges.
NOTE: Ensure that you are logged in as a user with Administrator privileges.
1. Log in to the vSphere web client with administrative rights.
2. In the left pane, click Administration → Roles in the vSphere web client.
3. Select a vCenter server system from the Roles provider drop-down list.
4. Select the role from the Roles list, and click
.
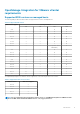
5. Click Privileges, expand Dell, and then select the following Dell privileges for the selected role and click OK:
• Dell.Configuration
• Dell.Deploy-Provisioning
• Dell.Inventory
• Dell.Monitoring
• Dell.Reporting
See Security roles and permissions in OpenManage Integration for VMware vCenter User’s Guide available at Dell.com/support/
manuals for more information about the available OMIVV roles within vCenter.
The changes to permissions and roles take effect immediately. The user with necessary privileges can now perform the OpenManage
Integration for VMware vCenter operations.
NOTE: For all vCenter operations, OMIVV uses the privileges of the registered user and not the privileges of the logged-
in user.
NOTE: If specific pages of OMIVV are accessed with no Dell privileges assigned to the logged-in user, the 2000000 error
is displayed.
Registering OpenManage Integration for VMware vCenter
and importing license file
Ensure that your licenses are ready for download at http://www.dell.com/support/licensing. If you have ordered more than one license,
they might be shipped separately at different times. You can check the status of other license items at Order status. The license file is
available as an .XML format.
NOTE:
If you want to upload a custom certificate for your appliance, ensure that you upload the new certificate before
vCenter registration. If you upload the new custom certificate after vCenter registration, communication errors are
displayed in the web client. To fix this issue, unregister, and re-register the appliance with vCenter.
1. From the vSphere web client, click Home > Hosts and Clusters, then in the left panel, locate OMIVV that you had deployed, and
click Power on the virtual machine.
During deployment, if you select Power on after Deployment, the VM is powered on automatically after deployment is complete.
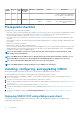
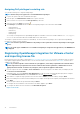
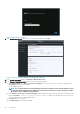
2. To run the Administration Console, click the Console tab in the main VMware vCenter window.
3. Allow OMIVV to complete booting up, and then enter the user name as, Admin (the default is Admin), and press Enter.
4. Enter a new admin password. Ensure that the admin password complies with the password complexity rules displayed in the interface.
Press Enter.
5. Reenter the password that was provided earlier and press Enter.
To configure the network and time zone information in the OMIVV appliance, press Enter.
6. To configure the OMIVV time zone information, click Date/Time Properties.
Figure 1. Console tab
18
Introduction