
Install Guide


1. Locate the OMIVV virtual disk that you downloaded and extracted, and run Dell_OpenManage_Integration.exe.
The supported client OS version for extracting and running the exe is Windows 7 SP1 and later.
The supported server OS version for extracting and running the exe is Windows 2008 R2 and later.
2. Accept EULA, and save the .OVF file.
3. Copy or move the .OVF file to a location accessible to the VMware vSphere host to which you upload the appliance.
4. Start the VMware vSphere Web Client.
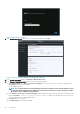
5. From the VMware vSphere Web Client, select a host, and in the main menu click Actions > Deploy OVF Template.
You can also right-click Host and select Deploy OVF Template.
The Deploy OVF Template wizard is displayed.
6. In the Select Source window, perform the following subtasks:
a) Select URL if you want to download the OVF package from Internet.
b) Select the Local file and click Browse if you want to select the OVF package from your local system.
NOTE: The installation process can take between 10-30 minutes if the OVF package resides on a network share. For a
quick installation, it is recommended that you host the OVF on a local drive.
7. Click Next.
The Review Details window is displayed with the following information:
• Product—The OVF template name is displayed.
• Version—The version of the OVF template is displayed.
• Vendor—The vendor name is displayed.
• Publisher—The publisher details are displayed.
• Download Size—The actual size of the OVF template in gigabytes is displayed.
• Size on Disk—Details of thick and thin provisioned details are displayed.
• Description—The comments are displayed here.
8. Click Next.
The Select Name and Folder window is displayed.
9. In the Select Name and Folder window, perform the following substeps:
a. In Name, enter the name of the template. The name can include up to 80 characters.
b. In the Select a folder or datacenter list, select a location for deploying the template.
10. Click Next.
The Select Storage window is displayed.
11. In the Select Storage window, perform the following substeps:
a) In the Select Virtual Disk Format drop-down list, select either of the following formats:
• Thick Provision (lazy Zeroed)
• Thick Provision (Eager zeroed
• Thin Provision
It is recommended that you select, Thick Provision (Eager Zeroed).
b) In the VM Storage Policy drop-down list, select a policy.
12. Click Next.
The Setup Networks window is displayed that includes details about the source and destination networks.
13. In the Setup Networks window, click Next.
NOTE: It is recommended that the OMIVV appliance and the vCenter server are located in the same network.
14. In the Ready to Complete window, review the selected options for the OVF deployment task and click Finish.
The deployment job runs and provides a completion status window where you can track the job progress.
Uploading HTTPS certificate
Ensure that the certificate uses PEM format.
You can use the HTTPS certificates for secure communication between the virtual appliance and host systems. To set up this type of
secure communication, a CSR must be sent to a certificate authority and then the resulting certificate is uploaded using the Administration
Console. There is also a default certificate that is self-signed and can be used for secure communication; this certificate is unique to every
installation.
NOTE: You can use the Microsoft internet explorer, Firefox, Chrome to upload certificates.
Introduction 15