
Users Guide


Manually configuring PowerEdge 12th and later generation servers for
auto discovery
Ensure that you have an iDRAC address.
When you order servers from Dell, you can ask for the auto discovery feature to be enabled on the servers after you provide the
provisioning server IP address. The provisioning server IP address should be the IP address of OMIVV. Therefore, after you receive the
servers from Dell, when you power on the servers after mounting and connecting the iDRAC cable, the servers get auto discovered and
listed in the first page of the Deployment Wizard.
NOTE: For auto discovered servers, the credentials that are provided under Manage > Settings > Deployment
Credentials is set as admin credentials and is used for further communication with the server, until the OS deployment
is completed. After a successful OS deployment, the iDRAC credentials that are provided in the associated connection
profile are set.
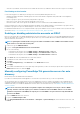
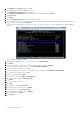
To enable auto discovery manually on the target machine, perform the following steps for 12th and later generation servers:
1. To go to system setup, boot/reboot the target system and press F2 during the initial boot.
2. Go to iDRAC Settings > User Configuration and disable the root user. Ensure that there are no other users with active
administrator privileges on the iDRAC address when you are disabling the root user.
3. Click Back, and click Remote Enablement.
4. Set Enable Auto-Discovery as Enabled and Provisioning Server as the IP address of the OMIVV.
5. Save the settings.
The server is auto discovered upon next server boot. After successful auto discovery, the root user gets enabled, and the Enable
Auto-Discovery flag is disabled automatically.
Removing bare-metal server
You can manually remove a server that has been auto discovered or manually added.
1. In OpenManage Integration for VMware vCenter, click the Manage > Deployment tab.
2. In the Bare Metal Servers page, select the servers and click
.
Provisioning
All auto/manually discovered complaint bare-metal systems are available to OMIVV for hardware provisioning and hypervisor deployment.
To prepare for provisioning and deployment, do the following:
Table 34. Preparing for deployment
Steps Description
Create a hardware profile Contains the hardware settings gathered from a reference server that is used to deploy new servers.
See Customizing reference server to create hardware profile.
Create a hypervisor profile Contains the hypervisor installation information needed for ESXi deployment. See Creating a hypervisor
profile.
Create a deployment template Optionally contains a hypervisor profile, or both hardware and hypervisor profiles. You can save and
reuse these profiles as needed for all available data center servers.
NOTE: Only hardware profile deployment is not supported.
Once the deployment template is created, use the deployment wizard to gather the information necessary to create a scheduled job that
provisions server hardware and deploys new hosts in vCenter. For information about running the deployment wizard, see Running the
deployment wizard. Lastly, view the job status through job queue and change the pending deployment jobs.
Configuring hardware profile
To configure server hardware settings, create a hardware profile. A hardware profile is a configuration template that you can apply to
newly discovered infrastructure components and it requires the following information:
Deploying hypervisor
93