
Users Guide


Understanding the vSphere Client Console
The vSphere Client Console is found within the vSphere Client on a virtual machine. The Console works hand in hand with the
Administration Console. The Console provides the ability to:
• Congure network settings
• Change the virtual appliance password
• Set the local timezone
• Reboot the virtual appliance
• Reset the virtual appliance to factory settings
• Refresh Console
• Log out from console
• Read-only user role
• Upgrading OpenManage Integration Plugin from 3.0 version to the current version
• Migration Path to migrate from 2.x to 3.1
Use the arrow keys to navigate up or down. Once you have selected the option you want, press <ENTER>. After you access the
Console screen, VMware vSphere Client takes control of your cursor. To escape from that control, press <CTRL> + <ALT>.
Conguring Network Settings
Changes to the network settings are done in the vSphere Client Console.
1. In vSphere Web Client, in the Navigator, select vCenter.
2. In the Navigator, select the Virtual Machine that you want to manage.
3. Do one of the following:
• On the Object tab, select Action → Open Console.
• Right-click the virtual machine that you selected and select Open Console.
4. In the Console window, select Congure Network, then press <ENTER>.
5. Enter the desired network settings under Edit Devices or under Edit DNS conguration, then click Save & Quit. To abort any
changes, click Quit.
Changing The Virtual Appliance Password
The virtual appliance password can be changed in the vSphere Client using the appliance console.
To change the virtual appliance password:
1. Log in to the vCenter/ESXi host where the OpenManage Integration for VMware vCenter is deployed. Select the OpenManage
Integration for VMware vCenter virtual machine and click the Console tab.
2. Log in to the appliance using username as admin and password which was set earlier.
3. In the OpenManage Integration for VMware vCenter Virtual Appliance Setup window, click on Change Admin Password.
4. In the Change Password Window, enter the Current Password
5. In the New Password enter the new password.
6. In the Conrm New Password enter the new password for conrmation.
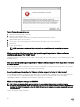
7. Click on Change Password Button
A message, Password was updated successfully is displayed.
8. Click OK .
72