
Users Guide

NOTE: You can add licenses if you need to add more hosts. Follow the process mentioned above to add more
licenses.
NOTE: If the number of successfully inventoried 11th, 12th, and 13th generation servers equals the number of
purchased licenses. Edit existing connection profiles by removing few 11th, 12th, or 13th generation servers. Create a
new connection profile for the removed 11th, 12th, or 13th generation servers.
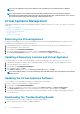
Virtual Appliance Management
Virtual appliance management contains the OpenManage Integration for VMware vCenter network, version, NTP, and HTTPS information,
and lets you:
• Restart the virtual appliance
• Update the virtual appliance and configure an update repository location
• Download a troubleshooting bundle
• Set up NTP servers
• Upload HTTPS certificates
Restarting the Virtual Appliance
Restarting the virtual appliance logs you out from the Administration Console, and the OpenManage Integration for VMware vCenter is
unavailable until the virtual appliance and its services are active.
1. In OpenManage Integration for VMware vCenter, under Administrative Console, use the link to open the Administration Console.
2. In the Login dialog box, type your password.
3. In the left pane, click APPLIANCE MANAGEMENT.
4. To restart the OpenManage Integration for VMware vCenter, click Restart the Virtual Appliance.
5. On the Restart Virtual Appliance dialog box, to restart the virtual appliance click Apply or click Cancel to cancel.
Updating a Repository Location and Virtual Appliance
Perform a backup prior to an update of the virtual appliance to make sure all data is protected. See, Managing Backup and Restore.
1. In OpenManage Integration for VMware vCenter, under Administration Console, use the link to open the Administration Console.
2. In the Login dialog box, type your password.
3. In the left pane, click APPLIANCE MANAGEMENT.
4. Next to Appliance Update, click Edit.
5. In the Appliance Update window, enter the Repository Location URL, and then click Apply.
NOTE:
If the update location is on an external network, such as the Dell FTP site, then a proxy must be entered in the
HTTP Proxy area.
Updating the Virtual Appliance Software
To prevent data loss, perform an appliance backup prior to beginning the software update.
1. Launch a web Browser then enter https://<ApplianceIPAddress>.
2. In the left pane, click APPLIANCE MANAGEMENT.
3. To update the virtual appliance to the software version listed under Appliance Update, click Update Virtual Appliance.
4. In the Update Appliance dialog box, the current and available versions are listed. To begin the update, click Update.
5. The system is locked down and put into maintenance mode. When the update is complete, the Appliance page displays showing the
newly installed version.
Downloading the Troubleshooting Bundle
Use this information to assist in troubleshooting issues, or send to Technical Support.
1. Launch a web Browser then enter https://<ApplianceIPAddress>.
34
Console Administration