
Users Guide


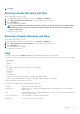
Viewing Warranty History
A warranty job is a scheduled task to get warranty information from support.dell.com on all systems. Columns are sortable in ascending
and descending order.
1. In the OpenManage Integration for VMware vCenter, click the Monitor tab.
2. Click Job Queue > Warranty History.
3. Expand Warranty History to display Hosts Warranty and Chassis Warranty.
4. Select either Hosts Warranty or Chassis Warranty to view your corresponding warranty job history information
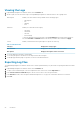
vCenter History
vCenters Displays lists of vCenters.
Hosts Passed Displays the number of vCenter Hosts that passed.
Last Warranty Displays the last warranty job that was run.
Next Warranty Displays the next warranty job that will run.
Modify Schedule button Click to edit a warranty job schedule.
Run Now button Click to run a warranty job.
Hosts History
Host Displays the host address.
Status
Displays the status. Options include:
• Successful
• Failed
• In Progress
• Scheduled
Duration (MM:SS) Displays the duration of the warranty job in MM:SS.
Start Date and Time Displays the date and time when the warranty job started.
End Date and Time Displays the time the warranty job ended.
Chassis History
Chassis IP Displays the chassis IP address.
Service Tag
Displays the service tag of the chassis. The service tag is a
unique identifier provided by the manufacturer for support and
maintenance.
Status Displays the status of the chassis.
Duration (MM:SS) Displays the duration of the warranty job in MM:SS.
Start Date and Time Displays the date and time when the warranty job started.
End Date and Time Displays the time the warranty job ended.
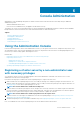
Modifying a Warranty Job Schedule
Warranty jobs are originally configured in the Initial Configuration Wizard. Later, you can modify a warranty job schedule on the Monitor
Tab > Job Queue > Warranty History > Hosts Warranty page or from the Manage Tab > Settings page.
1. In the OpenManage Integration for VMware vCenter, on the Monitor > Job Queue tab, click Warranty History.
2. Click the Change Schedule icon.
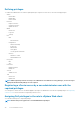
3. In the Warranty Data Retrieval dialog box, do the following:
a) Under Warranty Data, select the Enable Warranty Data Retrieval check box.
b) Under Warranty Data Retrieval Schedule, select the days of the week for your job.
c) In the Warranty Data Retrieval Time text boxes, type the local time for this job.
You may need to calculate the time difference required to run this job at the proper time.
26
Job Queue