OpenManage Integration for VMware vCenter Quick Installation Guide for Web Client Version 2.
Notes, Cautions, and Warnings NOTE: A NOTE indicates important information that helps you make better use of your computer. CAUTION: A CAUTION indicates either potential damage to hardware or loss of data and tells you how to avoid the problem. WARNING: A WARNING indicates a potential for property damage, personal injury, or death. Copyright © 2014 Dell Inc. All rights reserved. This product is protected by U.S. and international copyright and intellectual property laws.
Contents 1 Quick Start Installation...............................................................................................................5 Installation Introduction............................................................................................................................................5 Prerequisites.............................................................................................................................................................
Quick Start Installation 1 Installation Introduction This guide provides step-by-step instructions for the installation and configuration of the OpenManage Integration for VMware vCenter on Dell servers. Once the installation is complete, refer to the OpenManage Integration for VMware vCenter User's Guide for information about all aspects of administration including: inventory management, monitoring and alerting, firmware updates, and warranty management.
generation of Dell Servers you have, refer to the tables in the Release Notes. See the OpenManage Integration for VMware vCenter Release Notes for specific hardware support information. Software Requirements The vSphere environment must meet virtual appliance, port access, and listening port requirements. VMware vSphere has both a desktop client and Web client. Requirements for Web Client • Supported for vCenter 5.5 or higher.
To deploy theOpenManage Integration for VMware vCenter OVF using the vSphere Web Client: 1. Locate the OpenManage Integration for VMware vCenter virtual disk that you downloaded and extracted and run Dell_OpenManage_Integration.exe. 2. Agree to the EULA, extract the Quick Installation guide and obtain the OVF file. 3. Copy/move the OVF file to a location accessible to the VMware vSphere host to which you will upload the appliance. 4. Start the VMware vSphere web client. 5.
Registering OpenManage Integration for VMware vCenter and Importing The License File This procedure assumes that you have received the licenses in the form of an e-mail attachment from download_software@dell.com. If you have more than one license, you can add the licenses one after another. The license file is available as an XML format file. 1.
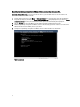
5. To open the Administration Console for the product, open a Web browser and type the appliance's IP address or hostname. The IP address is the IP address of the appliance VM and not the ESXi host IP address. The Administration Console can be accessed using the URL mentioned at the top of the console. For example: https://10.210.126.120 or https://myesxihost. Figure 2.
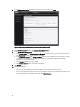
6. In the Administration Console login window, enter the password, and then click Login. Figure 3. vCenter Registration Window from within the Administration Console 7. In the vCenter Registration window, click Register New vCenter Server. 8. On the Register New vCenter Server window, do the following: a. Under vCenter Name, in the vCenter Server IP or Hostname text box, enter the server IP or hostname and then in the Description text box, enter the optional description. b.
. On the Upload License window, click the Browse button to navigate to the license file. Click Upload to import the license file. NOTE: • If the license file is modified or edited in any way, the license file will not work and you must send an email with the original order number to download_software@dell.com. For any license file support, e-mail to download_software@dell.com with your original order number. The license XML file is used in this procedure and it does not come with a hard coded file name.
3. To upgrade OpenManage Integration plug-in from version 2.0 to the current version, do one of the following: • To upgrade using the RPM that is available in the Default Update Repository, under APPLIANCE SETTINGS, click Update Virtual Appliance, and then go to step 6. • To upgrade using the latest downloaded RPMs, on the Appliance Management page, in the APPLIANCE UPDATE section, click Edit, and then in the Update Repository Path text box, update the path.
9. Run the Inventory on all the registered vCenters. NOTE: It is recommended that you run the inventory on all the hosts managed by the plug-in again after the upgrade. For more information, see the section Running Inventory Jobs for steps to run the inventory on demand. If the IP address of the new OpenManage Integration version 2.1 appliance has changed from that of the old appliance, the trap destination for the SNMP traps must be configured to point to the new appliance.
Understanding How to Configure or Edit the OpenManage Integration for VMware vCenter 2 After you complete the basic installation of the OpenManage Integration for VMware vCenter, the Initial Configuration Wizard is displayed when you click on the Dell OpenManage Integration icon. Use the Initial Configuration Wizard to configure the Settings on first launch. For subsequent instances use the Settings page.
Creating A New Connection Profile using the Initial Configuration Wizard A connection profile stores the iDRAC and host credentials that the virtual appliance uses to communicate with Dell servers. Each Dell server must be associated with a connection profile to be managed by the OpenManage Integration for VMware vCenter. You may assign multiple servers to a single connection profile.
3. In the Name and Credentials page, under iDRAC Credentials, do one of the following: NOTE: The iDRAC account requires administrative privileges for updating firmware, applying hardware profiles, and deploying hypervisor. • • For iDRACs already configured and enabled for Active Directory on which you want to use Active Directory, select the Use Active Directory check box; otherwise skip down to configure the iDRAC credentials. – In the Active Directory User Name text box, type the user name.
4. In the Host Root area, do one of the following: • • For hosts already configured and enabled for Active Directory on which you want to use Active Directory, select the Use Active Directory check box; otherwise skip down to configure your Host Credentials. – In the Active Directory User Name text box, type the user name. Type the username in one of these formats: domain\username or username@domain. The user name is limited to 256 characters.
To schedule an inventory job: 1. In the Configuration Wizard, in the Inventory Schedule window, do one of the following: 2. • The Enable Inventory Data Retrieval check box is selected by default to enable you to schedule the inventory. Under Inventory Data Retrieval Schedule, do the following: a. Select the check box next to each day of the week that you want to run the inventory. By default, all the days are selected. b. In the text box, enter the time in HH:MM format.
To configure events and alarms: 1. In the Initial Configuration Wizard, under Event Posting Levels, select one of the following: • Do not post any events - Block hardware events. • Post All Events - Post all hardware events. • Post only Critical and Warning Events - Post only critical or warning level hardware events. • 2. Post only Virtualization-Related Critical and Warning Events - Post only virtualization-related critical and warning events; this is the default event posting level.