
Deployment Guide
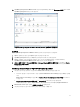


• Appliance Settings(어플라이언스 설정) 아래의 기본 Update Repository Path(업데이트 리포지토리 경로)에
있는 RPM을 사용하여 업그레이드하려면, Update Virtual Appliance(가상 어플라이언스 업데이트)를 클릭
한 후, 7단계로 이동합니다.
• Appliance Management(어플라이언스 관리) 페이지에서 가장 최근에 다운로드된 RPM을 사용하여 업그
레이드하려면, Edit(편집)를 클릭한 후, 해당 RPM이 포함된 경로를 입력합니다.
4. RPM 폴더/파일을 다른 HTTP 위치에 다운로드한 경우 리포지토리 경로를 수정합니다. 수정된 경로는 리포
지토리 위치를 위한 기본 경로에 지정된 폴더를 가리켜야 합니다.
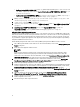
5. 이 변경사항을 저장하려면 적용을 클릭합니다.
6. 업데이트를 가상 어플라이언스에 적용하려면 어플라이언스 설정 아래에서 가상 어플라이언스 업데이트를
클릭합니다.
7. Update Appliance(어플라이언스 업데이트) 대화 상자에서 Upgrade(업그레이드)를 클릭합니다.
Upgrade(업그레이드)를 클릭하면, Administration Console(관리 콘솔)에서 로그 오프됩니다.
Migration Path to migrate from 1.6/1.7 to 2.1
OpenManage Integration for VMware vCenter version 2.1 is an OVF release only. There is no RPM update path from the
older versions to this version. You can migrate from older version (1.6 or 1.7) to the version 2.1 release using the Backup
and Restore path. Also, the migration path is only supported from version 1.6 and 1.7. If you are at a lower version than
1.6, you will have to upgrade your appliance to the supported version before you perform the migration to OpenManage
Integration for VMware vCenter version 2.1.
Do the following to migrate from older version to the OpenManage Integration for VMware vCenter 2.1 version:
1. Take a Backup of the database for the older release. For more information, See the section, Managing Backup and
Restore in this guide.
2. Power off the older appliance from the vCenter.
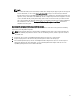
NOTE:
Do not unregister the Plug-in from the vCenter. Unregistering the plug-in from the vCenter will remove all the
Alarms registered on the vCenter by the plug-in and remove all the customizing performed on the alarms like
actions and so on, on the vCenter. For more information, see the section How to recover if I have unregistered the
older plugin after the backup in this guide if you have already unregistered the Plug-ins after the backup.
3. Deploy the new OpenManage Integration version 2.1 OVF. For more information, see the section Deploying the
OpenManage Integration for VMware vCenter OVF Using the vSphere Client in this guide to deploy the OVF.
4. Power on the OpenManage Integration version 2.1 appliance.
5. Setup the network, time zone and so on to the appliance. It is recommended that the new OpenManage Integration
version 2.1 appliance has the same IP address as the old appliance. To setup the network details, see the section,
Registering OpenManage Integration for VMware vCenter And Importing The License File in this guide.
6. Restore the database to the new appliance. For more information, see the section, Restoring The Database From A
Backup in this guide.
7. Upload the new license file. For more information, see the section, Registering OpenManage Integration for
VMware vCenter And Importing The License File in OpenManage Integration Version 2.1 Quick Install Guide.
8. Verify the appliance. For more information, see the section Installation Verification in this guide to ensure the
database migration is successful.
9. Run the Inventory on all the registered vCenters.
12