
Deployment Guide
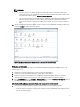


L’adresse URL de la Console d’administration s’affiche dans l’onglet Console vCenter vSphere.
• Utilisez le lien de la page Console de gestion Dell → Paramètres.
L’adresse URL utilise le format suivant et est sensible à la casse : https://<AdresseIPdel'Appliance>
2. Dans le volet gauche de l'Administration Console, cliquez sur GESTION D'APPLIANCE.
3. Pour mettre à niveau l’appliance virtuelle, effectuez l’une des opérations suivantes :
• Pour une mise à niveau à l’aide du RPM qui est disponible dans le chemin par défaut de l’espace de stockage
de mise à jour, sous Paramètres de l’appliance, cliquez sur Mettre à jour l’appliance virtuelle, puis passez à
l’étape 7.
• Pour une mise à niveau à l’aide des derniers RPM téléchargés, à la page Gestion de l’appliance, cliquez sur
Modifier, puis entrez le chemin d’accès qui contient le RPM.
4. Si vous avez téléchargé les fichiers ou dossiers RPM à un emplacement HTTP distinct, modifiez le chemin d’accès
de l'espace de stockage. Le chemin modifié doit indiquer le dossier spécifié dans le chemin par défaut de
l’emplacement de l’espace de stockage.
5. Pour enregistrer cette modification, cliquez sur Appliquer.
6. Pour appliquer la mise à jour à l'appliance virtuelle, sous Paramètres d'appliance, cliquez sur Mettre à jour
l'appliance virtuelle.
7. Dans la boîte de dialogue Mise à jour de l’appliance, cliquez sur Mettre à niveau.
En cliquant sur Mettre à niveau, vous vous déconnectez de la Console d’administration.
Migration Path to migrate from 1.6/1.7 to 2.1
OpenManage Integration for VMware vCenter version 2.1 is an OVF release only. There is no RPM update path from the
older versions to this version. You can migrate from older version (1.6 or 1.7) to the version 2.1 release using the Backup
and Restore path. Also, the migration path is only supported from version 1.6 and 1.7. If you are at a lower version than
1.6, you will have to upgrade your appliance to the supported version before you perform the migration to OpenManage
Integration for VMware vCenter version 2.1.
Do the following to migrate from older version to the OpenManage Integration for VMware vCenter 2.1 version:
1. Take a Backup of the database for the older release. For more information, See the section, Managing Backup and
Restore in this guide.
2. Power off the older appliance from the vCenter.
NOTE:
Do not unregister the Plug-in from the vCenter. Unregistering the plug-in from the vCenter will remove all the
Alarms registered on the vCenter by the plug-in and remove all the customizing performed on the alarms like
actions and so on, on the vCenter. For more information, see the section How to recover if I have unregistered the
older plugin after the backup in this guide if you have already unregistered the Plug-ins after the backup.
3. Deploy the new OpenManage Integration version 2.1 OVF. For more information, see the section Deploying the
OpenManage Integration for VMware vCenter OVF Using the vSphere Client in this guide to deploy the OVF.
4. Power on the OpenManage Integration version 2.1 appliance.
5. Setup the network, time zone and so on to the appliance. It is recommended that the new OpenManage Integration
version 2.1 appliance has the same IP address as the old appliance. To setup the network details, see the section,
Registering OpenManage Integration for VMware vCenter And Importing The License File in this guide.
6. Restore the database to the new appliance. For more information, see the section, Restoring The Database From A
Backup
in this guide.
7. Upload the new license file. For more information, see the section, Registering OpenManage Integration for
VMware vCenter And Importing The License File in OpenManage Integration Version 2.1 Quick Install Guide.
8. Verify the appliance. For more information, see the section Installation Verification in this guide to ensure the
database migration is successful.
12