OpenManage Integration for VMware vCenter Using the vSphere Client Quick Install Guide Version 2.
Notes, Cautions, and Warnings NOTE: A NOTE indicates important information that helps you make better use of your computer. CAUTION: A CAUTION indicates either potential damage to hardware or loss of data and tells you how to avoid the problem. WARNING: A WARNING indicates a potential for property damage, personal injury, or death. © 2013 Dell Inc.
Contents 1 Quick Start Installation...............................................................................................................4 Installation Introduction............................................................................................................................................4 Prerequisites.............................................................................................................................................................
Quick Start Installation 1 Installation Introduction This guide provides step-by-step instructions for the installation and configuration of the OpenManage Integration for VMware vCenter installation on Dell servers. Once the installation is complete, refer to the OpenManage Integration for VMware vCenter User's Guide for information about all aspects of administration including: inventory management, monitoring and alerting, firmware updates, deployments and provisioning, and warranty management.
generation of Dell Servers you have, refer to the tables in the Release Notes. See the OpenManage Integration for VMware vCenter Release Notes for specific hardware support information. Software Requirements The vSphere environment must meet virtual appliance, port access, and listening port requirements. VMware vSphere has both a desktop client and Web client. Requirements for Desktop Client • Install Adobe Flash Player 10.
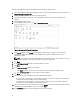
To deploy theOpenManage Integration for VMware vCenter OVF using the vSphere Client: 1. Locate the OpenManage Integration for VMware vCenter virtual disk that you downloaded and extracted, then run Dell_OpenManage_Integration.exe. 2. Agree to the EULA, extract the user guides and obtain the OVF file. 3. Copy/move the OVF file to a location accessible to the VMware vSphere host to which you will upload the appliance. 4. Start the VMware vSphere client. 5.
a. Thick Provision Eager Zeroed [Recommended] An eager-zeroed thick disk has all the space allocated and zeroed out at the time of creation. This type of disk increases the time it takes to create the disk, but results in the best performance, even on the first write to each block. 15. Click Next. 16. The Network Mapping page is displayed which contains details about the source and destination networks. Click Next. 17.
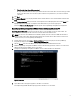
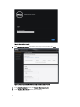
Figure 3. Administration Console 6. In the Administration Console login window, enter the password, and then click Login. Figure 4. vCenter Registration Window from within the Administration Console 7. In the vCenter Registration window, click Register New vCenter Server. 8.
a. Under vCenter Name, in the vCenter Server IP or Hostname text box, enter the server IP or hostname and then in the Description text box, enter the optional description. b. Under Admin User Account, in the Admin User Name text box, enter the Admin user name. Enter the username as domain\user or domain/user or user@domain. The Admin user account is used by the OpenManage Integration for vCenter administration. c. In the Password text box, enter the password. d.
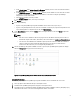
4. In vSphere Client, click Plug-ins → Managed Plug-ins. In the Plug-in Manager window verify the OpenManage Integration for VMware vCenter is installed and enabled. Upgrading OpenManage Integration Plugin from 2.0 Version to the Current Version 1. Open the Administration Console of the virtual machine using one of the following methods: • Open a browser window and enter the Administration Console URL of the virtual machine you want to configure.
7. Upload the new license file. For more information, see the section, Registering OpenManage Integration for VMware vCenter And Importing The License File in OpenManage Integration Version 2.1 Quick Install Guide. 8. Verify the appliance. For more information, see the section Installation Verification in this guide to ensure the database migration is successful. 9. Run the Inventory on all the registered vCenters.
Understanding How To Configure the OpenManage Integration for VMware vCenter Using the Wizard 2 After you do the basic installation of the OpenManage Integration for VMware vCenter, it needs to be configured. This is typically done using the Configuration Wizard, but you can also do it using the Settings page options in the Dell Management Center Setting's options. The user interface in both areas is similar except in the wizard you Save and Continue, whereas in the Settings options you click Apply.
NOTE: With installations on hosts that are using Dell PowerEdge 12th generation servers, the OMSA agent installation is not required. For installations on 11th generation servers, OMSA agent is now automatically installed during the deployment process. NOTE: You are not allowed to create a connection profile if the number of hosts added exceeds the license limit.
• • For hosts already configured and enabled for Active Directory on which you want to use Active Directory, select the Use Active Directory check box; otherwise skip down to configure your Host Credentials. – In the Active Directory User Name text box, type the user name. Type the username in one of these formats: domain\username or domain/username or username@domain. The user name is limited to 256 characters. Refer to Microsoft Active Directory documentation for user name restrictions.
• 2. Post only Virtualization-Related Critical and Warning Events - Post only virtualization-related critical and warning events; this is the default event posting level. To enable all hardware alarms and events, select the Enable Alarms for Dell Hosts check box. NOTE: Dell hosts that have alarms enabled respond to critical events by entering maintenance mode. 3. In the dialog box that displays, click Continue to accept this change, or click Cancel.
c. To automatically run the inventory task once the wizard is complete, select the Run inventory at the end of the wizard [Recommended] check box. This check box only appears when the On Selected Days check box is selected. 3. To apply the changes and continue, click Save and Continue. Running A Warranty Retrieval Job [Wizard] The warranty retrieval job configuration is similar between the wizard and from the Dell Management Center → Settings option.
• Dell Online Default firmware repository (ftp.dell.com) with a staging folder. The OpenManage Integration for VMware vCenter downloads selected firmware updates and stores them in the staging folder, and then they are applied as necessary. • Local/shared repository These are created with the Dell Repository Manager application. These local repositories should be located on Windows-based file shares. 2. If you selected Local/shared repository, do the following: a.
http://en.community.dell.com/techcenter/systems-management/w/wiki/1760.openmanage-server-administratoromsa.aspx Configuring NFS Shares To use NFS shares with the OpenManage Integration for VMware vCenter for backup and restore operations, firmware updates, and as a staging folder, there are certain configuration items that you must complete. CIFS shares do not require additional configuration. To configure NFS shares: 1.