OpenManage Integration for VMware vCenter Quick Installation Guide for Web Client Version 2.
Anmerkungen, Vorsichtshinweise und Warnungen ANMERKUNG: Eine ANMERKUNG liefert wichtige Informationen, mit denen Sie den Computer besser einsetzen können. VORSICHT: Ein VORSICHTSHINWEIS macht darauf aufmerksam, dass bei Nichtbefolgung von Anweisungen eine Beschädigung der Hardware oder ein Verlust von Daten droht, und zeigt auf, wie derartige Probleme vermieden werden können.
Contents 1 Schnellstart-Installation.............................................................................................................4 Einführung in die Installation.................................................................................................................................... 4 Voraussetzungen...................................................................................................................................................... 4 Produkt-Hardware-Anforderungen..
Schnellstart-Installation 1 Einführung in die Installation Dieses Handbuch enthält Schritt-für-Schritt-Anleitungen zur Installation und Konfiguration der OpenManage Integration for VMware vCenter auf Dell Servern.
Produkt-Hardware-Anforderungen Die OpenManage Integration for VMware vCenter bietet umfassenden Support für Dell-Server der 11. und 12. Generation mit iDRAC sowie eingeschränkten Support für Dell-Server der 9. und 10. Generation. Um festzustellen, mit welcher Generation von Dell-Server Sie arbeiten, sehen Sie in den Tabellen in den Versionshinweisen nach.
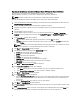
Deploying the OpenManage Integration for VMware vCenter OVF Using the vSphere Web Client This procedure assumes that you have downloaded and extracted the product zip file (Dell_OpenManage_Integration_..zip) from the Dell website. NOTE: Thick Provision Eager Zeroed is the disk format recommended during this installation. To deploy theOpenManage Integration for VMware vCenter OVF using the vSphere Web Client: 1.
Registering OpenManage Integration for VMware vCenter and Importing The License File This procedure assumes that you have received the licenses in the form of an e-mail attachment from download_software@dell.com. If you have more than one license, you can add the licenses one after another. The license file is available as an XML format file. 1.
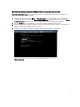
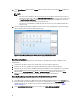
5. To open the Administration Console for the product, open a Web browser and type the appliance's IP address or hostname. The IP address is the IP address of the appliance VM and not the ESXi host IP address. The Administration Console can be accessed using the URL mentioned at the top of the console. For example: https://10.210.126.120 or https://myesxihost. Figure 2.
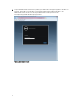
6. In the Administration Console login window, enter the password, and then click Login. Figure 3. vCenter Registration Window from within the Administration Console 7. 8. In the vCenter Registration window, click Register New vCenter Server. On the Register New vCenter Server window, do the following: a. Under vCenter Name, in the vCenter Server IP or Hostname text box, enter the server IP or hostname and then in the Description text box, enter the optional description. b.
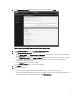
11. On the Upload License window, click the Browse button to navigate to the license file. Click Upload to import the license file. NOTE: • If the license file is modified or edited in any way, the license file will not work and you must send an email with the original order number to download_software@dell.com. For any license file support, e-mail to download_software@dell.com with your original order number. The license XML file is used in this procedure and it does not come with a hard coded file name.
3. To upgrade OpenManage Integration plug-in from version 2.0 to the current version, do one of the following: • To upgrade using the RPM that is available in the Default Update Repository, under APPLIANCE SETTINGS, click Update Virtual Appliance, and then go to step 6. • To upgrade using the latest downloaded RPMs, on the Appliance Management page, in the APPLIANCE UPDATE section, click Edit, and then in the Update Repository Path text box, update the path.
9. Run the Inventory on all the registered vCenters. NOTE: It is recommended that you run the inventory on all the hosts managed by the plug-in again after the upgrade. For more information, see the section Running Inventory Jobs for steps to run the inventory on demand. If the IP address of the new OpenManage Integration version 2.1 appliance has changed from that of the old appliance, the trap destination for the SNMP traps must be configured to point to the new appliance.
Wie OpenManage Integration for VMware vCenter konfiguriert oder bearbeitet werden kann 2 Nachdem Sie die grundlegende Installation von OpenManage Integration for VMware vCenter beenden, wird der Erstkonfigurationsassistent angezeigt, wenn Sie das Dell OpenManage Integration-Symbol anklicken. Verwenden Sie den Erstkonfigurationsassistenten, um die Einstellungen beim ersten Start zu konfigurieren. Für nachfolgende Instanzen verwenden Sie die Seite Einstellungen.
3. Click Next to proceed to the Connection Profile description page. Creating A New Connection Profile using the Initial Configuration Wizard A connection profile stores the iDRAC and host credentials that the virtual appliance uses to communicate with Dell servers. Each Dell server must be associated with a connection profile to be managed by the OpenManage Integration for VMware vCenter. You may assign multiple servers to a single connection profile.
3. In the Name and Credentials page, under iDRAC Credentials, do one of the following: NOTE: The iDRAC account requires administrative privileges for updating firmware, applying hardware profiles, and deploying hypervisor. • • For iDRACs already configured and enabled for Active Directory on which you want to use Active Directory, select the Use Active Directory check box; otherwise skip down to configure the iDRAC credentials. – In the Active Directory User Name text box, type the user name.
4. In the Host Root area, do one of the following: • • For hosts already configured and enabled for Active Directory on which you want to use Active Directory, select the Use Active Directory check box; otherwise skip down to configure your Host Credentials. – In the Active Directory User Name text box, type the user name. Type the username in one of these formats: domain\username or username@domain. The user name is limited to 256 characters.
So planen Sie einen Bestandsaufnahme-Job: 1. Führen Sie im Konfigurationsassistent im Fenster Zeitplan Bestandsaufnahme einen der folgenden Schritte aus: • 2. Das Kontrollkästchen Abrufen von Bestandsaufnahmedaten wird standardmäßig markiert, um Ihnen das Planen der Bestandsaufnahme zu ermöglichen. Führen Sie unter Zeitplan für den Abruf von Bestandsaufnahmedaten Folgendes aus: a. Markieren Sie das Kontrollkästchen neben jedem Wochentag, an dem Sie die Bestandsaufnahme ausführen möchten.
So konfigurieren Sie Ereignisse und Alarme: 1. Wählen Sie im Erstkonfigurationsassistenten unter Anzeigeebenen für das Ereignis eine der folgenden Optionen: • Keine Ereignisse übermitteln – Hardware-Ereignisse blockieren. • Alle Ereignisse übermitteln – Alle Hardware-Ereignisse übermitteln. • Nur kritische Ereignisse und Warnungsereignisse übermitteln – Nur kritische und Warnungsereignisse der Hardware übermitteln. • 2.