
Users Guide


• In the Address column, type the address for each device. For example, 1 dell way, round rock, TX.
NOTE: Before you import devices using the address, ensure that the system is connected to
the Internet. If the system connects to the Internet through a proxy server, verify if the proxy
settings are configured in the Settings → General Settings page. Also, the Internet search
provider may reject the address search request if you are attempting to import too many
devices at a time. If this occurs, wait for some time and try importing again.
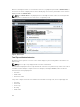
6. Click Import.
The Open dialog box is displayed.
7. Select the location where the updated .csv file is located, and click Open.
The Import Summary dialog box is displayed.
8. Click Ok.
NOTE: Any errors that may occur during the import process are displayed in Logs → UI Logs.
Related References
Template for Importing Devices
Related Tasks
Using Map View
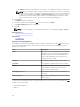
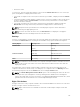
Template for Importing Devices
The template for importing PowerEdge VRTX devices with an Enterprise license is a .csv file that you can
use to provide details about devices that you want to import to the map. The following are the fields
available in the template:
Field Description
Name The name of the PowerEdge VRTX device with an
Enterprise license. This field is already populated
with the currently discovered PowerEdge VRTX
devices with an Enterprise license that are not
already placed on the map.
Latitude The latitude coordinate of the device location.
Longitude The longitude coordinate of the device location.
Address The address of the device location. If both latitude
and longitude coordinates are specified, the
address need not be specified.
Description (Optional) Any information that you want to include about
the device.
Contact (Optional) Any contact information that you want to include
for the device..
To import the PowerEdge VRTX devices with an Enterprise license to the map, you must update the .csv
file with one of the following:
• Latitude and Longitude
• Address
112