
Users Guide
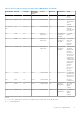


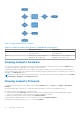
Table Of Contents
- Dell EMC OpenManage Enterprise-Modular Edition for PowerEdge MX7000 Chassis User's Guide
- Contents
- Overview
- Updating firmware for PowerEdge MX solution
- MX7000 Solution Baselines
- Upgrading ethernet switch using DUP
- OME-Modular licenses
- Logging in to OME-Modular
- Logging in to OME–Modular as local, Active Directory, or LDAP user
- Logging in to OME-Modular using OpenID Connect
- OME-Modular home page
- Viewing device health
- Setting up chassis
- Initial configuration
- Configuring chassis settings
- Managing chassis
- Chassis groups
- Controlling chassis power
- Backing up chassis
- Restoring chassis
- Exporting chassis profiles
- Managing chassis failover
- Troubleshooting in chassis
- Blinking LEDs
- Interfaces to access OME-Modular
- Viewing chassis hardware
- Viewing chassis alerts
- Viewing chassis hardware logs
- Configuring OME–Modular
- Viewing current configuration
- Configuring users and user settings
- Configuring login security settings
- Configuring alerts
- Managing compute sleds
- Managing Profiles
- Managing storage
- Managing templates
- Managing identity pools
- Ethernet IO Modules
- MX Scalable Fabric architecture
- SmartFabric Services
- Managing networks
- Managing Fibre Channel IOMs
- Managing firmware
- Monitoring alerts and logs
- Monitoring audit logs
- Use case scenarios
- Troubleshooting
- Storage
- Firmware update is failing
- Storage assignment is failing
- SAS IOM status is downgraded
- SAS IOM health is downgraded
- Drives on compute sled are not visible
- Storage configuration cannot be applied to SAS IOMs
- Drives in OpenManage are not visible
- iDRAC and OpenManage drive information do not match
- The assignment mode of storage sled is unknown
- Unable to access OME-Modular using Chassis Direct
- Troubleshooting lead chassis failure
- Storage
- Recommended slot configurations for IOMs
- Creating validated firmware solution baseline using Dell Repository Manager
- Upgrading networking switch using different OS10 DUP versions
- Upgrading networking switch using CLI

Configuring email alerts
1. Click Application Settings > Alerts.
2. Click Email Configuration
3. Enter the SMTP Server Network Address.
NOTE: The SMTP server network address can have a maximum length of 255 characters.
4. If the server requires authentication, select Enable Authentication.
NOTE: If Enable Authentication is selected, you must provide the user name and password to access the SMTP
server.
5. Enter SMTP Port Number.
6. If the SMTP server is configured to use SSL, select the SSL option.
Configuring SNMP alerts
The SNMP alerts contain the service tag of the chassis as one of the parameters in the trap. Third-party consoles can use this
information to correlate the traps with the system.
For network IOMs and compute sleds, OME–Modular subscribes to alerts through internal private VLANs—SNMP or REST. For
MXG610s fiber channel switching modules, only SNMP V1 is supported and you can configure only four SNMP alert destinations.
You can configure the SNMP alert destination for IOMs from the Application Settings > Alerts > SNMP Configuration
page. After configuring the SNMP destination, go to I/O Settings > Replicate Alert Destinations.
To configure SNMP alerts, perform the following steps:
1. From the main menu, select Application Settings > Alerts.
2. Click SNMP Configuration.
3. Select Enable to enable the configuration.
4. Enter the Destination Address.
You can configure up to four SNMP destinations.
5. Select the SNMP Version.
The available SNMP versions are:
● SNMP V1
● SNMP V2
NOTE: For MX9116n or MX5108n IOMs, SNMP V2, is supported. SNMP V1 only supports MXG610s FC IOM.
NOTE: The MX7000 chassis facilitates configuration of four SNMP destinations. However, the MXG610s FC IOM
switches support only three SNMP destinations. If the fourth SNMP destination is configured, the IOM ignores it.
6. Enter the Community String.
When you configure the community string for SNMP V1, by default, the community string is appended with |common|
FibreChannel11.
7. Select the Port Number and click Send to test the SNMP trap.
Configuring sys log alerts
You can configure up to four sys log destinations.
To configure system log alerts, perform the following steps:
1. Click Application Settings > Alerts > Syslog Configuration.
2. Select the Enabled check box corresponding to the required server.
3. Enter the destination address or the hostname.
4. Enter the port number.
66
Logging in to OME-Modular