
Users Guide


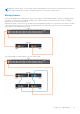


Table Of Contents
- Dell EMC OpenManage Enterprise-Modular Edition for PowerEdge MX7000 Chassis User's Guide
- Contents
- Overview
- Updating firmware for PowerEdge MX solution
- MX7000 Solution Baselines
- Upgrading ethernet switch using DUP
- OME-Modular licenses
- Logging in to OME-Modular
- Logging in to OME–Modular as local, Active Directory, or LDAP user
- Logging in to OME-Modular using OpenID Connect
- OME-Modular home page
- Viewing device health
- Setting up chassis
- Initial configuration
- Configuring chassis settings
- Managing chassis
- Chassis groups
- Controlling chassis power
- Backing up chassis
- Restoring chassis
- Exporting chassis profiles
- Managing chassis failover
- Troubleshooting in chassis
- Blinking LEDs
- Interfaces to access OME-Modular
- Viewing chassis hardware
- Viewing chassis alerts
- Viewing chassis hardware logs
- Configuring OME–Modular
- Viewing current configuration
- Configuring users and user settings
- Configuring login security settings
- Configuring alerts
- Managing compute sleds
- Managing Profiles
- Managing storage
- Managing templates
- Managing identity pools
- Ethernet IO Modules
- MX Scalable Fabric architecture
- SmartFabric Services
- Managing networks
- Managing Fibre Channel IOMs
- Managing firmware
- Monitoring alerts and logs
- Monitoring audit logs
- Use case scenarios
- Troubleshooting
- Storage
- Firmware update is failing
- Storage assignment is failing
- SAS IOM status is downgraded
- SAS IOM health is downgraded
- Drives on compute sled are not visible
- Storage configuration cannot be applied to SAS IOMs
- Drives in OpenManage are not visible
- iDRAC and OpenManage drive information do not match
- The assignment mode of storage sled is unknown
- Unable to access OME-Modular using Chassis Direct
- Troubleshooting lead chassis failure
- Storage
- Recommended slot configurations for IOMs
- Creating validated firmware solution baseline using Dell Repository Manager
- Upgrading networking switch using different OS10 DUP versions
- Upgrading networking switch using CLI

OME-Modular command line console features
OME-Modular supports the following serial and SSH console features:
● RACADM support
● Integrated connect command connecting to the serial console of servers and I/O modules; also available as racadm
connect
● Maximum of four SSH sessions
● Minimum of three and maximum of nine authentication retries for the SSH session
OME-Modular command line commands
When you connect to the OME-Modular command line, you can enter these commands:
Table 10. OME-Modular command line commands
Command Description
racadm
RACADM commands begin with the keyword racadm followed by a subcommand.
For more information, see Dell EMC OpenManage Enterprise Modular for
PowerEdge MX7000 Chassis RACADM Command Line Reference Guide.
connect
Connects to the serial console of a server or I/O module. For more information,
see Dell EMC OpenManage Enterprise Modular for PowerEdge MX7000 Chassis
RACADM Command Line Reference Guide.
NOTE: You can also use the racadm connect command.
exit, logout, and quit All the commands perform the same action. They end the current session and return
to a login prompt.
To end a session:
● On systems running Windows as the client host, use the keys, [Ctrl]+[A] [Ctrl]+[X].
● On systems running Linux as the client host, use [Ctrl]+[A] [Ctrl]+[A] [Ctrl]+[X].
To end a binary session in the OME-Modular serial console, use the keys, [Ctrl] + ]. For IOMs, use [Ctrl] + \.
To end a nonbinary session login to OME-Modular interface, and go to All Devices > Chassis > Overview > Troubleshoot and
click Terminate Serial Connection.
Configure local access
You can configure chassis power button, quick sync, KVM, LCD, and chassis USB direct accesses for a chassis.
To configure the local access settings in a chassis:
1. Click Devices > Chassis > View Details > Settings > Local Access Configuration.
The Local Access Configuration section is expanded.
2. Select Enable Chassis Power Button to turn the chassis off or on.
If the check box is cleared, you cannot change the power state of the chassis using the chassis power button.
3. Select Enable LCD Override Pin to enter the LCD override pin.
This option is displayed only if you clear the Enable Chassis Power Button. If the check box is cleared, you cannot enter
the LCD override pin.
4. In the Disabled Button LCD OVerride Pin text box, enter the six-digit pin to change the power state of the chassis.
Chassis administrator can only generate the LCD override pin. The override PIN is designed to prevent other users from
gaining unauthorized access to the chassis. If other users need access to perform tasks, the chassis administrator can
provide the six-digit PIN.
NOTE: If the pin is not valid, an error message is displayed. You can retry the operation for maximum of three times.
5. Select the Quick Sync access type.
The available options are:
Logging in to OME-Modular
41