
Users Guide

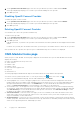


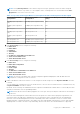
Table Of Contents
- Dell EMC OpenManage Enterprise-Modular Edition for PowerEdge MX7000 Chassis User's Guide
- Contents
- Overview
- Updating firmware for PowerEdge MX solution
- MX7000 Solution Baselines
- Upgrading ethernet switch using DUP
- OME-Modular licenses
- Logging in to OME-Modular
- Logging in to OME–Modular as local, Active Directory, or LDAP user
- Logging in to OME-Modular using OpenID Connect
- OME-Modular home page
- Viewing device health
- Setting up chassis
- Initial configuration
- Configuring chassis settings
- Managing chassis
- Chassis groups
- Controlling chassis power
- Backing up chassis
- Restoring chassis
- Exporting chassis profiles
- Managing chassis failover
- Troubleshooting in chassis
- Blinking LEDs
- Interfaces to access OME-Modular
- Viewing chassis hardware
- Viewing chassis alerts
- Viewing chassis hardware logs
- Configuring OME–Modular
- Viewing current configuration
- Configuring users and user settings
- Configuring login security settings
- Configuring alerts
- Managing compute sleds
- Managing Profiles
- Managing storage
- Managing templates
- Managing identity pools
- Ethernet IO Modules
- MX Scalable Fabric architecture
- SmartFabric Services
- Managing networks
- Managing Fibre Channel IOMs
- Managing firmware
- Monitoring alerts and logs
- Monitoring audit logs
- Use case scenarios
- Troubleshooting
- Storage
- Firmware update is failing
- Storage assignment is failing
- SAS IOM status is downgraded
- SAS IOM health is downgraded
- Drives on compute sled are not visible
- Storage configuration cannot be applied to SAS IOMs
- Drives in OpenManage are not visible
- iDRAC and OpenManage drive information do not match
- The assignment mode of storage sled is unknown
- Unable to access OME-Modular using Chassis Direct
- Troubleshooting lead chassis failure
- Storage
- Recommended slot configurations for IOMs
- Creating validated firmware solution baseline using Dell Repository Manager
- Upgrading networking switch using different OS10 DUP versions
- Upgrading networking switch using CLI

1. On the OpenID Connect Providers page, select the OIDC provider that you want to enable and click Enable.
A message is displayed prompting you to confirm to proceed with enabling the OIDC provider.
2. Click OK to proceed.
Disabling OpenID Connect Provider
To disable an OpenID Connect Provider:
1. On the OpenID Connect Providers page, select the OIDC provider that you want to enable and click Disable.
A message is displayed prompting you to confirm to proceed with disabling the OIDC provider.
2. Click OK to proceed.
Deleting OpenID Connect Provider
You can delete one or more OIDC providers simultaneously.
To delete an OIDC provider:
1. On the OpenID Connect Providers page, select the OIDC provider that you want to enable and click Delete.
A message is displayed prompting you to confirm to proceed with deleting the OIDC provider.
2. Click OK to proceed.
In MCM environment, if you delete OIDC providers in the lead chassis, the delete job details are also displayed in the member
chassis.
If a delete OIDC provider job in the member chassis fails, you must log in to the member chassis to delete the OIDC provider.
After you delete an OIDC provider, the option to log in to OME-Modular using OIDC Providers, is not displayed.
OME-Modular home page
When you log in to OME–Modular, the home page is displayed. The menu bar at the top of the OME-Modular user interface
displays the following:
● Name of the application at the top-left corner
● Search text box
● Number of jobs
● Number of alerts
● User name of the logged in user
● Help icon
● Information icon
The home page displays a dashboard with high-level information about the system and the subcomponents.
You can also view the job activity and events. To view the job activity, click
and to view events, click .
To return to the OME–Modular home page, click the OME–Modular logo or click Home.
● Chassis graphical view—On left of the page, a graphical view of the front and rear chassis is displayed. It shows all the
modules (sleds, fans, power supplies, IOMs, and MMs) present in the chassis. A hover over on each module displays a brief
description and health status of the module. Click View Devices to see more details about the modules present in the
chassis. Click View Slot Information to switch the display of the widget to slot information list.
● Slot information view—On the upper left corner of the page, a list of modules present on the chassis is displayed showing
slot information, health status and a link that goes into details. Modules in this list include compute, storage sleds, and IOMs.
Click View Inventory to see more details about the modules present in the chassis. Click View Chassis Image to switch
the display of the widget to chassis graphical view.
● Chassis Information—On the left center of the page, you can view a summary of the chassis information such as FIPS
status, name, model, service tag, asset tag, express service code, firmware version, power state, faceplate power, power
cap, power redundancy, location, and licenses.
● Group Information—On the lower left corner of the page, you can view the summary of chassis group. Group information
includes, group name, lead chassis name, lead chassis service tag, lead chassis IP, redundancy, backup chassis name, backup
chassis service tag, backup chassis IP, and backup sync status.
32
Logging in to OME-Modular