Dell OpenManage Connection Version 3.
註、警示與警告 註: 「註」表示可以幫助您更有效地使用產品的重要資訊。 警示: 「警示」表示有可能會損壞硬體或導致資料遺失,並告訴您如何避免發生此類問題。 警告: 「警告」表示有可能會導致財產損失、人身傷害甚至死亡。 © 2011 - 2018 Dell Inc. 或其子公司。版權所有,翻印必究。Dell、EMC 與其他商標均為 Dell Inc.
目錄 1 簡介............................................................................................................................................................... 5 2 事前準備作業.................................................................................................................................................7 支援的作業系統與管理系統的需求............................................................................................................................... 7 管理系統支援的作業系統................................
解除安裝 Desktop Integration........................................................................................................................................32 解除安裝 Web GUI Integration...................................................................................................................................... 32 6 從 Dell Support 網站存取文件......................................................................................................................34 7 與 Dell 公司聯絡..............................
1 簡介 本指南就安裝、設定與解除安裝適用 IBM Tivoli Netcool/OMNIbus 的 Dell OpenManage Connection 3.
如需關於存取文件的更多資訊,請參閱從 Dell Support 網站存取文件 - 軟體。 6 簡介
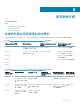
2 事前準備作業 完成下列事前準備作業。 主題: • 支援的作業系統與管理系統的需求 • 管理系統支援的作業系統 • 支援的 Dell 裝置及韌體 支援的作業系統與管理系統的需求 下表列出在安裝 Netcool/OMNIbus 7.3.1、7.4 或 8.1 版元件之系統上,支援整合 Dell OpenManage Connection 的作業系統和需求: 表 1. 支援 Dell OpenManage Connection for IBM Tivoli Netcool/OMNIbus 8.1 的作業系統 VMware vSphere ESXi Windows Server SUSE Linux Enterprise Server (SLES) Red Hat Enterprise Linux Server (RHEL) ESXi 5.5 Windows Server 2012 R2 64 位 元 (標準版、資料中心版) SLES 12 64 位元 RHEL 7.0-1 64 位元 (伺服器) ESXi 5.
VMware vSphere ESXi Windows Server ESXi 4.0 Windows Server 2012 R2 64 位元 (資料中心 版、基本版、標準版) ESXi 3.5 Windows Server 2012 64 位元 (資料中心版、 基本版、標準版) Windows 用戶端 SUSE Linux Enterprise Server (SLES) Red Hat Enterprise Linux Server (RHEL) SUSE Linux for Desktop (SLED) SUSE Linux Enterprise Server (SLES) Red Hat Enterprise Linux Server (RHEL) SUSE Linux for Desktop (SLED) SLED 11.0-3 64 位元 ESX 3.5 表 3. 支援 Dell OpenManage Connection for IBM Tivoli Netcool/OMNIbus 7.3.
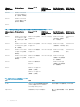
元件 需求 用途 桌上型 確定桌上型電腦與 Dell 裝置之間已經有 SNMP/WS-MAN 通訊。 從 Dell 裝置擷取需要的資訊。 Web GUI 安裝及設定 OMNIbus web GUI 和 WAAPI。 支援 Dell OpenManage Connection 可用的 Dell 工具。 確定 web GUI 伺服器與受管 Dell 系統之間 已經有 SNMP/WS-MAN 通訊通道。 從 Dell 裝置擷取需要的資訊。 管理系統支援的作業系統 下表列出 Dell 支援裝置所支援的作業系統: 表 5. Dell 工作站的支援作業系統 VMware vSphere ESXi Windows Server SUSE Linux Enterprise Server (SLES) Red Hat Enterprise Linux Server (RHEL) ESXi 6.0 U1 Windows Server 2012 R2 (資料 中心版、基礎版、基本版、標 準版) SLES 12 64 位元 RHEL 7.2 64 位元 ESXi 5.
VMware vSphere ESXi Windows Server SUSE Linux Enterprise Server (SLES) Red Hat Enterprise Linux Server (RHEL) ESXi 5.1 U1 Windows Server 2008 R1 與 R2 (HPC Edition) RHEL 5.9 64 位元與 32 位元 ESXi 5.1 Windows Storage Server 2008 SP2 RHEL 5.5 64 位元與 32 位元 ESXi 5.0 U3 Windows Small Business Server 2008 SP2 RHEL 5.3 64 位元與 32 位元 ESXi 5.0 U2 Windows Small Business Server 2008 R2 RHEL 5.0 64 位元與 32 位元 ESXi 5.
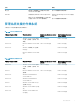
Dell 裝置 支援的 OMSA 版本 支援的韌體版本 DELL 資料中心可擴充的解決方案 (DSS1500 和 DSS 2500) NA • 2.30.30.30 • 2.16.16.12 DELL 資料中心可擴充的解決方案 (DSS 1510) NA • 2.30.30.30 • 2.17.17.13 iDRAC8 NA • 2.30.30.30 • 2.20.20.20 • 2.30.30.30 • 2.20.20.20 • 3,6 • 3,5 • 1.97 • 1,96 • 1.6 • 1.5 • 1,4 • 1.3 • 2,2 • 2.1 • 5.
Dell 裝置 支援的 OMSA 版本 支援的韌體版本 • S4820T (9.5 與 9.4) • S5000 (9.1 與 9.0) • S6000 (9.5 與 9.4) M 系列 • MXL (9.6 和 9.5) • MIOA (9.5 與 9.4) Z 系列 • Z9500 (9.2) • Z9000 (9.5 與 9.4) C 系列 • C150 (8.4.6.0) • C300 (8.4.5.0) N 系列 • 6.1.2 和 6.1 W 系列 • 註: Dell 工作站指的是 Dell Precision R7910 Rack 工作站。 12 事前準備作業 W 系列行動控制器 (6.
3 安裝 Dell OpenManage Connection for Netcool/ OMNIbus 若要安裝 Dell OpenManage Connection for Netcool/OMNIbus,您必須在安裝 Netcool/OMNIbus 元件的系統解壓縮特定元件檔案,然 後加以部署。如需解壓縮特定元件檔案的更多資訊,請參閱 Netcool/OMNIbus 元件的整合詳細資料。 開始部署檔案之前: 1 從 dell.com/support 下載 Dell_OpenManage_Connection_for_OMNIbus_v3_0.
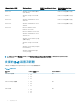
Netcool/OMNIbus 元件的整合詳細資料 下表列出 Netcool/OMNIbus 元件和 Dell OpenManage Connection 的 Integration 資料夾。從相應的資料夾,將 Dell OpenManage Connection 的整合檔案部署至 Netcool/OMNIbus 元件資料夾。 表 8.
在 dell.master.include.rules 檔案取消註解 dell-IDRAC-MIB.include.snmptrap.rules 檔案 include 陳述式。 b FX2 CMC、VRTX CMC、CMC、iDRAC6、DRAC5 設陷 a 在 dell.master.include.lookup 檔案取消註解 dell-RAC-MIB.include.snmptrap.lookup 檔案 include 陳述式。 b 在 dell.master.include.rules 檔案取消註解 dell-RAC-MIB.include.snmptrap.rules 檔案 include 陳述式。 Compellent Storage Array 設陷 a 在 dell.master.include.lookup 檔案取消註解 dell-STORAGE-SC-MIB.include.snmptrap.lookup 檔案 include 陳述式。 b 在 dell.master.include.rules 檔案取消註解 dell-STORAGE-SC-MIB.include.
• delldevice_confpack_64bit_v_3_0.jar • delldevice_confpack_v_3_0.jar • delldevice_int_objectserver.ver 若要在託管 ObjectServer 的系統部署 Dell 整合元件: 1 以需要的安全憑證執行下列命令,存取 OMNIbus ObjectServer: a b IBM Tivoli Netcool/OMNIbus 8.1: • 在執行 64 位元 Linux 的系統上: $OMNIHOME/bin/nco_confpack -import -server -user -password -package /OMNIbus81/delldevice_confpack_64bit_v_3_0.jar • 在執行 Windows 的系統上: %OMNIHOME%\bin\nco_confpack.
若要重新設定,提供 Oracle Java version 1.6.0_18 或更新版本二進位的路徑,並遵守下列步驟: 1 在 Configuration (組態) 視窗中,選取 Menu (選單) > Tools (工具)。 2 在右窗格連按兩下 Tools (工具),啟動 Tool (工具) 詳細資料視窗。 3 按一下可執行檔標籤,編輯字串: 例如: 若為執行 Windows 的系統: $(NCHOME)\platform\win32\jre_1.6.7\jre\bin\java 變更為 \jre1.6.0_18\bin\java 若為執行 Linux 的系統: $(NCHOME)/platform/linux2x86/jre_1.6.7/jre/bin/java 變更為 /jre1.6.
例如: https://11.95.145.156:2607/ 如需更多資訊,請參閱 OpenManage Essentials 使用者指南,網址是:dell.
在 ObjectServer 設定 Dell AirWave Management Platform 主控 台 Dell AirWave Management Platform 主控台使用設定的 URL,在預設的瀏覽器啟動主控台。 若要在執行 Windows 和 Linux 的系統上設定 Dell AirWave Management Platform 主控台 URL: 1 提供存取 OMNIbus ObjectServer 和登入 ObjectServer 所需的安全憑證。 2 在 Configuration (組態) 視窗中,選取 Menu (選單) > Tools (工具)。 3 在執行 Windows 的系統上,於右窗格連按兩下 Launch AirWave Management Platform Console (Windows) (啟動 AirWave Management Platform 主控台),以啟動 Tool Details (工具詳細資料) 視窗。 在執行 Linux 的系統上,於右窗格連按兩下 Launch AirWave Management Platform Conso
安裝 Desktop Integration Dell 裝置的 desktop_integration 資料夾包含下列檔案: • dell_config.properties • dell_MD_Array_Common.jar • dell_OMNIbus_Connection_KB_Tool_v_3_0.jar • dell_OMC_ITNO_ConfigUtility_v_3_0.jar • dell_OMC_ITNO_Helper_v_3_0.jar • intel_wsman_v_1_0_1.jar • delldevice_int_desktop.ver • snmp4j-2.3.0.jar • SYMsdk.
3 執行下列命令來設定 WS-MAN 參數,例如使用者名稱與密碼: a IBM Tivoli Netcool/OMNIbus 8.1: 在執行 Windows 的系統上: %NCHOME%\platform\\jre_1.7.0\jre\bin\java -Ddell.config.path=desktop jar dell_OMC_ITNO_ConfigUtility_v_3_0.jar –wsmanusername=root –wsmanpassword 在執行 Linux 的系統上: b $NCHOME/platform//jre_1.7.0/jre/bin/java -Ddell.config.path=desktop jar dell_OMC_ITNO_ConfigUtility_v_3_0.jar –wsmanusername=root –wsmanpassword IBM Tivoli Netcool/OMNIbus 7.4: 在執行 Windows 的系統上: %NCHOME%\platform\
• compellent_linux.cgi • compellent_nt.cgi • dell_config.properties • dell_MD_Array_Common.jar • dell_OMC_ITNO_ConfigUtility_v_3_0.jar • dell_OMC_ITNO_Helper_v_3_0.jar • delldevice_int_webgui.ver • draclauncher_linux.cgi • draclauncher_nt.cgi • eqllauncher_linux.cgi • eqllauncher_nt.cgi • export.xml • idraclauncher_linux.cgi • idraclauncher_nt.cgi • intel_wsman_v_1_0_1.jar • kblauncher_linux.cgi • kblauncher_nt.cgi • n_switchadminlauncher_linux.
例如: datasource="NCOMS" 變更為 datasource="" a IBM Tivoli Netcool/OMNIbus 8.1: 在執行 Windows 的系統上: \waapi\bin\runwaapi -host -user password -file export.xml 在執行 Linux 的系統上: b /waapi/bin/runwaapi -host -user password -file export.xml IBM Tivoli Netcool/OMNIbus 7.4: 在執行 Windows 的系統上: \waapi\bin\runwaapi -host -user
在執行 Windows 的系統上: \java\jre\bin\java -Ddell.config.path=webgui jar dell_OMC_ITNO_ConfigUtility_v_3_0.jar –communitystring=public 在執行 Linux 的系統上: /java/jre/bin/java -Ddell.config.path=webgui jar dell_OMC_ITNO_ConfigUtility_v_3_0.jar –communitystring=public 3 執行下列命令來設定 WS-MAN 參數,例如使用者名稱與密碼: a IBM Tivoli Netcool/OMNIbus 8.1: 在執行 Windows 的系統上: \java\jre\bin\java -Ddell.config.
g 按一下 Save (儲存)。 2 瀏覽至 Administration (管理) > Availability (可用性) > Events (事件) > Active Event List (AEL) (使用中事件清單),然後重新整理 清單,同步化新增的選單項目。 3 以滑鼠右鍵按一下 Dell 裝置警示,確定各別的 Dell 主控台啟動工具都可以使用。 在 Web GUI 設定 Dell Server Administrator Web Server 主控台 若要設定啟動 Dell Server Administrator Web Server 主控台: 1 登入 web GUI。 2 按一下 Administration (管理) > Event Management Tools (事件管理工具) > Tool Creation (工具建立)。 3 在右窗格選取 LaunchDellServerAdministratorWebServerConsole,啟動 Tool Configuration (工具組態) 視窗。 4 提供 IP 位址和連接埠編號來編輯下列 URL: h
在執行 Windows 的系統上: "%PROGRAMFILES%\Dell\MD Storage Software\MD Storage Manager\client\Modular Disk Storage Manager Client.
在 Web GUI 設定 Dell Warranty Report Tool 您可以從監控中、用於擷取該裝置相關保固資訊之 Dell 裝置所產生的事件,啟動 Dell Warranty Report Tool。 如果無法直接存取網際網路,且是使用 proxy 設定存取網際網路,就必須在 Web GUI 伺服器設定 Warranty Report tool。這樣的話, 如果是執行 Linux 的系統,務必在 /etc/host 這個檔案中解析主機名稱 api.dell.com。如果是執行 Windows 的系統,務必在 C: \Windows\System32\drivers\etc\hosts 這個檔案中解析主機名稱 api.dell.com。 例如: 143.166.11.198 api.dell.
主控台啟動工具 CGI Script/URL Dell Connections License Manager http://DCLM_IP:DCLM_Port/DellLicenseManagement Dell Warranty Report warranty_linux.cgi Dell Server Trap Configuration Information kblauncher_linux.
4 升級 Dell OpenManage Connection for Netcool/ OMNIbus 若要升級 Dell OpenManage Connection for Netcool/OMNIbus: 1 解除安裝現有的連線。如需更多資訊,請參閱 Dell OpenManage Connection for Netcool/OMNIbus 安裝指南,有關現有版本的資 訊,參閱此網址:dell.
5 解除安裝 Dell OpenManage Connection for Netcool/OMNIbus 您必須解除安裝或移除特定元件檔案,才能解除安裝 Dell OpenManage Connection for Netcool/OMNIbus。 主題: • 解除安裝 Probe Integration • 解除安裝 ObjectServer Integration • 解除安裝 Desktop Integration • 解除安裝 Web GUI Integration 解除安裝 Probe Integration 若要解除安裝 Probe integration: 1 瀏覽至您安裝 Probe 元件系統上的 %NC_RULES_HOME%/include-snmptrap 資料夾。 註: 在執行 Linux 的系統,使用 $NC_RULES_HOME/include-snmptrap 資料夾。 2 瀏覽至 $NC_RULES_HOME\snmptrap-rules.
• Dell OpenManage Network Manager 主控台 • Dell AirWave Management Platform 主控台 • 啟動 Dell Connections License Manager 主控台 • Dell Warranty Report • 啟動 OpenManage Essentials 主控台 • Dell Server Trap Configuration Information 4 在 Configuration (組態) 視窗中,選取 Menu (選單) > Menus (選單)。 5 在 Alerts Menu (警示選單) 下,選取 Dell Tools (Dell 工具)。 6 以滑鼠右鍵按一下 Dell Tools (Dell 工具),然後按一下 Delete (刪除)。 7 在 Configuration (組態) 視窗中,瀏覽至 Automation Triggers (自動觸發),然後刪除下列觸發: 8 • dell_idrac_clear • dell_idrac_deduplicate_c
11 重新啟動 Web GUI。 解除安裝 Desktop Integration 若要解除安裝 desktop integration: 1 瀏覽至安裝 desktop integration 元件系統上的 %OMNIHOME% 目錄。 2 執行下列步驟: • 移除 delldevice_int_desktop.ver 這個檔案 • 所有 Desktop Integration — 移除下列檔案: – dell_config.properties – dell_MD_Array_Common.jar – dell_OMNIbus_Connection_KB_Tool_v_2_2.jar – dell_OMC_ITNO_Helper_v_2_2.jar – dell_OMC_ITNO_ConfigUtility_v_2_2.jar – intel_wsman_v_1_0_1.jar – snmp4j-2.3.0.jar – SYMsdk.
• Dell AirWave Management Platform 主控台 • 啟動 Dell Connections License Manager 主控台 • Dell Warranty Report • 啟動 OpenManage Essentials 主控台 • Dell Server Trap Configuration Information 5 瀏覽至 Administration (管理) > Event Management Tools (事件管理工具) > Menu Configuration (選單組態)。 6 在 Available menus (可用選單) 下方選取 DellTools (Dell 工具),然後按一下 Delete (刪除)。 7 瀏覽至 Administration (管理) > Event Management Tools (事件管理工具) > CGI Registry (CGI 登錄)。 8 選取下列 .cgi 檔案,然後按一下 Unregister (取消登錄)。 9 • idraclauncher_linux.
6 從 Dell Support 網站存取文件 您可以用下列方式之一存取所需文件: • • 使用下列連結: – 若需所有企業系統管理文件 — dell.com/softwaresecuritymanuals – 若需企業系統管理文件 — dell.com/openmanagemanuals – 若需遠端企業系統管理文件 — dell.com/esmmanuals – 若需 OpenManage Connections 企業系統管理文件 — dell.com/OMConnectionsEnterpriseSystemsManagement – 若需服務性工具文件 — dell.com/serviceabilitytools – 若需用戶端系統管理文件 — dell.com/clientsystemsmanagement – 若需 OpenManage Connections 用戶端系統管理文件 — dell.com/dellclientcommandsuitemanuals 從 Dell Support 網站: a 移至 dell.
7 與 Dell 公司聯絡 註: 如果無法連線網際網路,則可以在購買發票、包裝單、帳單或 Dell 產品目錄中找到聯絡資訊。 Dell 提供多項線上和電話支援與服務選擇。服務的提供因國家/地區和產品而異,某些服務可能在您所在地區並不提供。若因銷售、 技術支援或客戶服務問題要與 Dell 聯絡: 1 前往 dell.