Dell OpenManage Connection Version 1.0 for IBM Tivoli Network Manager (ITNM) IP Edition 3.
註、警示與警告 註: 「註」表示可以幫助您更有效地使用電腦的重要資訊。 警示: 「警示」表示有可能會損壞硬體或導致資料遺失,並告訴您如何避免發生此類問題。 警告: 「警告」表示有可能會導致財產損失、人身傷害甚至死亡。 © 2013 Dell Inc. All Rights Reserved. Trademarks used in this text: Dell™, the Dell logo, Dell Boomi™, Dell Precision™ , OptiPlex™, Latitude™, PowerEdge™, PowerVault™, PowerConnect™, OpenManage™, EqualLogic™, Compellent™, KACE™, FlexAddress™, Force10™, Venue™ and Vostro™ are trademarks of Dell Inc. Intel®, Pentium®, Xeon®, Core® and Celeron® are registered trademarks of Intel Corporation in the U.S.
目錄 1 簡介...............................................................................................................................................5 從 Dell Support 網站存取文件................................................................................................................................ 5 管理系統支援的作業系統與瀏覽器..................................................................................................................... 6 管理系統支援的作業系統..............................................................
6 獲得幫助....................................................................................................................................29 與 Dell 公司聯絡....................................................................................................................................................
簡介 1 Dell OpenManage Connection Version 1.0 for IBM Tivoli Network Manager (ITNM) IP Edition 3.
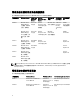
管理系統支援的作業系統與瀏覽器 以下表格列出支援 ITNM 3.9 Fix Pack 2 與 ITNM 3.9 Fix Pack 3 元件的作業系統: 虛擬化環境 Windows Server SUSE Linux Enterprise Server Red Hat Enterprise Linux Server Windows 用 戶端 SUSE Linux for Desktop ESXi 5.0 Windows Server 2008 R2 64 位元 (企業版、資料中 心版、標準版) SLES 11.0-1 64 位元 Red Hat Enterprise Linux 6.0-4 32 位元 (伺 服器版) Windows 7 64 SUSE Linux 位元 (企業版) Enterprise Desktop 11.0-1 64 位 元 Windows Server 2008 R2 64 位元 SP1 (企業版、資 料中心版、標準 版) SLES 11.0-1 32 位元 Red Hat Windows Enterprise Linux Vista SP2 64 5.
虛擬化環境 Windows Server SUSE Linux Server Red Hat Enterprise Linux Server ESXi 4.1 U1 (HDD 與 Flash) Windows Server 2008 SP2 (32 位 元與 64 位元) Red Hat Enterprise Linux 5.9 (32 位元與 64 位元) ESXi 4.0 U3 (HDD 與 Flash) Windows Server 2008 R2 (64 位 元) Red Hat Enterprise Linux 5.8 (32 位元與 64 位元) ESXi 4.0 U2 (HDD 與 Flash) Windows Server 2008 R2 SP1 (64 位元) Red Hat Enterprise Linux 5.5 (32 位元與 64 位元) ESXi 4.0 U1 (HDD 與 Flash) Windows Server 2008 R1、R2 (HPC 版本) Red Hat Enterprise Linux 5.
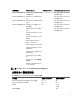
Dell 裝置 支援的 OMSA 版本 支援的韌體版本 3.50 iDRAC 6 大型 NA 1.90 1.95 DRAC5 NA 1.5 1.65 DRAC/MC NA 1.5 1.6 CMC NA 4.3.1 4.45 VRTX CMC NA 1.0 Dell EqualLogic 儲存陣列 NA 5.2 6.0 Dell PowerVault MD 儲存陣列 NA 韌體版本 07.80.62.60、 07.84.44.60 以及 07.84.47.
2 安裝 Dell OpenManage Connection for Network Manager 請從 dell.com/support 網站下載 Dell-OpenManage-Connection-for-ITNM-1.0.zip 檔案,並將檔案解壓縮至資料夾 內,以下為解壓縮後的資料夾與檔案: • Dell-OMC-ITNM-Core-Integration • Dell-OMC-ITNM-Topology-Database-Integration • Dell-OMC-ITNM-TIP-Server-Integration • Dell-Utilities • Dell-MIBS • Dell_OMC_1_0_for_ITNM_IG.pdf • Dell_OMC_1_0_For_ITNM_Readme.txt • license_en.txt 註: Windows 的檔案分隔符為反斜線 (\),Linux 則為正斜線 (/)。 註: 使用環境變數時請依照以下格式,於執行 Windows 的系統為 %%,執行 Linux 的系統 則為 $
3. 啟動 ITNM 核心服務。 註: – 於執行 Windows 的系統:Start ncp_ctrl service – 於執行 Linux 的系統:itnm_start ncp 4. 請複製 dellomc_int_itnm_topo_db.ver 檔案至 %NCHOME%\precision 資料夾。 於核心元件上安裝 Dell OpenManage Connection for Network Manager Dell-OMC-ITNM-Core-Integration 核心元件資料夾內含: • agents 資料夾 • aoc 資料夾 • configuration 資料夾 • perlAgents 資料夾 • dellomc_int_itnm_core.ver 檔案 若要於核心元件上安裝 Network Manager: 1. 請瀏覽至 Dell-OMC-ITNM-Core-Integration\agents 資料夾並將下列探索代理程式複製至 %NCHOME% \precision\disco\agents 資料夾。 – DellServerSNMP.agnt – DellDRAC.
5. 6. 7. – DellServerModularLinux.aoc – DellServerModularESXi.aoc – DellServerMonolithicWindows.aoc – DellServerMonolithicLinux.aoc – DellServerMonolithicESXi.aoc – DellCMC.aoc – DellVRTXCMC.aoc – DellDRAC5.aoc – DellDRACMC.aoc – DelliDRAC6.aoc – DellOOBServer.aoc – DellEqualLogic.aoc – DellMDArray.aoc 請瀏覽至 Dell-OMC-ITNM-Core-Integration\aoc 資料夾並將 EndNode.aoc 的檔案內容插入至 %NCHOME% \precision\aoc\EndNode.aoc 檔案。 有關您必須插入的 EndNode.aoc 檔案內容的相關資訊,請見附錄中《Dell 規定之 EndNode.
註: 請將環境變數 DELL_OMC_ITNM_JAVA_PATH 複製至 /etc/profile 檔案,以確保環境 變數適用於所有外殼。 12. 請執行以下步驟,以重新啟動 Network Manager 核心服務: – 於執行 Windows 的系統:重新啟動 ncp_ctrl 服務。 – 於執行 Linux 的系統:執行 itnm_stop ncp 及 itnm_start ncp 命令。 13. 請瀏覽至 Dell-OpenManage-Connection-for-ITNM-1.0\Dell-MIBS 資料夾,並將 MIB 檔案複製至 %NCHOME% \precision\mibs 資料夾。 14. 若要載入新的 MIB,請執行命令: %NCHOME%\precision\platform\\bin\ncp_mib 註: 在執行 ncp_mib 之前請複製所有相依的 MIB 檔案。 15. 請瀏覽至 Dell-OMC-ITNM-Core-Integration\configuration 資料夾,並在匯入下列輪詢原則前執行下列命令: %NCHOME%\precision\bin\nc
17. 請重新啟動 ncp_poller 服務。 18. 若下列輪詢原則與輪詢定義正確建立於 Tivoli Integrated Portal,請瀏覽至 Administration → Network → Network Polling 進行驗證。 – 輪詢原則: * DellCMCPoll * DellVRTXCMCPoll * DellDRACPoll * DellOOBServerPoll * DellServerPoll – 輪詢定義: * DellServerCriticalDef * DellServerWarningDef * DellOOBServerCriticalDef * DellOOBServerWarningDef * DellCMCCriticalDef * DellCMCWarningDef * DellVRTXCMCCriticalDef * DellVRTXCMCWarningDef * DellDRACCriticalDef * DellDRACWarningDef 19. 請從 %NCHOME%\..\tipv
* 於執行 Linux 的系統 sh cronJob.sh add ESXi_POLL – Dell PowerVault MD 儲存陣列 * 於執行 Windows 的系統 scheduleTask.bat add MDARRAY_POLL * 於執行 Linux 的系統 sh cronJob.sh add MDARRAY_POLL 21. 請自 %NCHOME%\precision\dell\scripts 資料夾執行下列命令,以設定週期性的授權同步化。 – 於執行 Windows 的系統: scheduleTask.bat add LICENSE_SYNCH – 於執行 Linux 的系統: cronJob.
5. 請瀏覽至 Dell-OpenManage-Connection-for-ITNM-1.0\Dell-OMC-ITNM-TIP-Server-Integration\menus 並將 ncp_topoviz_device_menu.xml 檔案內容插入至 %NCHOME%\precision\profiles\TIPProfile\etc\tnm\menus \ncp_topoviz_device_menu.xml 內最尾端的定義 () 標籤前。 有關您必須插入的 ncp_topoviz_device_menu.xml 檔案內容的相關資訊,請見附錄中〈Dell 規定之 ncp_topoviz_device_menu.xml 變更〉一節。 6. 請將 ncp_delltools.xml 檔案複製至 %NCHOME%\precision\profiles\TIPProfile\etc\tnm\menus 資料夾。 7. 請瀏覽至 tools 資料夾並將下列檔案複製至 %NCHOME%\precision\profiles\TIPProfile\etc\tnm\tools 資
配置 Dell Connections 3 Dell Connections for Network Manager 需配置為可供不同元件使用,以用於監控 Dell 裝置。以下章節會提供詳細 的配置細節。 設定 Dell Connections License Manager (DCLM) 參數 DCLM 參數需在核心元件內進行設定,若要設定 DCLM 參數:DCLM URL、網域、使用者名稱以及密碼,請執行 下列命令: java –jar dell_OMC_ITNM_ConfigUtility_v_1_0.jar -
• dbpassword:指定資料庫密碼。 • dbhostname:以連接埠指定資料庫主機名稱。 • dbtype:指定資料庫類型。可能的選項為: – Informix – Oracle – DB2 – MySQL 例如: java –jar dell_OMC_ITNM_ConfigUtility_v_1_0.jar -dbusername=Administrator dbhostname=TEST:123 -dbtype=Informix -dbpassword 註: 請務必於核心系統以及 TIP 系統內進行設定。 註: 執行命令時若出現 dbpassword 提示,請輸入密碼值。 設定 WS-MAN 參數 WS-MAN 參數需在核心元件以及 Web GUI 元件內進行設定。若要設定 WS-MAN 參數,請執行下列命令: java –jar dell_OMC_ITNM_ConfigUtility_v_1_0.jar -
例如: https://test.domain.com:2607 配置 Dell OpenManage Power Center 主控台啟動工具 Dell OpenManage Power Center (OMPC) 主控台需在 Web GUI 元件內進行配置。若要配置 OMPC 主控台啟動 工具,請瀏覽至 %NCHOME%\precision\profiles\TIPProfile\etc\tnm\tools\ 並以下列 URL 取代 OMPC IP 位址與 連接埠的佔位符來編輯 ncp_dell_ome_launch.xml 檔案: https://OMPC_IP_Address_OR_Host:OMPC_Port/powercenter 例如: https://host.domain.com:8643/powercenter 配置 Dell OpenManage Web Server Administrator (DWS) 主控台 啟動工具 DWS 主控台需在 Web GUI 元件內進行配置。若要配置 DWS 主控台的啟動工具,請瀏覽至 %NCHOME% \precision\profiles\TI
解除安裝 Dell OpenManage Connection for Network Manager 4 以下章節將會說明解除安裝 Dell OpenManage Connection for Network Manager 所需的步驟: • 解除安裝 TIP 元件上的 Dell OpenManage Connection for Network Manager • 解除安裝核心元件上的 Dell OpenManage Connection for Network Manager • 解除安裝 Database Integration 上的 Dell OpenManage Connection for Network Manager 解除安裝 TIP 元件上的 Dell OpenManage Connection for Network Manager 解除安裝 Tivoli Integrated Portal (TIP): 1. 請瀏覽至 “%NCHOME%\precision\profiles\TIPProfile\etc\tnm\topoviz.
解除安裝核心元件上的 Dell OpenManage Connection for Network Manager 若要解除安裝核心元件: 1. 請執行命令以刪除 Dell 代理程式: %NCHOME%\precision\bin\ncp_agent_registrar -remove 例如: %NCHOME%\precision\bin\ncp_agent_registrar -remove DellServerSNMP,DellOOBServer,DellServerWsman,DellDRAC,DellEqualLogic,DellMDA rray 2. 請瀏覽至 %NCHOME%\precision\disco\agents Network Manager Core 伺服器資料夾並刪除 Dell*.agnt 檔案。 3. 請瀏覽至 %NCHOME%\precision\disco\agents\perlAgents 資料夾並刪除 Dell*.pl 檔案。 4. 請瀏覽至 %NCHOME%\etc\prec
– DellDRACCriticalDef – DellDRACWarningDef – DellCMCCriticalDef – DellCMCWarningDef – DellVRTXCMCCriticalDef – DellVRTXCMCWarningDef – DellOOBServerCriticalDef – DellOOBServerWarningDef 12. 請瀏覽至 %NCHOME%\precision\dell\scripts 資料夾,並執行下列命令,以刪除所設定的 DCLM 週期性輪 詢。 – 於執行 Windows 的系統:scheduleTask.bat remove DCLM_POLL – 於執行 Linux 的系統:cronJob.sh remove DCLM_POLL 13. 請瀏覽至 %NCHOME%\precision\dell\scripts 資料夾,並執行下列命令,以刪除所設定的 ESXi 系統週期性輪 詢。 – 於執行 Windows 的系統:scheduleTask.bat remove ESXi_POLL – 於執行 Linux 的系統:cronJob.
– 若為 Oracle 資料庫: sqlplus -s / @drop_dellDevice_Oracle.sql 2. 24 刪除 %NCHOME%\precision\dellomc_int_itnm_topo_db.
附錄 5 本節包含用於安裝 Dell OpenManage Connection Version 1.0 for IBM Tivoli Network Manager (ITNM) IP Edition 3.9 的 檔案中所出現的資訊。 如何插入或附加資訊格式 檔案內的資訊以下列格式呈現 • // Dell specified changes - START:此註釋文字用於標示檔案資訊的開頭, • 此資訊一定得包含於 ITNM 元件檔案內。 • // Dell specified changes - END:此註釋文字用於標示檔案資訊的結尾, 當插入或附加資訊至 ITMN 元件檔案時,請將此註釋文字包含在內以分辨檔案資訊。 Dell 規定之 ClassSchema.cfg 變更 // Dell specified changes – START insert into class.classIds values (17950, 'DellServerMonolithicWindows'); insert into class.
Dell 規定之 nco_p_ncpmonitor.
Dell 規定之 ip_default.
獲得幫助 6 與 Dell 公司聯絡 註: 如果無法連線網際網路,則可以在購買發票、包裝單、帳單或 Dell 產品目錄中找到聯絡資訊。 Dell 提供多項線上和電話支援與服務選擇。服務的提供因國家/地區和產品而異,某些服務可能在您所在地區並 不提供。若因銷售、技術支援或客戶服務問題要與 Dell 聯絡: 1. 請造訪 dell.com/support 2. 選擇您的支援類別。 3. 在頁面最上方的 Choose a Country/Region (選擇國家/地區) 下拉式選單中確認您所在的國家或地區。 4.