Dell OpenManage Connection Version 1.0 for IBM Tivoli Network Manager (ITNM) IP Edition 3.
注、小心和警告 注: “注”表示可以帮助您更好地使用计算机的重要信息。 小心: “小心”表示可能会损坏硬件或导致数据丢失,并说明如何避免此类问题。 警告: “警告”表示可能会造成财产损失、人身伤害甚至死亡。 © 2013 Dell Inc. 保留所有权利。 本文中使用的商标: Dell™、Dell 徽标、Dell Boomi™、Dell Precision™、 OptiPlex™、Latitude™、PowerEdge™、PowerVault™、 PowerConnect™、OpenManage™、EqualLogic™、Compellent™、KACE™、FlexAddress™、Force10™、Venue™ 和 Vostro™ 是 Dell Inc. 的 商标。Intel®、Pentium®、Xeon®、Core® 和 Celeron® 是 Intel Corporation 在美国和其他国家或地区的注册商标。 AMD® 和 AMD Opteron™、AMD Phenom™ 以及 AMD Sempron™ 是 Advanced Micro Devices, Inc.
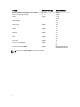
目录 1 简介...............................................................................................................................................5 从 Dell 支持站点访问文档......................................................................................................................................5 用于管理系统的支持的操作系统和浏览器......................................................................................................... 6 用于受管系统的支持的操作系统.....................................................................
6 获得帮助....................................................................................................................................29 联系 Dell.................................................................................................................................................................
1 简介 Dell OpenManage Connection Version 1.0 for IBM Tivoli Network Manager (ITNM) IP Edition 3.
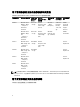
用于管理系统的支持的操作系统和浏览器 下表列出了支持 ITNM 3.9 Fix Pack 2 和 ITNM 3.9 Fix Pack 3 组件的操作系统: 虚拟化环境 Windows 服务器 SUSE Linux Enterprise Server Red Hat Enterprise Linux 服务器 Windows 客 户端 SUSE Linux for Desktop 支持的浏览 器 ESXi 5.0 Windows Server 2008 R2(64 位) (Enterprise、 Datacenter、 Standard) SLES 11.0-1 (64 位) Red Hat Enterprise Linux 6.0-4(32 位) (Server) Windows 7 (64 位) (Enterprise) SUSE Linux Enterprise Desktop 11.
虚拟化环境 Windows 服务器 SUSE Linux 服务器 Red Hat Enterprise Linux 服务 器 ESXi 5.1 Windows Essential Business Server 2008 SP1 SUSE Linux Enterprise Server 11 SP2(64 位) Red Hat Enterprise Linux 6.2-4 (64 位) ESXi 5.0 Windows Essential Business Server 2008 SP1 SUSE Linux Enterprise Server 10 SP4(64 位) Red Hat Enterprise Linux 6.0 (64 位) ESXi 4.1 U1(HDD 和闪 存) Windows Server 2008 SP2(32 位和 64 位) Red Hat Enterprise Linux 5.9 (64 位和 32 位) ESXi 4.
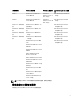
Dell 设备 受支持的 OMSA 版本 受支持的固件版本 Dell PowerEdge 第 9 代 (9G) 至第 12 代 (12G) 系统 6.5–7.3 不适用 Dell PowerVault 9G 至 12G 系统 6.5–7.3 不适用 iDRAC7 不适用 1.31.30 1.40.40 3.40 3.50 iDRAC 6 模块化 iDRAC 6 单片 不适用 1.90 1.95 DRAC5 不适用 1.5 1.65 DRAC/MC 不适用 1.5 1.6 CMC 不适用 4.3.1 4.45 VRTX CMC 不适用 1.0 Dell EqualLogic 存储阵列 不适用 5.2 6.0 Dell PowerVault MD 存储阵列 不适用 固件版本为 07.80.62.60、 07.84.44.60 和 07.84.47.
2 安装 Dell OpenManage Connection for Network Manager 从 dell.com/support 下载 Dell-OpenManage-Connection-for-ITNM-1.0.zip 文件并将其内容提取至一个文件夹。以下 是提取的文件夹和文件: • Dell-OMC-ITNM-Core-Integration • Dell-OMC-ITNM-Topology-Database-Integration • Dell-OMC-ITNM-TIP-Server-Integration • Dell-Utilities • Dell-MIBS • Dell_OMC_1_0_for_ITNM_IG.pdf • Dell_OMC_1_0_For_ITNM_Readme.txt • license_en.txt 注: Windows 的文件分隔符是反斜杠 (\),而 Linux 的是正斜杠 (/)。 注: 请按照以下格式使用环境变量,%%(在运行 Windows 的系统上)或 $(在
3. 启动 ITNM 核心服务。 注: – 对于运行 Windows 的系统:Start ncp_ctrl service – 对于运行 Linux 的系统:itnm_start ncp 4. 将 dellomc_int_itnm_topo_db.ver 文件复制到 %NCHOME%\precision 文件夹。 在核心组件上安装 Dell OpenManage Connection for Network Manager Dell-OMC-ITNM-Core-Integration 核心组件文件夹包含: • agents 文件夹 • aoc 文件夹 • configuration 文件夹 • perlAgents 文件夹 • dellomc_int_itnm_core.ver 文件 在核心组件上安装 Network Manager: 1. 导航至 Dell-OMC-ITNM-Core-Integration\agents 文件夹并将以下查找代理文件复制到 %NCHOME%\precision \disco\agents 文件夹。 – DellServerSNMP.
– DellServerModularLinux.aoc – DellServerModularESXi.aoc – DellServerMonolithicWindows.aoc – DellServerMonolithicLinux.aoc – DellServerMonolithicESXi.aoc – DellCMC.aoc – DellVRTXCMC.aoc – DellDRAC5.aoc – DellDRACMC.aoc – DelliDRAC6.aoc – DellOOBServer.aoc – DellEqualLogic.aoc – DellMDArray.aoc 5. 导航至 Dell-OMC-ITNM-Core-Integration\aoc 文件夹并将 EndNode.aoc 文件的内容插入 %NCHOME%\precision \aoc\EndNode.aoc 文件。 关于您必须插入的 EndNode.aoc 文件的内容信息,请参考附录中“Dell 为 EndNode.aoc 指定的更改”部 分。 6. 导航至 Dell-OMC-ITNM-Core-Integration\co
– 对于运行 Linux 的系统: $NCHHOME/platform/linux2x86/jre_1.6.7/jre/bin/java 注: 将环境变量 DELL_OMC_ITNM_JAVA_PATH 复制到 /etc/profile 文件,以确保环境变 量在所有 shell 中可用。 12. 请按照以下步骤重新启动 Network Manager 核心服务: – 对于运行 Windows 的系统:重新启动服务 ncp_ctrl 服务。 – 对于运行 Linux 的系统:运行 itnm_stop ncp 和 itnm_start ncp 命令 13. 导航至 Dell-OpenManage-Connection-for-ITNM-1.0\Dell-MIBS 文件夹并将 MIB 文件复制到 %NCHOME% \precision\mibs 文件夹。 14. 要加载新的 MIB,请运行以下命令: %NCHOME%\precision\platform\\bin\ncp_mib 注: 在运行 ncp_mib 之前,请复制所有相关的 MIB 文件。 15.
Append the value of @Identifier, with the new variable $tmpVal, as given below # # @Identifier = $EntityName + @LocalPriObj + "->" + $EventName + @Type + @NmosDomainName + $tmpVal default: # do nothing} } } 17. 重新启动 ncp_poller 服务。 18.
* 在运行 Windows 的系统上 scheduleTask.bat add ESXi_POLL * 在运行 Linux 的系统上 sh cronJob.sh add ESXi_POLL – Dell PowerVault MD 存储阵列 * 在运行 Windows 的系统上 scheduleTask.bat add MDARRAY_POLL * 在运行 Linux 的系统上 sh cronJob.sh add MDARRAY_POLL 21. 在 %NCHOME%\precision\dell\scripts 文件夹中运行以下命令,以配置定期许可证同步。 – 在运行 Windows 的系统上 — scheduleTask.bat add LICENSE_SYNCH – 在运行 Linux 的系统上 — cronJob.
关于您必须插入的 ip_default.xml 文件的内容信息,请参考附录中的“Dell 为 ip_default.xml 指定的更改”部 分。 5. 导航至 Dell-OpenManage-Connection-for-ITNM-1.0\Dell-OMC-ITNM-TIP-Server-Integration\menus 并将 ncp_topoviz_device_menu.xml 文件内容插入 %NCHOME%\precision\profiles\TIPProfile\etc\tnm\menus \ncp_topoviz_device_menu.xml 中的定义 () 标记末尾之前。 关于您必须插入的 ncp_topoviz_device_menu.xml 文件的内容信息,请参考附录中的“Dell 为 ncp_topoviz_device_menu.xml 指定的更改”部分。 6. 将 ncp_delltools.xml 文件复制到 %NCHOME%\precision\profiles\TIPProfile\etc\tnm\menus 文件夹。 7.
配置 Dell Connections 3 应对不同组件配置 Dell Connections for Network Manager,以监测 Dell 设备。详细的配置信息将在以下章节中提 供。 配置 Dell Connections License Manager (DCLM) 参数 DCLM 参数应该在核心组件中进行配置。要配置 DCLM 参数 - DCLM URL、域、用户名和密码,请执行以下命 令: java –jar dell_OMC_ITNM_ConfigUtility_v_1_0.jar -
• dbusername:指定数据库用户名。 • dbpassword:指定数据库密码。 • dbhostname:根据端口指定数据库主机名称。 • dbtype:指定数据库类型。可能的选择为: – Informix – Oracle – DB2 – MySQL 例如: java –jar dell_OMC_ITNM_ConfigUtility_v_1_0.jar -dbusername=Administrator dbhostname=TEST:123 -dbtype=Informix -dbpassword 注: 这些必须在核心和 TIP 系统中进行配置。 注: 运行命令期间,当提示输入 dbpassword 时,请键入密码值。 配置 WS-MAN 参数 WS-MAN 参数应该在核心组件和 Web GUI 组件中进行配置。要配置 WS-MAN 参数,请运行以下命令。 java –jar dell_OMC_ITNM_ConfigUtility_v_1_0.jar -
配置 Dell OpenManage Essentials 启动工具 Dell OpenManage Essentials (OME) 控制台应该在 Web GUI 组件中进行配置。要配置 OME 控制台启动工具, 请导航至 %NCHOME%\precision\profiles\TIPProfile\etc\tnm\tools\,并编辑 ncp_dell_ome_launch.xml 文件,方 法是在下面 URL 中替换 OME IP 地址和端口的占位符: https://OME_IP_Address_OR_Host:OME_Port 例如: https://test.domain.com:2607 配置 Dell OpenManage Power Center 控制台启动工具 Dell OpenManage Power Center (OMPC) 控制台应该在 Web GUI 组件中配置。要配置 OMPC 控制台启动工 具,请导航至 %NCHOME%\precision\profiles\TIPProfile\etc\tnm\tools\ 并编辑 ncp_dell_ompc_launch.
– 对于运行 Linux 的系统: "/opt/dell/mdstoragesoftware/mdstoragemanager/client/SMclient" 20
4 卸载 Dell OpenManage Connection for Network Manager 卸载 Dell OpenManage Connection for Network Manager 的步骤如以下各部分中所述: • 卸载 TIP 组件上的 Dell OpenManage Connection for Network Manager • 卸载核心组件上的 Dell OpenManage Connection for Network Manager • 卸载数据库集成上的 Dell OpenManage Connection for Network Manager 卸载 TIP 组件上的 Dell OpenManage Connection for Network Manager 要卸载 Tivoli Integrated Portal (TIP): 1. 导航至 “%NCHOME%\precision\profiles\TIPProfile\etc\tnm\topoviz.properties” 并删除 Dell 特定于图像的条 目。 关于您必须删除的 topoviz.
卸载核心组件上的 Dell OpenManage Connection for Network Manager 要卸载核心组件: 1. 运行以下命令以删除 Dell 代理: %NCHOME%\precision\bin\ncp_agent_registrar -remove 例如: %NCHOME%\precision\bin\ncp_agent_registrar -remove DellServerSNMP,DellOOBServer,DellServerWsman,DellDRAC,DellEqualLogic,DellMDA rray 2. 导航至 %NCHOME%\precision\disco\agents Network Manager Core server 文件夹并删除 Dell*.agnt 文件。 3. 导航至 %NCHOME%\precision\disco\agents\perlAgents 文件夹并删除 Dell*.pl 文件。 4. 导航至 %NCHOME%\etc\precision
– DellDRACWarningDef – DellCMCCriticalDef – DellCMCWarningDef – DellVRTXCMCCriticalDef – DellVRTXCMCWarningDef – DellOOBServerCriticalDef – DellOOBServerWarningDef 12. 导航至 %NCHOME%\precision\dell\scripts 文件夹,并通过运行以下命令删除已配置的 DCLM 定期轮询。 – 对于运行 Windows 的系统:scheduleTask.bat remove DCLM_POLL – 对于运行 Linux 的系统:cronJob.sh remove DCLM_POLL 13. 导航至 %NCHOME%\precision\dell\scripts 文件夹,并通过运行以下命令删除已配置的 ESXi 系统定期轮询。 – 对于运行 Windows 的系统:scheduleTask.bat remove ESXi_POLL – 对于运行 Linux 的系统:cronJob.sh remove ESXi_POLL 14.
– 对于 Oracle 数据库: sqlplus -s / @drop_dellDevice_Oracle.sql 2. 24 删除 %NCHOME%\precision\dellomc_int_itnm_topo_db.
附录 5 本部分包含安装 Dell OpenManage Connection Version 1.0 for IBM Tivoli Network Manager (ITNM) IP Edition 3.9 时所 用到文件中的信息。 如何插入或添加信息格式 文件信息的格式如下 • // Dell 指定的更改 – START — 提供该备注文本来标记文件信息的开头。 • 您必须纳入 ITNM 组件文件的信息。 • // Dell 指定的更改 - END — 提供该备注文本来标记文件信息的末尾。 在向 ITNM 组件文件中插入或添加信息时,请加入注释文本以分辨文件信息。 Dell 为 ClassSchema.cfg 指定的更改 // Dell specified changes – START insert into class.classIds values (17950, 'DellServerMonolithicWindows'); insert into class.
Dell 为 nco_p_ncpmonitor.
Dell 为 ip_default.
获得帮助 6 联系 Dell 注: 如果没有活动的 Internet 连接,您可以在购货发票、装箱单、帐单或 Dell 产品目录上查找联系信息。 Dell 提供了若干联机及电话支持和服务选项。服务会因所在国家和地区以及产品的不同而有所差异,您所在的 地区可能不提供某些服务。如要联系 Dell 解决有关销售、技术支持或客户服务问题: 1. 请访问 dell.com/support 2. 选择您的支持类别。 3. 在页面顶部的 Choose a Country/Region(选择国家/地区)下拉式菜单中,验证您所在的国家或地区。 4.