
Users Guide


30 Configuring Your Managed System
5
Copy your custom scripts into the folder you created in step 4.
NOTE: Your scripts should also take care of copying miscellaneous items to unlock the CD, so that the CD can
be mounted and ejected as required by the operating system’s installation process.
6
In
/mnt/cdrom/isolinux.cfg
, the cd install section points to your customized start-up script.
NOTE: The scripts that you copy into the CD will be copied to and run from the RAM disk. This task is done to
ensure the CD is not locked. Ensure that your sample scripts have valid path names.
7
Copy the directory structure created in your work station, into the root folder that you created in "step 4".
8
This folder contains the Deployment Toolkit CD files necessary for operating system installation, and
files required for replication.
9
Use the
isolinux
utility to burn the contents of the folder you created in "step 7" to a CD and make
it bootable.
10
Your ISO image is ready for booting.
Basic configuration
Before you can use the BMC Management Utility to remotely manage the BMC on a managed system,
you must perform some basic configuration tasks. The Deployment Toolkit SYSCFG.EXE utility
provides a powerful command-line interface for performing the following configuration tasks:
• Configuring BMC users for the managed system
• Configuring the BMC IP address for IPMI LAN access and SOL access for the managed system
• Configuring the BMC serial channel for IPMI serial access for the managed system
NOTE: See the Deployment Toolkit Version 2.1 User’s Guide for additional information about installing and using the
Deployment Toolkit utilities, and the Command Line Interface Reference Guide for a complete list of valid options,
suboptions, and arguments for using the SYSCFG.EXE to configure and manage your BMC.
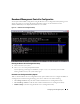
Configuring New BMC Users
The BMC is configured by default with user ID 2 set to username: root and password: calvin. It is
highly recommended that you change the user name and password when deploying your system.
1
Insert the bootable BMC configuration diskette or CD into the appropriate drive of the system to be
deployed and reboot the system.
2
To create a new user, at the command prompt, type:
syscfg username --userid=
X
--name=
name
where
X
is a number between 2–10 and
name
is an ASCII string of 16 or fewer characters.
Press <Enter> to execute the command line options.
3
To enable the new user ID, at the command prompt, type:
syscfg useraction --userid=
X
--action=enable
Press <Enter> to execute the command line options.