
Users Guide


32 Configuring Your Managed System
1
Access the DRAC 5 Web-based interface. See the
Dell Remote Access Controller 5 User’s Guide
for
more information.
2
Click Remote Access in the System tree.
3
Click the Configuration tab and then click Network.
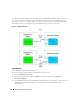
4
Configure the DRAC 5 NIC settings in the
Network Configuration
page. Table 2-1 describes the
Network Settings and IPMI Settings on the
Network Configuration
page.
5
Click
Apply Changes
when completed.
6
Click the appropriate
Network Configuration
page button to continue.
Adding and Configuring DRAC 5 Users
Create unique users with specific administrative permissions (or role-based authority) to manage your
system with the DRAC 5 and maintain system security. For additional security, you can also configure
alerts that are e-mailed to specific users when a specific system event occurs.
NOTE: You must have Configure DRAC 5 permission to do the following steps.
1
Expand the System tree and click
Remote Access
.
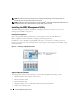
2
Click the
Configuration
tab and then click
Users
. The
Users
page appears, which includes each user’s
State, RAC Privilege, IPMI LAN Privilege, and IPMI Serial Privilege.
3
Click a user ID number in the User ID column.
4
Configure the user’s properties and privileges in the
User Configuration
page.
5
Click
Apply Changes
when completed.
6
Click the appropriate
User Configuration
page button to continue.
See the
Dell Remote Access Controller 5 User’s Guide
for more information on the IPMI user privileges,
DRAC group permissions, and the DRAC user privilege settings.