
Install Guide
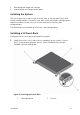

3. Front standoff with locking
tab.
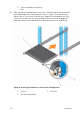
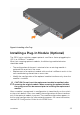
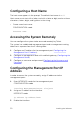
2. After you have installed both switch rails, line them up on the previously
mounted Ready-Rails and slide the switch in ( item 1 in the following
figure) until it is flush with front of rack. About 3 inches before you fully
insert your system, the rail locking feature (items 2 and 3) engages to
keep the switch from inadvertently sliding out of the rack and falling.
Figure 6. Installing the Switch in a Front-Rack Configuration
1. Chassis. 2. Rail end.
3. Rail locking feature.
12
Installation