
Owner's Manual

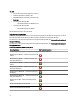
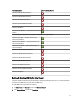
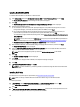
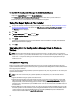
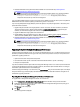
Table Of Contents
- Dell Lifecycle Controller Integration For Microsoft System Center Configuration Manager Version 2.0.1 Installation Guide
- Introduction
- Prerequisites
- Configuring An Account For Use With Discovery And Handshake
- Configuring User Access To WMI
- Providing User Permissions For DCOM
- Providing User Permissions For DCOM Config WMI
- Setting Namespace Security And Granting Permissions
- Validating User Permissions From The Dell Provisioning Server
- Providing Share And Folder Permissions
- Enabling Remote PowerShell Commands For Dell Provisioning Server
- Software Prerequisites And Requirements
- Configuring An Account For Use With Discovery And Handshake
- Installing DLCI For Configuration Manager
- Troubleshooting

4. Accept the license agreement and click Next.
The Custom Setup screen is displayed.
5. Select one or both the components. Follow the steps provided:
– Installing Both DLCU And DPS
– Installing DLCU Only
– Installing DPS Only
NOTE: You cannot abort the upgrade process by closing the installation wizard. If you close the installation wizard,
the following message is displayed: Are you sure you want to cancel Dell Lifecycle
Controller Integration installation? The upgrade process continues irrespective of the selection
you make on the message box.
Using The Modify Option In The Installer
The Modify option in the DLCI for Configuration Manager installer, modifies the program features that are installed. This
option enables you to perform the following actions:
• Installing A Feature That You Did Not Install Earlier
• Removing A Feature That You Had Installed Earlier
If you uninstall DLCU in the DLCI server using the Modify option, then uninstall DPS and install again.
Installing A Feature That You Did Not Install Earlier
To install a feature that you did not install earlier:
1. Run Dell_Lifecycle_Controller_Integration_2.0.1.xxx.msi from the folder where you have extracted it.
2. Click Next.
The installer displays three options.
3. Select the Modify option.
The Custom Setup screen is displayed.
4. In Custom Setup, select the feature that you did not install earlier.
5. Click Next.
6. In Ready to Modify the Program, click Install to begin installing the feature.
When the installation process completes, click Finish to exit the installer.
Removing A Feature That You Had Installed Earlier
To remove a feature that you had installed earlier:
1. Run Dell_Lifecycle_Controller_Integration_2.0.0.xxx.msi from the folder where you have extracted it.
2. Click Next.
The installer displays three options.
3. Select the Modify option.
The Custom Setup screen is displayed.
4. In Custom Setup, select the feature that you want to remove.
5. Click the feature and select the option This feature will not be available and click Next.
20