
Setup guide


5 Configuring VLAN Settings in Lifecycle Controller for Dell PowerEdge Servers
1 Network Setup for LC GUI with VLAN Settings
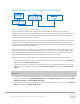
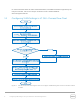
Figure 1 VLAN setup to use network features from LC GUI
As shown in the flow diagram here, you can select a Server Management domain for the Server
Management activities on the Dell PowerEdge servers. This can be achieved by using a VLAN, where the
management ports can be configured to operate with a particular VLAN ID. This provides an additional
security to the system management activities.
The Server Management software supported by the Dell PowerEdge servers such as iDRAC and Lifecycle
Controller can be accessed through the network, or a network is needed to perform various Server
Management activities. With a dedicated VLAN setup, you can configure all the Managed Server Network
ports to operate with a particular VLAN ID.
In the context of Lifecycle Controller, there are several network-dependent features that require DHCP
/NFS/CIFS/FTP servers for the network operations. All these servers can be configured to operate with a
specific VLAN ID dedicated for the Server Management. In Lifecycle Controller, system network port is
used for the network operations, which include Onboard LOMs and add-on cards.
A list of network features supported by LC GUI and the navigation path to each page are listed here:
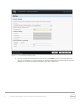
1. To export the lifecycle log to a Network Share such as a CIFS or NFS, in the left pane click LifeCycle
Log, and then click Export LifeCycle Log,
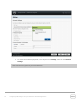
2. To update the feature, and allow you to provide the FTP site, or the Network Share such as CIFS or
NFS at the source location, in the left pane click Firmware Update, and then click Launch Firmware
Update,
Note: To perform firmware updates of different components, store the firmware DUPs at appropriate
locations.
3. To allow you to export the Hardware Inventory files or Factory-Shipped Inventory file to a CIFS or NFS
share, in the left pane click Hardware Configuration, click Hardware Inventory, and then click Export
Hardware Inventory or Factory Shipped Inventory.
4. To allow the you to import server profile from either CIFS or NFS share, in the left pane click Platform
Restore, and then click Import Server Profile.