
Users Guide


The attached USB drive is ready for provisioning client systems. For more information, see Provisioning Client Systems.
Provisioning Client Systems
1. Connect the USB key which is ready for client provisioning in the client system you want to provision. For more
information, see Client Machines Using Intel Setup & Configuration Service (SCS).
2. Reboot the client systems and when the Dell logo appears press F12 to enter the One Time Boot menu.
3. Select Intel Management Engine Bios Extension (MEBx).
4. Enter Y when the Found USB Key for provisioning. Continue with Auto Provisioning (Y/N) message is displayed.
The Configuration Settings from the USB file were successfully applied Press any key to continue with system
boot… message is displayed.
5. Log in to the Windows account on your client systems.
6. Copy the ACU_Configurator folder from the IntelAMTSCS folder on the Windows SBS server to the Dell client
system.
7. On the client system navigate to the ACU_Configurator through the command prompt with administrative privileges.
8. Enter the following command ACUConfig.exe /output file acuoutput.txt /verbose
configviarcsonly
<IPAddress of SBS Server><TLSProfile>
/WMIUser
<Domain>\<DomainUser>
.
The client system is now configured in the Admin Control Mode and able to run operations from the AMT Plugin console.
To verify this open acuoutput.txt from the directory in which ACUConfig is running. The last entry in this log should read
(Success). Another method to check this is to open Intel Management and Security Status from the system tray at the
bottom left corner, open the Advanced tab and make sure that the client machine is configured in Admin Control Mode.
Client Configuration
Allows you to configure the Power Profile, Boot Order, BIOS Settings, and BIOS Passwords on the target client systems.
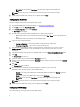
Configuring Power Profile
You can control various functions like Wake-up On Lan (WOL), ON, OFF after power loss, and so on, in the different
power states (S0 to S5) of your client system.
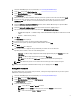
1. Launch the AMT plug-in. For more information, see Launching the Dell AMT Plug-in.
2. On the Home screen, click Client Configuration.
3. On the Client Configuration screen, click Power Profile.
4. Select the power package for your desktop and/or mobile computers. Click Next.
The Select Clients tab is displayed.
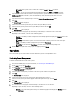
5. Search for client systems to which you want to apply the power packages.
6. Select the client systems to which you want to install the power packages on and click Add.
7. Click Next.
The Schedule Task tab is displayed.
8. You can either choose to apply the changes immediately or schedule it to run at a later time.
Depending on your schedule, select one of the following options:
– Run now — the changes to the Power Profiles are immediately applied and displays the Running status in
the Task Queue.
– Run At — the changes to the Power Profiles are queued in the Task Queue.
7