
Users Guide


Installing Dell AMT vPro Plugin
Before you proceed, ensure that you are logged in as administrator on the system where you want to install Dell AMT
vPro Plugin.
To install Dell AMT vPro Plugin:
1. Go to support.dell.com.
2. Select the product, which is ideally the client system you are targeting.
3. Select the operating system.
4. In the Category field, select Systems Management.
5. Click Download against Dell AMT vPro Plugin.
6. Download the DellSBSAMTPlugin.zip and extract the contents to a folder on the local drive.
7. Run the DellSBSAMTPlugin.exe file.
8. If Microsoft SQL CE 3.5 SP2 is not installed on the system, a dialog box is displayed prompting you to install it. Click
Install.
The Welcome screen for Dell AMT vPro Plugin is displayed.
9. Click Next.
The License Agreement is displayed.
10. Select I accept the terms in the license agreement and click Next.
The Destination Folder screen is displayed.
11. Click Change (if required) to change the default installation folder and click Next.
12. Select Basic Mode Provisioning or Advanced Mode Provisioning based on your requirement. For more information,
see Basic Mode Versus Advanced Mode.
13. Click Next.
The Ready to Install the Program screen is displayed.
14. Click Install.
The Installing Dell AMT vPro Plugin progress screen is displayed.
15. Click Finish.
Select the Show the Windows Installer log option to review the installation logs.
Basic Mode Versus Advanced Mode
Depending on the feature that you want to enable, you can install the basic version or the advanced version of Dell AMT
vPro Plugin. The following table lists the features available for the different modes.
NOTE: To enable Advanced Mode make sure that the client systems are provisioned with Transport Layer Security
(TLS) enabled. To check if TLS is enabled access the link https://
<System_hostname>
_
<IP Address>
_
<Hostname>
:
16992
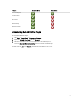
Table 1. Features for Basic Mode Versus Advanced Mode
Feature Advanced Mode Basic Mode
Power Management
KVM Connect
6