
Users Guide
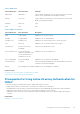


Table 14. Default Role Group Privileges
Role Groups Default Privilege Level Permissions Granted Bit Mask
Role Group 1 None Login to iDRAC, Configure
iDRAC, Configure Users, Clear
Logs, Execute Server Control
Commands, Access Virtual
Console, Access Virtual Media,
Test Alerts, Execute Diagnostic
Commands
0x000001ff
Role Group 2 None Login to iDRAC, Configure
iDRAC, Execute Server Control
Commands, Access Virtual
Console, Access Virtual Media,
Test Alerts, Execute Diagnostic
Commands
0x000000f9
Role Group 3 None Login to iDRAC 0x00000001
Role Group 4 None No assigned permissions 0x00000000
Role Group 5 None No assigned permissions 0x00000000
NOTE: The Bit Mask values are used only when setting Standard Schema with the RACADM.
Single Domain Versus Multiple Domain Scenarios
If all the login users and role groups, including the nested groups, are in the same domain, then only the domain controllers’ addresses must
be configured on iDRAC. In this single domain scenario, any group type is supported.
If all the login users and role groups, or any of the nested groups, are from multiple domains, then Global Catalog server addresses must be
configured on iDRAC. In this multiple domain scenario, all the role groups and nested groups, if any, must be a Universal Group type.
Configuring Standard Schema Active Directory
To configure iDRAC for a Active Directory login access:
1. On an Active Directory server (domain controller), open the Active Directory Users and Computers Snap-in.
2. Create a group or select an existing group. Add the Active Directory user as a member of the Active Directory group to access iDRAC.
3. Configure the group name, domain name, and the role privileges on iDRAC using the iDRAC Web interface or RACADM.
Related tasks
Configuring Active Directory With Standard Schema Using iDRAC Web Interface
Configuring Active Directory With Standard Schema Using RACADM
Configuring Active Directory With Standard Schema Using iDRAC
Web Interface
NOTE:
For information about the various fields, see the
iDRAC Online Help
.
1. In the iDRAC Web interface, go to Overview > iDRAC Settings > User Authentication > Directory Services > Microsoft Active
Directory.
The Active Directory summary page is displayed.
2. Click Configure Active Directory.
The Active Directory Configuration and Management Step 1 of 4 page is displayed.
3. Optionally, enable certificate validation and upload the CA-signed digital certificate used during initiation of SSL connections when
communicating with the Active Directory (AD) server. For this, the Domain Controllers and Global Catalog FQDN must be specified.
This is done in the next steps. And hence the DNS should be configured properly in the network settings.
118
Configuring User Accounts and Privileges