
Users Guide
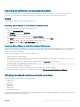

NOTE: If you navigate away from the page without saving the updates, an error message is displayed and all the
uploaded content is lost.
Related link
Updating device rmware
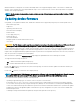
Viewing and managing staged updates
Updating rmware using repository
A repository is a storage location where update packages can be stored and accessed. Dell Repository Manager (DRM) allows you to create
and manage a repository that iDRAC can check for updates. There are several advantages of creating and using custom rmware update
repositories because it provides complete control of which devices or components are updated. Using iDRAC, you can perform repository
update in either attended or fully attended mode.
NOTE: It is recommended that you use the Dell Repository Manager to perform updates on your system instead of downloading
and updating rmware directly from the Dell website.
DRM can use the following to create the repository:
• New Dell online catalog
• Previously used Dell catalog
• Local source repository
• A custom repository
NOTE
: For more information about DRM, see delltechcenter.com/repositorymanager.
NOTE: Lifecycle Controller must be enabled, and you must have the Server Control privilege to update rmware for devices
other than iDRAC.
To update device rmware using a repository:
1 In the iDRAC web interface, go to Overview > iDRAC Settings > Update and Rollback.
The Firmware Update page is displayed.
2 On the Update tab, select Network Share as the File Location.
3 In the Catalog Location section, enter the network setting details.
While specifying the network share settings, it is recommended to avoid special characters for user name and password or percent
encode the special characters. For more information, see Recommended characters in user names and passwords.
For information about the elds, see the iDRAC Online Help.
4 Click Check for Update.
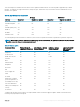
The Update Details section displays a comparison report showing the current rmware versions and the rmware versions available in
the repository.
NOTE
: Updates that are not supported, or are not applicable to the system or installed hardware, are not included in the
comparison report.
5 Select the required updates, and do one of the following:
NOTE
: A version marked as Available does not always indicate that it is the latest version available or newer than the
version already installed.
• For rmware images that do not require a host system reboot, click Install. For example, .d7 rmware le.
• For rmware images that require a host system reboot, click Install and Reboot or Install Next Reboot.
• To cancel the rmware update, click Cancel.
When you click Install, Install and Reboot, or Install Next Reboot, the message Updating Job Queue is displayed.
6 Click Job Queue to display the Job Queue page, where you can view and manage the staged rmware updates or click OK to refresh
the current page and view the status of the rmware update.
Setting up managed system and management station
69