Dell EMC iDRAC Service Module 3.5.1 User’s Guide October 2020 Rev.
Notes, cautions, and warnings NOTE: A NOTE indicates important information that helps you make better use of your product. CAUTION: A CAUTION indicates either potential damage to hardware or loss of data and tells you how to avoid the problem. WARNING: A WARNING indicates a potential for property damage, personal injury, or death. © 2019 - 2020 Dell Inc. or its subsidiaries. All rights reserved. Dell, EMC, and other trademarks are trademarks of Dell Inc. or its subsidiaries.
Contents Chapter 1: Introduction................................................................................................................. 5 What’s New...........................................................................................................................................................................5 Supported features—operating systems matrix.........................................................................................................
Installing iDRAC Service Module when the System Configuration Lock Down Mode is enabled in iDRAC...............................................................................................................................................................................23 Support for iDRAC URI to get iSM installer.......................................................................................................... 24 Support for idrac.local and drac.local as iDRAC FQDN..................................
1 Introduction This guide provides information and step-by-step instructions on how to install iDRAC Service Module on the supported operating systems. The Integrated Dell Remote Access Controller(iDRAC) Service Module is a lightweight optional software application that can be installed on yx2x servers or later. The iDRAC Service Module complements iDRAC interfaces – Graphical User Interface (GUI), RACADM CLI, Redfish, and Web Service Management (WSMan) with additional monitoring data.
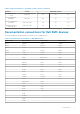
Table 1.
Table 1. Supported features—operating systems matrix (continued) Features Servers Operating Systems Single Sign-On (SSO) yx4x, yx5x Yes Yes No Auto-update iSM Installation yx4x, yx5x Yes Yes No Server Storage(S2D) Correlation yx3x, yx4x, yx5x Yes No No SMART monitoring on AHCI Mode yx3x, yx4x, yx5x Yes Yes Yes Documentation conventions for Dell EMC devices The following table lists the documentation conventions for Dell EMC devices. Table 2.
Table 2. Documentation Conventions for Dell EMC Devices (continued) yx5x servers yx4x servers yx3x servers yx2x servers T640 Coexistence of OpenManage Server Administrator and iDRAC Service Module In a system, both OpenManage Server Administrator (OMSA) and iDRAC Service Module can coexist.
○ ○ ○ ○ Serviceability Tools Support Utilities Virtualization Solutions 4. To view a document, click the required product and then click the required version. ● Using search engines: ○ Type the name and version of the document in the search box. Software license agreement The software license for the supported versions of the operating system of the iDRAC Service Module is on the installer. Read the license_agreement.txt file.
2 Preinstallation setup Ensure that you have access to the following before installing the iDRAC Service Module: ● ● ● ● ● ● yx2x or later PowerEdge servers. For the list of supported platforms, see Supported Platforms. Administrator privileges Read the installation instructions for the operating system. Read the applicable release notes and the Systems Software Support Matrix. Read the installation requirements to ensure that the system meets the minimum requirement.
Supported platforms on Linux operating systems The table lists the platforms that are supported by iDRAC Service Module 3.5.1 on Linux operating systems. Table 3. Supported platforms on Linux operating systems Dell EMC Devices Ubuntu 18.04.3 SLES 15 SP1 RHEL 8.2 RHEL 8.1 RHEL 7.8 RHEL 7.
Supported operating systems on Dell EMC Precision Rack System Table 6. Supported operating systems on Dell EMC Precision Rack System Dell EMC Devices Microsoft Windows 10 RS5 R7920 Yes System requirements ● One of the supported operating systems. For more information on supported operating systems, see Supported operating systems. ● Minimum 2 GB RAM. ● Minimum 512 MB of hard drive space. ● Administrator rights.
3 Installing iDRAC Service Module The iDRAC Service Module can be installed on any of the following operating systems: ● Supported versions of Microsoft Windows. ● Supported versions of Linux. ● Supported versions of VMware ESXi.
2. For Microsoft Windows OS, RDP to the server or go to the physical server console. For Linux OS, SSH to the host IP or go to the physical server console. 3. Find the mounted volume in your device list labeled SMINST, and click the appropriate script to start the installation. For Microsoft Windows OS, run the ISM-Win.bat script. For Linux OS, run the script ISM-Lx.sh from the shell. 4.
NOTE: By default, the In-Band SNMP Traps, iDRAC access via Host OS, SNMP Get via Host OS, SNMP Alerts via Host OS, Enable WSMan feature is not enabled. a. Choose the program features you want to install and click Next. The Lifecycle Controller Log Replication window is displayed. b. Specify the location where the LC logs are to be replicated. By default, Typical (Windows Logs/System) option is selected and the LC logs are replicated in the System group of the Windows Logs folder in the Event Viewer.
Table 7. Silent installation (continued) Locale Number Language 2052 Simplified Chinese Modifying the iDRAC Service Module components on Microsoft Windows operating systems To modify iDRAC Service Module components: 1. Browse to SYSMGMT > iSM > Windows, and then run iDRACSvcMod.msi. The iDRAC Service Module ˗ InstallShield Wizard is displayed. 2. Click Next. 3. Select Modify. 4. Enable or disable the features as required and then click Next. The Lifecycle Controller Log Replication window is displayed.
Uninstalling the iDRAC Service Module on Microsoft Windows operating systems The iDRAC Service Module can be uninstalled using two different methods: ● Unattended uninstall using the product ID ● Uninstalling using the add/remove feature Unattended uninstall using the product ID Type msiexec /x {0B2D9B70-DD98-4E31-8A85-228AB0636C94} /qn to uninstall the iDRAC Service Module using the product ID.
Table 8.
3. To install the selected features, enter I. If you do not want to continue the installation, enter q to quit. NOTE: After installing different features, you can also modify the same. NOTE: To know if iDRAC Service Module is installed on your Linux operating system, run the command /etc/init.d/ dcismeng status. If the iDRAC Service Module is installed and running, the status running is displayed. NOTE: Use the systemctl status dcismeng.service command instead of the init.
● Using uninstall script ● Using RPM command Uninstalling the iDRAC Service Module using the uninstall script The script used for uninstalling the iDRAC Service Module is dcism-setup.sh. Run the shell script and select d to uninstall the iDRAC Service Module. Uninstalling the iDRAC Service Module using the RPM command The iDRAC Service Module can be uninstalled using the RPM command rpm -e dcism in the command line. NOTE: Uninstalling iSM 3.
NOTE: On repository-based installs such as, VMware Update Manager (VUM) and apt-repository, all the features are not enabled by default. Download VMware vSphere Command Line Interface (vSphere CLI) from http://vmwaredepot.dell.com/DEL/ and install on the Microsoft Windows or Linux system. Using the vSphere CLI To install the iDRAC Service Module software on VMware ESXi using the vSphere CLI: 1. Copy the ISM-Dell-Web-3.5.1-.VIB-i-Live.zip file to a directory on the system. 2.
Upgrading iDRAC Service Module using VMware Update Manager To upgrade iDRAC Service Module using VMware Update Manager (VUM): 1. Install VMware vSphere 6.5 or later versions (vCenter Server, vSphere Client, and VMware vSphere Update Manager) on a supported Microsoft Windows operating system. 2. On the desktop, double-click VMware vSphere Client and login to vCenter Server. 3. Right-click vSphere Client host and click New Datacenter. 4. Right-click New Datacenter and click Add Host.
Using the Power CLI To install the iDRAC Service Module using Power CLI: 1. Install the supported PowerCLI of ESXi on the supported Microsoft Windows operating system. 2. Copy the ISM-Dell-Web-3.5.1-.VIB-i-Live.zip file to the ESXi host. 3. Navigate to the bin directory. 4. Run Connect-VIServer and provide the server and other credentials. 5. Log on to the ESXi host using supported vSphere CLI of ESXi 6.5 U3, ESXi 6.7 U3, ESXi 7.0, or ESXi 7.0 U1 and create a datastore. 6.
features that were enabled earlier will be available for the users. Whenever the System Configuration Lock Down Mode is turned off in iDRAC, then all the configuration operations can be performed. Support for iDRAC URI to get iSM installer Starting from yx4x servers, you can download the iSM web packs by using the following URL:https:// / software/ism/package.xml. You can download the packages only when iSM LC DUP is uploaded and available in iDRAC.
4 Configuring the iDRAC Service Module You can configure the iDRAC Service Module using the: ● iDRAC web interface ● RACADM CLI command ● WSMAN command Topics: • • • Configuring the iDRAC Service Module from iDRAC Web Interface Configuring the iDRAC Service Module from RACADM Configuring the iDRAC Service Module from WSMan Configuring the iDRAC Service Module from iDRAC Web Interface To use the iDRAC Service Module from the iDRAC Web interface for yx2x and yx3x servers, go to Overview > Server > Service
Configuring the iDRAC Service Module from WSMan The iDRAC Service Module can be accessed and configured through WSMan using the command To configure the iDRAC Service Module use winrm i ApplyAttributes http://schemas.dmtf.
5 iDRAC Service Module monitoring features The services provided are: ● ● ● ● ● ● ● ● ● ● ● ● OS information Lifecycle Controller Log replication into operating system Automatic system recovery Windows Management Instrumentation providers inclusive of storage data Prepare to remove NVMe SSD device Remote iDRAC hard reset iDRAC access via Host OS In-band support for iDRAC SNMP alerts Enable WSMan remotely Auto-updation of iDRAC Service Module FullPowerCycle Support Assist on the Box NOTE: FullPowerCycle and
Table 10. Attribute values and description Attribute Values Description Enabled The chipset SATA controllers are monitored for S.M.A.R.T events in real time. Disabled S.M.A.R.T monitoring is disabled. NA Chipset SATA controller is not available. NOTE: By default, the attribute is set to Enabled or NA when the configuration does not support chipset SATA. S.M.A.R.T monitoring is a feature that is installed through the iSM installer. User can install/modify the iSM installer package to disable the S.M.
Lifecycle Controller log replication into operating system Replicates the Lifecycle Controller (LC) logs to the OS logs. All events that have the OS Log option as the target (in the Alerts page or in the equivalent RACADM or WSMan interfaces) are replicated in the OS log. This process is similar to the System Event Log (SEL) replication performed by OpenManage Server Administrator. The default set of logs to be included in the OS logs are the same as the logs configured for SNMP traps/alerts.
Prepare to remove NVMe PCIe SSD device You can remove a Non-Volatile Memory Express (NVMe) Pheripheral Component Interconnect Express (PCIe) Solid State Device (SSD) without shutting down or rebooting the system. When you are removing a device, all the activities associated with the device must be stopped to prevent data loss. To prevent loss of data use the Prepare to Remove option, which stops all the device-associated background activities, after which you can remove the NVMe PCIe SSD physically.
received from the host OS than the traps received from iDRAC. When an SNMP alert is received from iDRAC, it would be challenging to determine the source of the alert as it is from an iDRAC IP and not the system IP. Starting from yx4x servers, all events that have the SNMP Trap option as the target (in the Alerts page or in the equivalent RACADM or WSMan interfaces) can be received as SNMP trap through the OS using the iDRAC Service Module. For iDRAC firmware 3.0.
● To do silent install or update, type––silent/-s. ● To uninstall the current version and install the update package available in LC, type ––force/-f. NOTE: This option overwrites the previous configuration. ● To get details about the update package version and the installed version of iDRAC Service Module, type ––get— version/-v. ● To download the iDRAC Service Module update packages to the user specified directory, type ––get—update/-g.
SupportAssist on the Box SupportAssist saves time and streamlines the technical support cases. A collection based on an event creates an open service request with SupportAssist. Scheduled collections helps to monitor and maintain your environment. These collections include the hardware data, RAID controller logs, OS, and Application Data. The features supported are : ● SupportAssist Registration — iSM supports the SupportAssist Registration. This is a one time activity.
NOTE: It might take few minutes to complete the registration process. After the registration is completed successfully, you will get a welcome email from SupportAssist to the email address being registered. 6. On the Summary tab, view the Registration ID and Automatic Features current setting details. 7. To close the SupportAssist Registration wizard, click Close. In the SupportAssist page, if you navigate to the bottom you can view the contact information. 8.
Anonymous Collection of Report Starting from iDRAC Service Module version 3.1, you can perform SupportAssist Collection/Upload without completing the registration process. Until iSM 3.0.2, the registration was a prerequisite to perform SupportAssist Collection. The supported iDRAC firmware for the anonymous collection is iDRAC 3.15.15.15 in the yx4x and yx5x servers and 2.60.60.60 in the yx3x servers.
Table 12. Windows Event Message mapped under LC logs monitored under S2D event correlation (continued) Windows Event Source - SourceID Windows Event Message Mapped on iDRAC LC Log StorageSpaces - Drivers - 301 All pool drives failed to read the configuration or returned corrupt data for storage space %1. As a result the storage space will not attach.
SupportAssist Collection Settings You can navigate in the SupportAssist dashboard page in iDRAC and click the Settings drop-down menu, to open the SupportAssist Collection Settings. Set Archive Directory You can store the copies of collections performed by SupportAssist into a directory. You must click the Set Archive Directory button to set the location.
prevailing licensing terms and conditions. Once you receive the email, you need to follow up and provide the service address to Dell EMC support for the delivery of the dispatched parts. NOTE: This feature is available only on Windows and Linux operating systems. iSM 3.4.0 or later supports filter and nonifilter OSApp Collection (OS and Application Data collection) on ESXi. This selection can be made from Collection Preferences.
The SNMP service on the iDRAC should be enabled. If it is not enabled, then iDRAC Service Module will enable and configure the SNMP service on the iDRAC. This feature can be enabled or disabled using any of the iDRAC interfaces or the installer. This feature supports SNMP v1 and v2 on Microsoft Windows Operating Systems and SNMP v1, v2 and v3 on Linux operating systems. NOTE: iDRAC GUI/Racadm commands for In-Band SNMP Get feature is applicable only for yx4x and later servers.
NOTE: Host OS users without administration rights cannot initiate iDRAC GUI launcher, if the iDRAC firmware version is 4.00.00.00 or later and the communication between iDRAC and iSM is not through IPv4. NOTE: See the iDRAC 9 User's Guide for specific privileges that are granted to a Read-only or Operator user account. Disable Single Sign-On into iDRAC from Host OS: The user can also opt to Disable this feature completely.
IPv6 communication between iSM and iDRAC over OS-BMC Passthru Starting iSM 3.4, iSM supports both IPv4 and IPv6 modes of communication. Once you install iSM, iSM service attempts to connect to iDRAC using IPv4 link-local address. If there is no IP address on the Host USBNIC interface, iSM tries to configure IPv4 address on the Host side. This USBNIC interface configuration on the Host OS from iSM is done only once.
NOTE: When Federal Information Processing Standards or FIPS mode is enabled either on the host operating system or iDRAC, the communication between iSM and iDRAC is not established.
6 Frequently asked questions This section lists some frequently asked questions about the iDRAC Service Module. iSM Communication with iDRAC switches from IPv4 protocol to IPv6 protocol iSM communication with iDRAC switches from IPv4 to IPv6 protocol, if user executes ifconfig iDRAC down.when iSM is communication to iDRAC through IPv4. Table 13.
Do I need to uninstall OpenManage Server Administrator before installing or running the iDRAC Service Module? No. Before you install or run the iDRAC Service Module, ensure that you have stopped the features of OpenManage Server Administrator that the iDRAC Service Module provide. NOTE: Uninstalling the OpenManage Server Administrator is not required.
Consult the User Guide for additional information about the supported servers. What should I do now? Before installing the iDRAC Service Module, ensure that the server or the system on which the iDRAC Service Module is to be installed is a yx2x or later server. Also make sure that you have a 64-bit system.
I used the remote iDRAC hard reset feature to reset the iDRAC. However, the IPMI is unresponsive and I am not able to troubleshoot. If you try to use the remote iDRAC hard reset feature on VMware ESXi operating system the IPMI drivers becomes unresponsive, because of this the iDRAC Service Module communication is stopped. You may have to reboot the server and load the IPMI driver again to resolve the issue.
I created a custom folder in Windows Event Viewer, but the LC logs are not replicated in my custom folder. What do I have to do now to replicate the LC logs? Ensure to close the Windows Event Viewer after creating the custom folder. Open the Windows Event Viewer again to view the replicated LC logs. I chose custom install option from the Graphical User Interface during iDRAC Service Module installation and disabled a feature, but I am not able to enable the feature using any of the other interfaces.
I am seeing 169.254.0.2 as the source IP address in the iDRAC SNMP trap received via iSM. How do I troubleshoot the issue? On Linux OS, the iDRAC SNMP traps received via Host OS displays the hostname or source IP address as 169.254.0.2 instead of the actual Host OS name or IP address. This is decided by the OS to populate the entry before rendering the trap to the user. I have configured OS to iDRAC pass-through to LOM and when I try to run dcism-sync, the update operation fails.
If dependent packages for iSM are not present on Ubuntu OS, then installation through OS DUP installs iSM in install +unpacked state. You can verify this using the below command: #dpkg -s dcism Package: dcism Status: install ok unpacked To fix this issue, run the command apt-get install -f. This will install dependent packages. When I install iSM 3.4.
7 Linux and Ubuntu installer packages The installer packages for the supported Linux and Ubuntu OS are as follows: Table 16. Linux installer packages Supported Linux Operating System Installer Packages Red Hat Enterprise Linux 7 SYSMGMT\iSM\linux\RHEL7\x86_64\dcism-3.5.1.el7.x86_64.rpm Red Hat Enterprise Linux 8 SYSMGMT\iSM\linux\RHEL8\x86_64\dcism-3.5.1.el8.x86_64.rpm Ubuntu 18 SYSMGMT\iSM\linux\Ubuntu18\x86_64\dcism-3.5.1.ubuntu18.deb SUSE Linux Enterprise Server 15 SYSMGMT\
8 Resources and support For more information about the features of this release, see the iDRAC Service Module 3.5.1 documentation. Latest Released Documents To access the latest version of iDRAC Service Module documents: ● Go to www.dell.com/ismmanuals.com. ● Click the version of iDRAC Service Module. ● Clicks Manuals & Documents. Accessing documents using direct links Table 17. Direct links for documents URL Product www.dell.com/idracmanuals iDRAC and Lifecycle Controller www.dell.
Identifying the series of your Dell EMC PowerEdge servers The PowerEdge series of servers from Dell EMC are divided into different categories based on their configuration. They are referred as YX2X, YX3X, YX4X, YX4XX, or YX5XX series of servers. The structure of the naming convention is described below: The letter Y denotes the character in the server model number. The character denotes the form factor of the server.
9 Contacting Dell EMC Dell EMC provides several online and telephone-based support and service options. Availability varies by country and product, and some services may not be available in your area. To contact Dell EMC for sales, technical support, or customer service issues, see www.dell.com/contactdell. If you do not have an active Internet connection, you can find contact information on your purchase invoice, packing slip, bill, or the product catalog.