Dell EMC iDRAC Service Module 3.6 User’s Guide March 2021 Rev.
Notes, cautions, and warnings NOTE: A NOTE indicates important information that helps you make better use of your product. CAUTION: A CAUTION indicates either potential damage to hardware or loss of data and tells you how to avoid the problem. WARNING: A WARNING indicates a potential for property damage, personal injury, or death. © 2020 -2021 Dell Inc. or its subsidiaries. All rights reserved. Dell, EMC, and other trademarks are trademarks of Dell Inc. or its subsidiaries.
Contents Chapter 1: Introduction................................................................................................................. 5 What’s new........................................................................................................................................................................... 5 Operating system supported features matrix...............................................................................................................
Chapter 4: Configuring iDRAC Servcie Module............................................................................ 25 Configuring iDRAC Service Module from iDRAC web interface............................................................................ 25 Configuring iDRAC Service Module from RACADM................................................................................................. 25 Configuring iDRAC Service Module from WS-Man...............................................................
1 Introduction The iDRAC Service Module (iSM) is a lightweight software module that you can install on yx2x or later PowerEdge servers. The iSM complements iDRAC interfaces—the user interface (UI), RACADM CLI, Redfish, and Web Services-Management (WS-Man) —with additional monitoring data. You can configure the iSM features from within the supported operating system depending on the features you install and the unique integration needs of your environment.
Table 1.
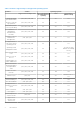
Table 1. Features supported by each supported operating system Features Servers Operating systems Supported PowerEdge series Microsoft Windows (including HyperV systems) Linux Virtualization (VMware ESXi) Single Sign-on (SSO) yx4x, yx5x Yes Yes NA Auto-update iSM installation yx4x, yx5x Yes Yes NA Server storage(S2D) correlation yx3x, yx4x, yx5x Yes NA NA S.M.A.R.T monitoring in AHCI Mode yx3x, yx4x, yx5x Yes Yes Yes S.M.A.R.
Table 2. Supported platforms on iDRAC Service Module yx5x PowerEdge servers yx4x PowerEdge servers yx3x PowerEdge servers R640 T630 yx2x PowerEdge servers R740 R740xd R940 T440 T640 Coexistence of OpenManage Server Administrator and iDRAC Service Module OpenManage Server Administrator (OMSA) and iDRAC Service Module (iSM) can coexist on a single system.
● Dell EMC support site: 1. Go to https://www.dell.com/support. 2. Click Browse all products. 3. From the All products page, click Software, and then click the required link. 4. Click the required product and then click the required version. Using search engines, type the name and version of the document in the search box. Other documents you may need You can access the following guides available at Dell.com/support.
2 Preinstallation setup Before installing iDRAC Service Module (iSM), ensure that you: ● ● ● ● ● ● Have access to yx2x or later PowerEdge servers. For the list of supported platforms, see Supported platforms. Have administrator privileges. Read the installation instructions for the operating system. Read the applicable release notes and the Systems Software Support Matrix. Read the installation requirements to ensure that the system meets the minimum requirement.
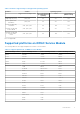
Table 3. Supported platforms on Linux operating systems Dell EMC devices Ubuntu 20.04 SUSE Linux Enterprise Server 15 SP2 Red Hat Enterprise Linux 8.3 Red Hat Enterprise Linux 7.9 yx5x PowerEdge servers Yes Yes Yes Yes yx4x PowerEdge servers Yes Yes Yes Yes yx3x PowerEdge servers No Yes Yes Yes yx2x PowerEdge servers No No No No NOTE: Limited yx3x PowerEdge servers support the Red Hat Enterprise Linux 8.0 operating system.
System requirements The following lists the system requirements: ● One of the supported operating systems. For more information about supported operating systems, see Supported operating systems. ● Minimum 2 GB RAM. ● Minimum 512 MB hard drive space. ● Administrator rights. ● The Remote Network Driver Interface Specification (RNDIS) capability for discovering a network device over USB.
3 Installing iDRAC Service Module The iDRAC Service Module (iSM) can be installed on any of the following operating systems: ● Microsoft Windows ● Linux ● VMware ESXi For the list of operating systems that are supported on iSM, see Supported operating systems.
You can perform a manual or an automated installation using appropriate command-line switches. You can install the iSM through the push mechanism using consoles like OpenManage Essentials (OME). NOTE: Perform the following steps only if a third-party PowerShell module path is missing in the operating system environment: 1. Browse to SYSMGMT > iSM > Windows, and then run iDRACSvcMod.msi. The iDRAC Service Module ˗ InstallShield Wizard is displayed. 2. Click Next. The License Agreement is displayed. 3.
● To replicate the Lifecycle Controller logs in an existing group or a custom folder, type msiexec /i iDRACSvcMod.msi CP_LCLOG_VIEW=“” ● To install the following feature using silent installation, type msiexec /i / iDRACSvcMod.msi /qn ADDLOCAL= NOTE: can be any feature that is mentioned in the following table. You can install more than one feature by using a comma.
4. Enable or disable features as required and then click Next. The Lifecycle Controller Log Replication window is displayed. 5. Specify the location where you need the LC log files to be replicated. By default, the Typical (Windows Logs/System) option is selected and the LC logs are replicated in the System group of the Windows Logs folder in the Event Viewer. 6. Click Next.
NOTE: You can also uninstall by selecting Uninstall after running the iDRACSvcMod.msi command. NOTE: You can view the iSM log files in the Application group of the Windows Logs folder in the Windows Event Viewer. Installing the iDRAC Service Module on VMware ESXi VMware ESXi is factory-installed on some systems. For a list of these systems, see the latest Systems Software Support Matrix at dell.com/support. iSM is available in a ZIP file for installing on systems running VMware ESXi.
For VMware ESXi 6.x: esxcli --server software vib install -d /var/log/vmware/ NOTE: The PL extension is not required if you are using the vSphere CLI on Linux. 4. Type the root username and password of the ESXi host when prompted. The command output displays a successful or a failed update. Installing iDRAC Service Module using VMware Update Manager To install iSM using VMware Update Manager (VUM): 1. Install VMware vSphere 6.
The offline bundle is displayed. 8. Click Baselines and Groups. 9. Click create from Baselines tab, mention baseline name and select Host Extension as baseline type. NOTE: Select the latest iDRAC Service Module version to create the baseline. Complete the rest as per instructions. 10. Click Admin View. 11. Click Add to Baseline (against the uploaded patch name) and select the baseline name that you have created in step 8. 12. Click Compliance view. Select the Update Manager tab.
7. Copy the ESXi ZIP file on ESXi 6.x U3, or ESXi 7.x host to /vmfs/volumes/ISM-Dell-Web-3.6.0.VIB-I directory. 8. Unzip the ZIP file in the above specified directory. 9. Run the following command in Power CLI: For ESXi 7.x: Install-VMHostPatch -VMHost - HostPath /vmfs/volumes/ name>/ISM-Dell-Web-3.6.0-.VIB-i/metadata.zip For ESXi 6.x: Install-VMHostPatch -VMHost
Linux install dependencies The following are the list of dependent packages and executables that need to be installed to complete the installation. Table 8.
3. To install the selected features, type I. If you do not want to continue the installation, type q to quit. NOTE: After installing different features, you can also modify the same. Linux operating systems that support systemd, run the command: systemctl status dcismeng.service. To verify if iSM is installed on your Linux operating system, run the command /etc/init.d/dcismeng status. If iSM is installed and running, the status running is displayed.
Uninstalling iDRAC Service Module using the uninstall script The command that is used for uninstalling the iSM is dcism-setup.sh. Run the shell command and select d to uninstall the iSM. To uninstall the iSM on silent mode, run ./setup.sh -d. Uninstalling iDRAC Service Module using the RPM command iSM can be uninstalled using the RPM command rpm -e dcism at the command line. NOTE: Uninstalling iSM 3.5 using the rpm -e dcism command does not uninstall the OSC package that is installed by iSM.
Red Hat Enterprise Linux web pack can be downloaded from https:///software/ism/OM-iSM-Dell-WebLX-3.6.0.tar.gz. Support for idrac.local and drac.local as iDRAC FQDN You can connect iSM to the iDRAC UI from the host operating system by typing drac.local or idrac.local in the web browser regardless of whether the host operating system supports multicast Domain Name System. NOTE: This feature is supported only over IPv4 address.
4 Configuring iDRAC Servcie Module iDRAC Service Module features can be configured remotely using various iDRAC interfaces such as UI, CLI, and WS-Man. Topics: • • • Configuring iDRAC Service Module from iDRAC web interface Configuring iDRAC Service Module from RACADM Configuring iDRAC Service Module from WS-Man Configuring iDRAC Service Module from iDRAC web interface Log in to iDRAC UI using the iDRAC IP address as a root or administrator user.
Configuring iDRAC Service Module from WS-Man iSM can be accessed and configured through WS-Man using the following command: winrm i ApplyAttributes http://schemas.dmtf.org/wbem/wscim/1/cim-schema/2/root/dcim/ DCIM_iDRACCardService? CreationClassName=DCIM_iDRACCardService+Name=DCIM:iDRACCardService+SystemCreationClassNam e=DCIM_ComputerSystem+SystemName=DCIM:ComputerSystem -u:root -p:calvin -r:https:///wsman -SkipCNcheck -SkipCAcheck -encoding:utf-8 -a:basic @{Target="iDRAC.Embedded.
5 Security configurations and compatibility iDRAC Service Module (iSM) is deployed with the default security configuration to protect against certain incidents like DLL hijacking, DLL tampering, information disclosure. This section briefs about the security configuration that iSM is installed with.
Authenticate DLLs and shared objects before loading The secure loading of libraries in iSM prevent the attacks such as DLL hijacking, DLL preloading, and binary planting. To secure iSM from such attacks, this feature will not: ● load dynamic libraries from any arbitrary path. ● load any unsigned library. This feature will do path verification and Authenticode signature check for DLLs and shared objects. And failure event is triggered in case of DLL and shared objects authentication failure.
6 iSM monitoring features Using iSM, you can monitor and manage aspects of server performance including power cycle, security, alerts, also specific device management to optimize and maintain system health and availability. NOTE: FullPowerCycle and SupportAssist on the Box are supported only on the yx4x and yx5x PowerEdge servers. Topics: • • • • • • • • • • • • • • • • • • • S.M.A.R.
If there is an operating system error due to a S.M.A.R.T error of the drive, then the event is not detected by the operating system. If hard drives are part of a storage pool, then iSM does not monitor the drives for S.M.A.R.T failures. On yx3x PowerEdge servers, S.M.A.R.T monitoring using software RAID is applicable only for the PDR22 event. NOTE: S.M.A.R.T also requires iDRAC9 firmware 4.00.00.00 or later to be installed.
1. Watchdog state: The default state is enabled when OMSA is not present, and when BIOS or operating system watchdog timer is disabled. 2. Watchdog timeout: The default value is 480 seconds. The minimum value is 60 seconds, and the maximum value is 720 seconds. 3. Watchdog timeout Recovery Action or Auto Recovery Action: The actions can be Powercycle, Power Off, Reboot or None.
IP or host irrespective of the connection between a device and an iDRAC dedicated network. This feature allows you to monitor the hardware or firmware even if the iDRAC is not connected to the network. You can select any of the following subfeatures to enable the iDRAC access via Host OS: ● Access via GUI, WS-Man, Redfish, Remote RACADM ● In-Band SNMP Traps ● Access via SNMP Get If you select iDRAC access via Host OS, all the subfeatures are selected by default.
Table 11. Enable WS-Man remotely Command Description Enable-iSMWSMANRemote —Status disable Disable remote WS-Man feature Enable-iSMWSMANRemote —Status enable — Forcereconfigure yes —Createselfsigncert yes — IPAddress Reconfigure the remote WS-Man feature NOTE: You must have a server authenticating certificate and an https protocol to work with this feature. Autoupdating iSM You can autoupdate iSM using the iDRAC autoupdate process.
lower power state, similar to removing and replacing AC. The flag can be cleared using the Cancel function anytime the system is in the S0 state prior to the system entering the S5 state. You can avail different options of FullPowerCycle on your system.
Service Request Summary In ● ● ● the Service Request Summary session, you can view the details of the following requests: Open Closed Submitted Support Assist Overview You can view the Service Contract details such as Contract Type and Expiration Date and the Automatic Collection settings details in this session. On the Service Requests tab, you can also view the list of requests that are created and the status, description, source, service request ID, date opened, the date closed, and so on.
Using iDRAC Service Module, you can reduce the number of manual steps required to collect the Dell Technical Support Report as the collection process is automated. Data to Collect SupportAssist automatically creates and sends a collection to Dell Technical Support when there is an event-based trigger or where you have configured a scheduled cadence.
software-defined alerts that are covered by operating system log files are merged, and the alerts are registered in the iDRAC Lifecycle log files. This feature is installed with the iSM package and will be enabled by default. You can change the preferences in the iDRAC settings. As part of the monitoring, iSM will audit the log files for potential failures and warnings. iSM will embed the SS correlation events on the host to an equivalent Lifecycle Controller event.
Table 14. Windows Event Message mapped under LC logs monitored under S2D event correlation Windows event source—SourceID Windows event message Mapped on iDRAC LC log StorageSpaces—drivers—304 One or more drives hosting data for storage space %1 have failed or are missing. As a result, at least one copy of data is not available. However, at least one copy of data is still available.
Run the following commands to enable or disable the Historic S.M.A.R.T log collection: For Windows run either one of the following commands: ● /shared/bin/dcismcfg.exe --collectperiodicsmartlog true/false ● /shared/bin/dcismcfg.
You can also specify the time for scheduled collection by selecting any of the following options from the Schedule automatic collections drop-down menu: ● Weekly ● Monthly ● Quarterly ● Never You can also set the automatic collection as recurring. To view the ProSupport Plus Recommendations report, select Yes from the Send ProSupport Plus Recommendations Report drop-down menu. After selecting your preferences, click Apply to save the changes.
Configuring the In-Band SNMP Get feature— Windows The In-Band SNMP Get feature allows you to query the system management data over the SNMP service on the host operating system. The host SNMP services must be enabled and configured as a prerequisite for this feature. The SNMP service on the iDRAC must be enabled. If it is not enabled, then iDRAC Service Module will enable and configure the SNMP service on the iDRAC. This feature can be enabled or disabled using any of the iDRAC interfaces or the installer.
● Read-Only account: An express or basic install of iSM installs iDRAC SSO launcher, enabling the administrator to log in to iDRAC as a Read-Only account. Besides the ability to view component health status, logs, and inventory, few additional SupportAssist operations that are required by the service personnel are enabled. ● Administrative account: Installing this feature by selecting the Administrator privilege enables the host operating system administrator to log in to iDRAC as an operator user.
IPv6 communication between iSM and iDRAC over OS-BMC Passthru The iSM supports both IPv4 and IPv6 modes of communication. After you install iSM, the iSM service attempts to connect to iDRAC using IPv4 link-local address. If there is no IP address on the host USBNIC interface, iSM tries to configure IPv4 address on the host side. This USBNIC interface configuration on the host operating system from iSM is done only once.
7 Frequently asked questions This section lists some frequently asked questions about the iDRAC Service Module (iSM). iSM communication with iDRAC switches from IPv4 protocol to IPv6 protocol iSM communication with iDRAC switches from IPv4 to IPv6 protocol, when you run ifconfig iDRAC down, when iSM is communicating with iDRAC through IPv4. Table 15.
Must I uninstall OpenManage Server Administrator before installing or running iSM? No. Before you install or run the iSM, however, ensure that you have stopped the features of OpenManage Server Administrator that the iSM provides. NOTE: Uninstalling the OpenManage Server Administrator is not required. How do I know that the iSM is running on my system? To verify that the iSM is installed on your system, ● On Windows: Run the service.msc command.
I see the message The iSM is unable to communicate with iDRAC using the operating system to iDRAC Pass-through channel in the operating system log files, even when the operating system to iDRAC Passthru over USBNIC is configured properly. Why do I get this message? iSM uses the operating system to iDRAC Pass-thru over USBNIC to establish communication with iDRAC. Sometimes, the communication is not established though the USBNIC interface is configured with correct IP endpoints.
Where do I find the Replicated LifeCycle log on my operating system? To view the replicated Lifecycle log files: Table 17. Operating system and it's location Operating System Location Microsoft Windows Event viewer > Windows Logs > . All the iSM Lifecycle log files are replicated under the source name iDRAC Service Module. Red Hat Enterprise Linux, and SUSE Linux /var/log/messages VMware ESXi /var/log/syslog.
custom folder. What do I have to do now to replicate the Lifecycle log files? Ensure that you close the Windows Event Viewer after creating the custom folder. Open the Windows Event Viewer again to view the replicated Lifecycle log files. I chose the custom install option from the Graphical User Interface during iSM installation and disabled a feature, but I am not able to enable the feature using any of the other interfaces.
I am seeing 169.254.0.2 as the source IP address in the iDRAC SNMP trap received through iSM. How do I troubleshoot the issue? On the Linux operating system, the iDRAC SNMP traps received through the host operating system displays the hostname or source IP address as 169.254.0.2 instead of the actual host operating system name or IP address. This is determined by the operating system to populate the entry before rendering the trap to the user.
console message saying "The system cannot find the file specified." After iSM is installed successfully, the logical partition SMINST is unmounted from the host operating system. This message appears if the BAT script is invoked from the SMINST partition itself. The installation is successful. No action is required by the user. If dependent packages for iSM are not present on Ubuntu operating system, then installation through operating system DUP installs iSM in install+unpacked state.
Alternatively, you can enable the OS-to-iDRAC Passthru in iDRAC in USBNIC mode and rerun the iDRAC launcher from the host operating system.
8 Linux and Ubuntu installer packages The installer packages for supported Linux and Ubuntu operating system are as follows: Table 18. Linux installer packages Supported Linux operating system Installer package Red Hat Enterprise Linux 7 SYSMGMT\iSM\linux\RHEL7\x86_64\dcism-3.6.0.el7.x86_64.rpm Red Hat Enterprise Linux 8 SYSMGMT\iSM\linux\RHEL8\x86_64\dcism-3.6.0.el8.x86_64.rpm Ubuntu 20 SYSMGMT\iSM\linux\Ubuntu18\x86_64\dcism-3.6.0.ubuntu20.
9 Resources and support For more information about the features of this release, see the documentation for iSM 3.6.0. Latest released documents To 1. 2. 3. access the latest version of iSM documents: Go to www.dell.com/ismmanuals. Click the version of iDRAC Service Module. Click Manuals & Documents. Accessing documents using direct links Table 19. Direct links for documents URL Product www.dell.com/idracmanuals iDRAC and Lifecycle Controller www.dell.
Identifying the series of your Dell EMC PowerEdge servers The PowerEdge series of servers from Dell EMC are divided into different categories based on their configuration. They are referred as YX2X, YX3X, YX4X, YX4XX, or YX5XX series of servers. The structure of the naming convention is described below: The letter Y denotes the character in the server model number. The character denotes the form factor of the server.
10 Contacting Dell EMC Dell EMC provides several online and telephone-based support and service options. Availability varies by country and product, and some services may not be available in your area. To contact Dell EMC for sales, technical support, or customer service issues, see www.dell.com/contact. If you do not have an active Internet connection, you can find contact information on your purchase invoice, packing slip, bill, or the product catalog.