Dell EMC iDRAC Service Module 3.
Notes, cautions, and warnings NOTE: A NOTE indicates important information that helps you make better use of your product. CAUTION: A CAUTION indicates either potential damage to hardware or loss of data and tells you how to avoid the problem. WARNING: A WARNING indicates a potential for property damage, personal injury, or death. © 2020 Dell Inc. or its subsidiaries. All rights reserved. Dell, EMC, and other trademarks are trademarks of Dell Inc. or its subsidiaries.
Contents 1 Introduction................................................................................................................................. 5 What’s New............................................................................................................................................................................5 Supported features—operating systems matrix...............................................................................................................
Support for idrac.local and drac.local as iDRAC FQDN............................................................................................ 23 4 Configuring the iDRAC Service Module........................................................................................ 24 Configuring the iDRAC Service Module from iDRAC Web Interface............................................................................24 Configuring the iDRAC Service Module from RACADM..............................................
1 Introduction This guide provides information and step-by-step instructions on how to install iDRAC Service Module on the supported operating systems. The Integrated Dell Remote Access Controller(iDRAC) Service Module is a lightweight optional software application that can be installed on yx2x servers or later. The iDRAC Service Module complements iDRAC interfaces – Graphical User Interface (GUI), RACADM CLI, Redfish, and Web Service Management (WSMan) with additional monitoring data.
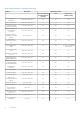
Table 1. Supported features—operating systems matrix Features Generation Operating Systems Microsoft Windows (including HyperV systems) Linux Virtualization (VMware ESXi) Sharing OS Information yx2x, yx3x, yx4x, yx5x Yes Yes Yes LC Log Replication yx2x, yx3x, yx4x, yx5x Yes Yes Yes Automatic System Recovery/Watchdog yx2x, yx3x, yx4x, yx5x Yes Yes Yes Windows Management Instrumentation Providers yx2x, yx3x, yx4x, yx5x Yes No No Prepare to Remove NVMe device through iDRAC.
Features Generation Operating Systems Server Storage(S2D) Correlation yx3x, yx4x, yx5x Yes No No SMART monitoring on AHCI Mode yx3x, yx4x, yx5x Yes Yes Yes Documentation conventions for Dell EMC devices The following table lists the documentation conventions for Dell EMC devices. Table 2.
Coexistence of OpenManage Server Administrator and iDRAC Service Module In a system, both OpenManage Server Administrator (OMSA) and iDRAC Service Module can coexist. If you enable the monitoring features during the iDRAC Service Module installation, and after the installation is complete, if the iDRAC Service Module detects the presence of OMSA, iDRAC Service Module disables the set of monitoring features that overlaps. At any time if the OMSA service stops, the iDRAC Service Module features are enabled.
Software license agreement The software license for the supported versions of the operating system of the iDRAC Service Module is on the installer. Read the license_agreement.txt file. By installing or copying any of the files on the media, you are agreeing to the terms in license_agreement.txt file. Other documents you may need You can access the following guides available at dell.com/support.
2 Preinstallation setup Ensure that you assess the following before installing the iDRAC Service Module: • • yx2x or later generation of PowerEdge servers. For the list of supported platforms, see Supported Platforms Suggested firmware version - • • • • • • For yx2x servers - 2.63.60.61 or later • For iDRAC 8 - 2.70.70.70 or later • For yx4x and yx5x servers with iDRAC 9 - 4.00.00.00 or later Administrator privileges Read the installation instructions for the operating system.
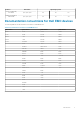
Supported platforms on Linux operating systems The table lists the platforms that are supported by iDRAC Service Module 3.5 on Linux operating systems. Supported platforms on Linux operating systems Dell EMC Devices Ubuntu 18.04.3 SLES 15 SP1 yx5x generation of PowerEdge Servers Yes Yes yx4x generation of PowerEdge Servers Yes Yes yx3x generation of PowerEdge Servers No Yes yx2x generation of PowerEdge Servers No No RHEL 8.1 RHEL 8.0 Yes Yes Yes Yes Yes Yes No No RHEL 7.
Supported operating systems on Dell EMC Precision Rack System The table lists the operating systems on Dell EMC Precision Rack System. Supported operating systems on Dell EMC Precision Rack System Dell EMC Devices Microsoft Windows 10 RS5 R7920 Yes System requirements • • • • • 12 One of the supported operating systems. For more information on supported operating systems, see Supported operating systems. Minimum 2 GB RAM. Minimum 512 MB of hard drive space. Administrator rights.
3 Installing iDRAC Service Module The iDRAC Service Module can be installed on any of the following operating systems: • • • Supported versions of Microsoft Windows. Supported versions of Linux. Supported versions of VMware ESXi.
3. Find the mounted volume in your device list labeled SMINST, and click the appropriate script to start the installation. For Microsoft Windows OS, run the ISM-Win.bat script. For Linux OS, run the script ISM-Lx.sh from the shell. 4. After the installation is complete, iDRAC shows that the Service Module as Installed and displays the last installed date. NOTE: The installer is available in the Host OS for 30 minutes.
b) Specify the location where the LC logs are to be replicated. By default, Typical (Windows Logs/System) option is selected and the LC logs are replicated in the System group of the Windows Logs folder in the Event Viewer. Click Next. NOTE: You can also create a custom group in the Application and Services Log folder by selecting the Custom option in the Lifecycle Controller Log Replication window.
The iDRAC Service Module ˗ InstallShield Wizard is displayed. 2. Click Next. 3. Select Modify. 4. Enable or disable the features as required and then click Next. The Lifecycle Controller Log Replication window is displayed. 5. Specify the location where you need the LC logs to be replicated. By default, Typical (Windows Logs/System) option is selected and the LC logs are replicated in the System group of the Windows Logs folder in the Event Viewer. Click Next.
Uninstalling using the add or remove feature The iDRAC Service Module can be uninstalled by using the Add or Remove option from the control panel. To do so, go to Start > Control Panel > Programs and Features . NOTE: You can also uninstall by selecting Uninstall after you run the iDRACSvcMod.msi. NOTE: You can view the iDRAC Service Module logs in the Application group of the Windows Logs folder in the Windows Event Viewer.
Executable Commands Package Name • install_initd aaa_base Red Hat Enterprise Linux • redhat-lsb-core SUSE Linux Enterprise Server • insserv Systemctl systemd curl libcurl openssl libssl Installing The iDRAC Service Module on Linux operating system 1. The available features that can be installed are displayed on the screen.
NOTE: When iSM 3.4.0 or later is installed on Linux operating systems, a gnome warning is observed similar to: "failed to rescan: Failed to parse /usr/share/applications/iDRACGUILauncher.desktop file: cannot process file of type application/x-desktop". Silent installation You can install the iDRAC Service Module silently in the background without a user console. This can be achieved by using setup.sh with parameters. The parameters that can be passed to use setup.sh are: Table 7.
Uninstalling the iDRAC Service Module using the dpkg command In Ubuntu operating system, iDRAC Service Module can be uninstalled using the dpkg command dpkg --remove dcism in the command line. User can uninstall the OSC package using dpkg --purge dcism-osc command. Installing the iDRAC Service Module on VMware ESXi VMware ESXi is factory-installed on some systems. For a list of these systems, see the latest Systems Software Support Matrix at dell.com/support. The iDRAC Service module is available as a .
3. Right-click vSphere Client host and click New Datacenter. 4. Right-click New Datacenter and click Add Host. Provide information for the ESXi server per online instructions. 5. Right-click the ESXi host added in step 4 and click Maintenance Mode. 6. From Plug-ins, select Manage Plug-ins > download VMware Update Manager. (The status is enabled if the download is successful.) Follow the instructions to install the VUM client. 7. Select the ESXi host.
NOTE: For more information about VMware Update Manager, see the VMware official website. NOTE: You can upgrade iDRAC Service Module from the VMware Update Manager repository https:// vmwaredepot.dell.com/. Using the Power CLI To install the iDRAC Service Module using Power CLI: 1. Install the supported PowerCLI of ESXi on the supported Microsoft Windows operating system. 2. Copy the ISM-Dell-Web-3.5.0-.VIB-i-Live.zip file to the ESXi host. 3. Navigate to the bin directory. 4.
Support for iDRAC URI to get iSM installer Starting from yx4x servers, you can download the iSM web packs by using the following URL:https:// /software/ism/ package.xml. You can download the packages only when iSM LC DUP is uploaded and available in iDRAC. You can also load it in iDRAC by enabling the iDRAC LC autoupdate. To download the packages, use the filename present in the xml to append to the URL. Example: PAGE 244 Configuring the iDRAC Service Module You can configure the iDRAC Service Module using the: • • • iDRAC web interface RACADM CLI command WSMAN command Topics: • • • Configuring the iDRAC Service Module from iDRAC Web Interface Configuring the iDRAC Service Module from RACADM Configuring the iDRAC Service Module from WSMan Configuring the iDRAC Service Module from iDRAC Web Interface To use the iDRAC Service Module from the iDRAC Web interface for yx2x and yx3x servers, go to Overview > Server > Service
Configuring the iDRAC Service Module from WSMan The iDRAC Service Module can be accessed and configured through WSMan using the command To configure the iDRAC Service Module use winrm i ApplyAttributes http://schemas.dmtf.
5 iDRAC Service Module monitoring features The services provided are: • • • • • • • • • • • • OS information Lifecycle Controller Log replication into operating system Automatic system recovery Windows Management Instrumentation providers inclusive of storage data Prepare to remove NVMe SSD device Remote iDRAC hard reset iDRAC access via Host OS In-band support for iDRAC SNMP alerts Enable WSMan remotely Auto-updation of iDRAC Service Module FullPowerCycle Support Assist on the Box NOTE: FullPowerCycle and
Disabled S.M.A.R.T monitoring is disabled. NA Chipset SATA controller is not available. NOTE: By default, the attribute is set to Enabled or NA when the configuration does not support chipset SATA. S.M.A.R.T monitoring is a feature that is installed through the iSM installer. User can install/modify the iSM installer package to disable the S.M.A.R.T monitoring feature. This feature is available on a Dell EMC supported SATA disk with S.M.A.R.T capabilities. If the disk is S.M.A.R.
is enabled only when the operating system watchdog timer is disabled. If OpenManage Server Administrator is installed, this monitoring feature is disabled to avoid duplicate watchdog timers. You can configure three parameters in this feature from iDRAC interfaces: 1. Watchdog state: The default state is enabled when OMSA is not present, and when BIOS or OS watchdog timer is disabled. 2. Watchdog timeout: The default value is 480 seconds. The minimum value is 60 seconds and the maximum value is 720 seconds.
If you select iDRAC access via Host OS, all the sub features are selected by default. If you want to select any one of the individual sub feature, you can select a particular feature and enable it. For more information, see iDRAC Access via Host OS whitepaper. Accessing iDRAC Via GUI, WSMan, Redfish, Remote RACADM Access via GUI, WSMan, Redfish, Remote RACADM feature enables a Host OS administrator to access iDRAC interfaces remotely via the Host OS.
Auto-updating iDRAC Service Module You can auto-update the iDRAC Service Module. It aims at making the update process easier for you, by integrating iSM update with the iDRAC auto-update process. NOTE: If iDRAC auto-update is enabled, iDRAC Service Module LC DUP must be updated to the latest version from dell.com/support. NOTE: You do not have to download the updates from support.dell.com. The updated iSM package is locally available in iDRAC.
Request message:"The Full Power Cycle operation is triggered by the server operating system (OS) user from the OS on date . However, the server components will be AC power cycled when the server is shut down". Cancel Message: "The Full Power Cycle operation is successfully cancelled by the server operating system (OS) user from the OS on date ". NOTE: FullPowerCycle feature is not available for ESXi operating systems.
3. On the Contact and Shipping Info tab, provide your primary contact information such as First Name, Last Name, Phone Number, Alternate Number, Email Address, Company Name, Address Line 1, Address Line 2, City, State, Zip Code, and Country. NOTE: You can add the secondary contact information, by clicking the Add Secondary Contact Information option. NOTE: To continue with the registration, you must fill all the mandatory information required. 4.
NOTE: The OS and Application Data collection on ESXi is supported only by yx4x and later servers. Anonymous Collection of Report Starting from iDRAC Service Module version 3.1, you can perform SupportAssist Collection/Upload without completing the registration process. Until iSM 3.0.2, the registration was a prerequisite to perform SupportAssist Collection. The supported iDRAC firmware for the anonymous collection is iDRAC 3.15.15.15 in the yx4x and yx5x servers and 2.60.60.60 in the yx3x servers.
StorageSpaces - Drivers - 301 All pool drives failed to read the configuration or returned corrupt data for storage space %1. As a result the storage space will not attach. Return Code: %2 MessageID : SDS0007 StorageSpaces - Drivers - 302 Majority of the pool drives hosting space meta-data for storage space %1 failed a space meta-data update, which caused the storage pool to go in failed state.
Identification Information You can include the identification information in the data sent by clicking the drop-down menu and selecting any of the following options: • • No Yes Email Notifications You can select the preference to receive email notifications when a new support case is opened or a new SupportAssist collection is uploaded. From the Receive Email Notifications drop-down menu, select any of the following: • • Yes No You can also select the language preference.
For installing the in-band SNMP get feature through setup.sh installer complete the following tasks: 1. Start the iSM installation using the setup.sh script by executing ./setup.sh 2. Review the license agreement and accept to proceed with the installation. 3. On the next page, the list of features are shown. Select the Access via SNMP Get sub option under the iDRAC access via Host OS feature by entering 4.c , and press Enter. 4.
NOTE: When the iDRAC Service Module is disabled, the iDRAC GUI Launcher icon is also disabled. NOTE: If the default browser proxy is set to use the system proxy, then you will see a failure to launch the iDRAC GUI. You have to copy the IP address from the address bar and enter it in the exception list of 'proxy settings'. Single sign-on (SSO) to iDRAC GUI from Host OS administrators desktop Overview Starting iSM 3.5, host administrators have an option to launch iDRAC from within the host OS using IPv6.
NOTE: When Local Configuration using Settings or Local Configuration using RACADM is disabled in iDRAC, iDRAC login screen is displayed. NOTE: When an iDRAC SSO session is active on the Host OS, closing the related terminal closes the browser with SSO session as well. NOTE: Ensure to invoke iDRAC GUI Launcher from a GUI supported and capable interface. NOTE: Single sign-on feature over IPv4 does not work when the user modifies the third octet in the USB-NIC IP Address.
• • • • InBand iDRAC Access InBand SNMP Get idrac.local and drac.local Auto-update of iSM Enhanced security between iSM and iDRAC communication using TLS protocol Starting iSM 3.4, the data communication between iSM and iDRAC happens through TLS protected USBNIC INET sockets. This ensures protection of all the data that transports from iDRAC to iSM over USBNIC. iSM and iDRAC use self-signed certificates to control Authentication. The self-signed certificates have 10 years of validity.
6 Frequently asked questions This section lists some frequently asked questions about the iDRAC Service Module. iSM Communication with iDRAC switches from IPv4 protocol to IPv6 protocol iSM communication with iDRAC switches from IPv4 to IPv6 protocol, if user executes ifconfig iDRAC down.when iSM is communication to iDRAC through IPv4.
an entry in Lifecycle Log "iSM0050: iDRAC is unable to communicate with iSM" This may occur if iSM was installed or upgraded to version 3.4.0 or later before iDRAC was upgraded to version 3.30.30 or later. This may also result from resetting the iDRAC's configuration or using the Repurpose or Retire System feature of Lifecycle Controller. Only during iSM installation are TLS certificates negotiated with iDRAC for secure communication.
supported server. Consult the User Guide for additional information about the supported servers. What should I do now? Before installing the iDRAC Service Module, ensure that the server or the system on which the iDRAC Service Module is to be installed is a yx2x or later server. Also make sure that you have a 64-bit system.
I used the remote iDRAC hard reset feature to reset the iDRAC. However, the IPMI is unresponsive and I am not able to troubleshoot. If you try to use the remote iDRAC hard reset feature on VMware ESXi operating system the IPMI drivers becomes unresponsive, because of this the iDRAC Service Module communication is stopped. You may have to reboot the server and load the IPMI driver again to resolve the issue.
What are the Linux-dependent packages or executables I should install while completing the Linux installation? To see the list of Linux-dependent packages, see Linux dependencies. I created a custom folder in Windows Event Viewer, but the LC logs are not replicated in my custom folder. What do I have to do now to replicate the LC logs? Ensure to close the Windows Event Viewer after creating the custom folder. Open the Windows Event Viewer again to view the replicated LC logs.
reset operation, such as racadm racresetcfg. How do I troubleshoot the issue? Ensure that the OS to iDRAC passthru channel is enabled. By default, it is disabled in factory mode. To enable the OS to IDRAC passthru channel on iDRAC, use the following command, racadm set idrac.os-bmc.adminstate 1. I am seeing 169.254.0.2 as the source IP address in the iDRAC SNMP trap received via iSM.
After installing iSM using the Batch file ISM_Win.BAT from the iDRAC exposed logical partition "SMINST" on Microsoft Windows OS, I see a console message saying "The system cannot find the file specified." After iSM is installed successfully, the logical partition SMINST gets unmounted from the Host OS. This message appears if the BAT script is invoked from the SMINST partition itself. The installation is successful. No action is required by the user.
In case, the OS-to-iDRAC Passthru is disabled in iDRAC, the user will see a blank terminal when iDRAC GUI is launched from the Linux OS such as RHEL 7.6 and RHEL 8.0. Select y or Y, and press Enter to indicate configuration of USBNIC interface on the Host OS. Alternatively, you can enable the OS-to-iDRAC Passthru in iDRAC in USBNIC mode and re-run the iDRAC launcher from the Host OS.
7 Linux and Ubuntu installer packages The installer packages for the supported Linux and Ubuntu OS are as follows: Table 11. Linux installer packages Supported Linux Operating System Installer Packages Red Hat Enterprise Linux 7 SYSMGMT\iSM\linux\RHEL7\x86_64\dcism-3.5.0.el7.x86_64.rpm Red Hat Enterprise Linux 8 SYSMGMT\iSM\linux\RHEL8\x86_64\dcism-3.5.0.el8.x86_64.rpm Ubuntu 18 SYSMGMT\iSM\linux\Ubuntu18\x86_64\dcism-3.5.0.ubuntu18.deb SUSE Linux Enterprise Server 15 SYSMGMT\i