Dell EMC iDRAC Service Module 3.4.1 User’s Guide June 2020 Rev.
Notes, cautions, and warnings NOTE: A NOTE indicates important information that helps you make better use of your product. CAUTION: A CAUTION indicates either potential damage to hardware or loss of data and tells you how to avoid the problem. WARNING: A WARNING indicates a potential for property damage, personal injury, or death. © 2019 Dell Inc. or its subsidiaries. All rights reserved. Dell, EMC, and other trademarks are trademarks of Dell Inc. or its subsidiaries.
Contents Chapter 1: Introduction................................................................................................................. 5 What’s New.......................................................................................................................................................................... 5 Supported features—operating systems matrix.........................................................................................................
Chapter 4: Configuring the iDRAC Service Module...................................................................... 25 Configuring the iDRAC Service Module from iDRAC Web Interface....................................................................25 Configuring the iDRAC Service Module from RACADM..........................................................................................25 Configuring the iDRAC Service Module from WSMan.......................................................................
1 Introduction This guide provides information and step-by-step instructions on how to install iDRAC Service Module on the supported operating systems. The Integrated Dell Remote Access Controller(iDRAC) Service Module is a lightweight optional software application that can be installed on yx3x servers or later. The iDRAC Service Module complements iDRAC interfaces – Graphical User Interface (GUI), RACADM CLI, Redfish, and Web Service Management (WSMan) with additional monitoring data.
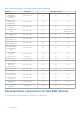
Table 1. Supported features—operating systems matrix (continued) Features Generation Operating Systems Windows Management Instrumentation Providers yx3x, yx4x, yx5x Yes No No Prepare to Remove NVMe device through iDRAC.
Table 2.
● Support site dell.com/support Downloading iDRAC Service Module You can download the iDRAC Service Module software from dell.com/support. In the support site, click Browse all products > Software > Enterprise Systems Management > Remote Enterprise Systems Management > iDRAC Service Module. Before downloading iSM, select the required version and then click Drivers & downloads.
● The Dell Update Packages User's Guide provides information about obtaining and using Dell Update Packages as part of your system update strategy. ● The Dell Event Messages Reference Guide provides information about the event and error information that is generated by firmware and other agents that monitor system components. ● The Dell Lifecycle Controller 2 Web Services Interface Guide provides information and examples for using the Web services for Management (WSMan) Management protocol.
2 Preinstallation setup Ensure that you assess the following before installing the iDRAC Service Module: ● yx3x servers or later. For the list of supported platforms, see Supported Platforms ● Minimum firmware version— ○ For iDRAC 8 - 2.70.70.70 ○ For yx4x servers with iDRAC 9 - 3.36.36.36 ○ For yx5x servers with iDRAC 9 - 3.40.40.40 (For R6515 and R7515) and 3.42.42.42 (For R6525 and C6525) ● Administrator privileges. ● Read the installation instructions for the operating system.
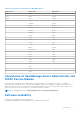
Supported platforms on Linux operating systems The table lists the platforms that are supported by iDRAC Service Module 3.4 on Linux operating systems. Table 3. Supported platforms on Linux operating systems Dell Systems SLES 15 Ubuntu 18.04.2 RHEL 7.
Table 3. Supported platforms on Linux operating systems (continued) Dell Systems SLES 15 Ubuntu 18.04.2 RHEL 7.
Table 3. Supported platforms on Linux operating systems (continued) Dell Systems SLES 15 Ubuntu 18.04.2 RHEL 7.6 T620 Yes No No Supported platforms iDRAC Service Module 3.4.1 supports yx3x, yx4x and yx5x servers. Supported platforms on Microsoft Windows operating systems The table lists the platforms that are supported by iDRAC Service Module 3.4.1 on Microsoft Windows operating systems. Table 4.
3 Installing iDRAC Service Module The iDRAC Service Module can be installed in any of the following operating systems: ● Microsoft Windows operating systems. ● Supported Linux operating systems. ● VMware ESXi.
2. For Microsoft Windows OS, RDP to the server or go to the physical server console. For Linux OS, SSH to the host IP or go to the physical server console. 3. Find the mounted volume in your device list labeled SMINST, and click the appropriate script to start the installation. For Microsoft Windows OS, run the ISM-Win.bat script. For Linux OS, run the script ISM-Lx.sh from the shell. 4.
a. Choose the program features you want to install and click Next. The Lifecycle Controller Log Replication window is displayed. b. Specify the location where the LC logs are to be replicated. By default, Typical (Windows Logs/System) option is selected and the LC logs are replicated in the System group of the Windows Logs folder in the Event Viewer. Click Next.
Modifying the iDRAC Service Module components on Microsoft Windows operating systems To modify iDRAC Service Module components: 1. Browse to SYSMGMT > iSM > Windows, and then run iDRACSvcMod.msi. The iDRAC Service Module ˗ InstallShield Wizard is displayed. 2. Click Next. 3. Select Modify. 4. Enable or disable the features as required and then click Next. The Lifecycle Controller Log Replication window is displayed. 5. Specify the location where you need the LC logs to be replicated.
Unattended uninstall using the product ID Type msiexec /x {BE762CE4-B8D4-4BFC-BA12-16360808DCF3} /qn to uninstall the iDRAC Service Module using the product ID. Uninstalling using the add or remove feature The iDRAC Service Module can be uninstalled by using the Add or Remove option from the control panel. To do so, go to Start > Control Panel > Programs and Features . NOTE: You can also uninstall by selecting Uninstall after you run the iDRACSvcMod.msi.
Table 7. Linux install dependency (continued) Executable Commands Package Name find findutils Shell Script commands bash ifconfig net-tools ping Iputils chkconfig Red Hat Enterprise Linux ● chkconfig install_initd Red Hat Enterprise Linux ● redhat-lsb-core Systemctl systemd curl libcurl openssl libssl Installing The iDRAC Service Module on Linux operating system 1. The available features that can be installed are displayed on the screen.
NOTE: if OpenManage Server Administrator (OMSA) is already installed on 1311, the same port could not be utilized for iDRAC Service module. NOTE: When iSM 3.4.0 or later is installed on Linux operating systems, a gnome warning is observed similar to: "failed to rescan: Failed to parse /usr/share/applications/iDRACGUILauncher.desktop file: cannot process file of type application/ x-desktop". Silent installation You can install the iDRAC Service Module silently in the background without a user console.
Uninstalling the iDRAC Service Module using the RPM command The iDRAC Service Module can be uninstalled using the RPM command rpm -e dcism in the command line. Installing the iDRAC Service Module on VMware ESXi VMware ESXi is factory-installed on some systems. For a list of these systems, see the latest Systems Software Support Matrix at dell.com/support. The iDRAC Service module is available as a .zip file for installing on systems running VMware ESXi operating system. The .
7. Select the ESXi host. Click Update Manager > Admin view > Patch Repository > Import Patches and follow the online instructions to upload the patch successfully. The offline bundle is displayed. 8. Click Baselines and Groups. 9. Click create from Baselines tab, mention baseline name and select Host Extension as baseline type. Complete the rest as per instructions. 10. Click Admin View. 11. Click Add to Baseline (against the uploaded patch name) and select the baseline name that you have created in step 8.
Using the Power CLI To install the iDRAC Service Module using Power CLI: 1. Install the supported PowerCLI of ESXi on the supported Microsoft Windows operating system. 2. Copy the ISM-Dell-Web-3.4.1-.VIB-i-Live.zip file to the ESXi host. 3. Navigate to the bin directory. 4. Run Connect-VIServer and provide the server and other credentials. 5. Log on to the ESXi host using supported vSphere CLI of ESXi host and create a datastore. 6. Create a folder ISM-Dell-Web-3.4.1-.
Support for iDRAC URI to get iSM installer Starting from yx4x servers, you can download the iSM web packs by using the following URL:https:// / software/ism/package.xml. You can download the packages only when iSM LC DUP is uploaded and available in iDRAC. You can also load it in iDRAC by enabling the iDRAC LC autoupdate. To download the packages, use the filename present in the xml to append to the URL. Example: PAGE 254 Configuring the iDRAC Service Module You can configure the iDRAC Service Module using the: ● iDRAC web interface ● RACADM CLI command ● WSMAN command Topics: • • • Configuring the iDRAC Service Module from iDRAC Web Interface Configuring the iDRAC Service Module from RACADM Configuring the iDRAC Service Module from WSMan Configuring the iDRAC Service Module from iDRAC Web Interface To use the iDRAC Service Module from the iDRAC Web interface for yx3x servers, go to Overview > Server > Service Module.
CreationClassName=DCIM_iDRACCardService+Name=DCIM:iDRACCardService+SystemCreationClassName= DCIM_ComputerSystem+SystemName=DCIM:ComputerSystem -u:root -p:calvin -r:https:///wsman -SkipCNcheck -SkipCAcheck -encoding:utf-8 -a:basic @{Target="iDRAC.Embedded.1";AttributeName="AgentLite.
5 iDRAC Service Module monitoring features The services provided are: ● OS information ● Lifecycle Controller Log replication into operating system ● Automatic system recovery ● Windows Management Instrumentation providers inclusive of storage data ● Prepare to remove NVMe SSD device ● Remote iDRAC hard reset ● iDRAC access via Host OS ● In-band support for iDRAC SNMP alerts ● Enable WSMan remotely ● Auto-updation of iDRAC Service Module ● FullPowerCycle ● Support Assist on the Box NOTE: FullPowerCycle and
NOTE: If the network configuration on the Host OS is configured using netplan, then iSM will be unable to monitor the network interfaces' change in states, DHCP configuration of an interface for instance. Hence you may not be able to view the change of the Host OS network interface details in the iDRAC interfaces. Lifecycle Controller log replication into operating system Replicates the Lifecycle Controller (LC) logs to the OS logs.
Prepare to remove NVMe PCIe SSD device You can remove a Non-Volatile Memory Express (NVMe) Pheripheral Component Interconnect Express (PCIe) Solid State Device (SSD) without shutting down or rebooting the system. When you are removing a device, all the activities associated with the device must be stopped to prevent data loss. To prevent loss of data use the Prepare to Remove option, which stops all the device-associated background activities, after which you can remove the NVMe PCIe SSD physically.
received from the host OS than the traps received from iDRAC. When an SNMP alert is received from iDRAC, it would be challenging to determine the source of the alert as it is from an iDRAC IP and not the system IP. Starting from yx4x servers, all events that have the SNMP Trap option as the target (in the Alerts page or in the equivalent RACADM or WSMan interfaces) can be received as SNMP trap through the OS using the iDRAC Service Module. For iDRAC firmware 3.0.
● To do silent install or update, type––silent/-s. ● To uninstall the current version and install the update package available in LC, type ––force/-f. NOTE: This option overwrites the previous configuration. ● To get details about the update package version and the installed version of iDRAC Service Module, type ––get— version/-v. ● To download the iDRAC Service Module update packages to the user specified directory, type ––get—update/-g.
SupportAssist on the Box SupportAssist saves time and streamlines the technical support cases. A collection based on an event creates an open service request with SupportAssist. Scheduled collections helps to monitor and maintain your environment. These collections include the hardware data, RAID controller logs, OS, and Application Data. The features supported are : ● SupportAssist Registration — iSM supports the SupportAssist Registration. This is a one time activity.
6. On the Summary tab, view the Registration ID and Automatic Features current setting details. 7. To close the SupportAssist Registration wizard, click Close. In the SupportAssist page, if you navigate to the bottom you can view the contact information. 8. Click the Edit option to make any changes in the primary or secondary contact information. Click Save to apply the changes.
The supported iDRAC firmware for the anonymous collection is iDRAC 3.15.15.15 in the yx4x and yx5x servers and 2.60.60.60 in the yx3x servers. NOTE: You can perform Anonymous SupportAssist Collection upload using blank username or password in proxy environment on the yx3x servers. SupportAssist Collection Settings You can navigate in the SupportAssist dashboard page in iDRAC and click the Settings drop-down menu, to open the SupportAssist Collection Settings.
iSM SupportAssist Disk Auto Dispatch Starting iSM 3.4, if the server hits one of the following SNMP events: PDR16 and PDR63, then you get a recommendation from Dell EMC support via email regarding the dispatch of the predictive failure or a bad disk block such as SSDs subject to the prevailing licensing terms and conditions. Once you receive the email, you need to follow up and provide the service address to Dell EMC support for the delivery of the dispatched parts.
Enabling the In-band SNMP Get feature—Windows The In-band SNMP Get feature allows you to query the system management data over the SNMP service on the host operating system. The host SNMP services should be enabled and configured s a prerequisite for this feature. The SNMP service on the iDRAC should be enabled. If it is not enabled, then iDRAC Service Module will enable and configure the SNMP service on the iDRAC. This feature can be enabled or disabled using any of the iDRAC interfaces or the installer.
NOTE: When browsers are not installed on the Host OS or Invoke-iDRACLauncher is not able to launch iDRAC due to browser issue, a session is created in iDRAC already. An iDRAC admin user can log in to iDRAC and delete the sessions. Following are the iDRAC GUI Launcher behavior with different OS-to-iDRAC Passthrustates: ● When OS-to-iDRAC Passthru setting in iDRAC is disabled, Invoke-iDRACLauncher prompts if you want to enable OSBMCPassthru in USBNIC mode.
NOTE: When iDRAC USBNIC is already configured with only IPv6 address on the Host OS and then iSM is installed on the Host, then iSM communication with iDRAC will start using IPv4 protocol. Unsupported features with IPv6 protocol The features that are not supported when iSM is configured with IPv6 protocol and IPv4 configuration is not available on the USBNIC interface are: ● ● ● ● ● InBand iDRAC Access iDRAC GUI Launcher iDRAC SSO Launcher idrac.local and drac.
6 Frequently asked questions This section lists some frequently asked questions about the iDRAC Service Module. Do I need to uninstall OpenManage Server Administrator before installing or running the iDRAC Service Module? No. Before you install or run the iDRAC Service Module, ensure that you have stopped the features of OpenManage Server Administrator that the iDRAC Service Module provide. NOTE: Uninstalling the OpenManage Server Administrator is not required.
Consult the User Guide for additional information about the supported servers. What should I do now? Before installing the iDRAC Service Module, ensure that the server or the system on which the iDRAC Service Module is to be installed is a yx3x or later server. Also make sure that you have a 64-bit system.
I used the remote iDRAC hard reset feature to reset the iDRAC. However, the IPMI is unresponsive and I am not able to troubleshoot. If you try to use the remote iDRAC hard reset feature on VMware ESXi 5.5 U3 or ESXi 6.0 U1, the IPMI drivers becomes unresponsive, because of this the iDRAC Service Module communication is stopped. You may have to reboot the server and load the IPMI driver again to resolve the issue.
I created a custom folder in Windows Event Viewer, but the LC logs are not replicated in my custom folder. What do I have to do now to replicate the LC logs? Ensure to close the Windows Event Viewer after creating the custom folder. Open the Windows Event Viewer again to view the replicated LC logs. I chose custom install option from the Graphical User Interface during iDRAC Service Module installation and disabled a feature, but I am not able to enable the feature using any of the other interfaces.
I am seeing 169.254.0.2 as the source IP address in the iDRAC SNMP trap received via iSM. How do I troubleshoot the issue? On Linux OS, the iDRAC SNMP traps received via Host OS displays the hostname or source IP address as 169.254.0.2 instead of the actual Host OS name or IP address. This is decided by the OS to populate the entry before rendering the trap to the user. I have configured OS to iDRAC pass-through to LOM and when I try to run dcism-sync, the update operation fails.
Windows OS, I see a console message saying "The system cannot find the file specified." After iSM is installed successfully, the logical partition SMINST gets unmounted from the Host OS. This message appears if the BAT script is invoked from the SMINST partition itself. The installation is successful. No action is required by the user. If dependent packages for iSM are not present on Ubuntu OS, then installation through OS DUP installs iSM in install+unpacked state.
7 Linux and Ubuntu installer packages The installer packages for the supported Linux and Ubuntu OS are as follows: Table 12. Linux installer packages Supported Linux Operating System Installer Packages Red Hat Enterprise Linux 7 SYSMGMT\iSM\linux\RHEL7\x86_64\dcism-3.4.1.el7.x86_64.rpm Red Hat Enterprise Linux 8 SYSMGMT\iSM\linux\RHEL8\x86_64\dcism-3.4.1.el8.x86_64.rpm Ubuntu 18 SYSMGMT\iSM\linux\Ubuntu18\x86_64\dcism-3.4.1.ubuntu18.