
Users Guide
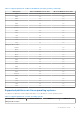


Table Of Contents
- Dell EMC iDRAC Service Module 3.4 User’s Guide
- Contents
- Introduction
- Preinstallation setup
- Installing iDRAC Service Module
- Initial installation of iDRAC Service Module through iDRAC for Windows
- Initial installation of iSM through iDRAC Express
- Initial installation of iDRAC Service Module via iDRAC for Linux
- Installing iDRAC Service Module on Microsoft Windows operating systems
- Installing iDRAC Service Module on supported Linux operating systems
- Installing the iDRAC Service Module on VMware ESXi
- Installing iDRAC Service Module when the System Configuration Lock Down Mode is enabled
- Configuring the iDRAC Service Module
- iDRAC Service Module monitoring features
- Operating system information
- Lifecycle Controller log replication into operating system
- Automatic System Recovery
- Windows Management Instrumentation Providers
- Prepare to remove NVMe PCIe SSD device
- Remote iDRAC hard reset
- iDRAC access via Host OS
- Accessing iDRAC Via GUI, WS-man, Redfish, Remote RACADM
- In-band support for iDRAC SNMP alerts
- Enable WSMAN Remotely
- Auto-updating iDRAC Service Module
- FullPowerCycle
- SupportAssist on the Box
- Enabling the In-band SNMP Get feature—Linux
- Enabling the In-band SNMP Get feature—Windows
- iDRAC GUI Launcher
- Single sign-on (SSO) to iDRAC GUI from Host OS administrators desktop
- IPv6 communication between iSM and iDRAC over OS-BMC Passthru
- Enhanced security between iSM and iDRAC communication using TLS protocol
- Frequently asked questions
- Linux and Ubuntu installer packages

a. Choose the program features you want to install and click Next.
The Lifecycle Controller Log Replication window is displayed.
b. Specify the location where the LC logs are to be replicated. By default, Typical (Windows Logs/System) option is
selected and the LC logs are replicated in the System group of the Windows Logs folder in the Event Viewer. Click
Next.
NOTE: You can also create a custom group in the Application and Services Log folder by selecting the Custom
option in the Lifecycle Controller Log Replication window.
c. Select the authentication mode to enable WSMAN remotely and also choose to install a self-signed certificate if the
authentication certificate is not found. Provide a WINRM port number to establish the communication. By default, the
port number is 5986.
5. Provide a unique port number between 1024 and 65535 to be used by iDRAC access via Host OS feature. If you do not
provide a port number, port number 1266 or a previously configured port (if any) is assigned by default.
The Ready to Install the Program is displayed.
6. Click Install to continue with the installation.
You can also click Back to change the preferences.
NOTE: At times, although the iDRAC Service Module is installed, you may receive a message "The communication
between iDRAC Service Module and iDRAC could not be established. Please refer to the latest iDRAC Service Module
installation guide." in the Host OS logs. For more information on troubleshooting, refer Frequently asked questions.
The iDRAC Service Module is successfully installed.
7. Click Finish.
NOTE: On Microsoft Windows 2016 operating system, the iDRAC USB NIC device description is displayed as “Remote
NDIS Compatible Device”. No action is required from the user.
Silent installation
You can install the iDRAC Service Module using silent installation in the background without any interactive console.
● To install iDRAC Service Module using silent installation, type msiexec /i iDRACSvcMod.msi /qn on the command
prompt.
● To generate the install logs, type msiexec /i iDRACSvcMod.msi /L*V <logname with the path>
● To replicate the LC logs in an existing group or a custom folder, type msiexec /i iDRACSvcMod.msi
CP_LCLOG_VIEW=“<existing group name or custom folder name>”
● To install iDRAC access via Host OS iDRAC feature using silent installation, type msiexec /i <location of the
installer file>/iDRACSvcMod.msi ADDLOCAL=IBIA /qn
● To install WSMAN, type msiexec.exe /i iDRACSvcMod.msi ADDLOCAL="WSMAN_Enablement"
CP_SELF_SIGN_CERT="2" CP_WSMAN_PORT="1234" CP_CERTIFICATE="1" CP_NEGOTIATE="1" /qn
● To view the user interface in the supported languages, type msiexec /i iDRACSvcMod.msi TRANSFORMS= <locale
number>.mst, where locale number is:
Table 6. Silent installation
Locale Number Language
1031 German
1033 English (US)
1034 Spanish
1036 French
1041 Japanese
2052 Simplified Chinese
Installing iDRAC Service Module 19