iDRAC Service Module 2.
Notes, cautions, and warnings NOTE: A NOTE indicates important information that helps you make better use of your product. CAUTION: A CAUTION indicates either potential damage to hardware or loss of data and tells you how to avoid the problem. WARNING: A WARNING indicates a potential for property damage, personal injury, or death. Copyright © 2017 Dell Inc. or its subsidiaries. All rights reserved. Dell, EMC, and other trademarks are trademarks of Dell Inc. or its subsidiaries.
Contents 1 Introduction..................................................................................................................... 6 New in this release............................................................................................................................................................. 6 iDRAC Service Module monitoring features........................................................................................................................
Uninstalling the iDRAC Service Module using the uninstall script................................................................................22 Uninstalling the iDRAC Service Module using the RPM command............................................................................. 22 5 Installing the iDRAC Service Module on VMware ESXi.................................................. 23 Using the vSphere CLI.................................................................................................
I am not able to access the iDRAC page through the host OS after performing an iDRAC factory reset operation, such as racadm racresetcfg. How do I troubleshoot the issue?........................................................................................ 33 9 Linux installer packages................................................................................................
1 Introduction This guide provides information and step-by-step instructions on how to install iDRAC Service Module on the supported operating systems. The Integrated Dell Remote Access Controller(iDRAC) Service Module is a lightweight optional software application that can be installed on Dell’s 12th generation of PowerEdge servers or later. The iDRAC Service Module complements iDRAC interfaces – Graphical User Interface (GUI), RACADM CLI and Web Service Management (WSMAN) with additional monitoring data.
NOTE: The minimum iDRAC firmware version required to view information using Redfish client is 2.30.30.30. Lifecycle Controller log replication into operating system Replicates the Lifecycle Controller (LC) logs to the OS logs. All events that have the OS Log option as the target (in the Alerts page or in the equivalent RACADM or WSMAN interfaces) are replicated in the OS log using the iDRAC Service Module. This process is similar to the System Event Log (SEL) replication performed by Server Administrator.
must be stopped to prevent data loss. To prevent loss of data use the Prepare to Remove option, which stops all the deviceassociated background activities, after which you can remove the NVMe PCIe SSD physically. Remote iDRAC hard reset Using iDRAC, you can monitor the supported servers for critical system hardware, firmware, or software issues. Sometimes, iDRAC may become unresponsive due to various reasons.
Table 1.
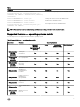
12th generation and 13th generation In-band Support for iDRAC SNMP alerts Yes Yes Yes Yes 12th generation and 13th generation Network interface monitoring support through Redfish client Yes Yes Yes Yes 12th generation and 13th generation Enable WSMAN Remotely Yes No No No * — The Prepare to Remove NVMe device through iDRAC feature is supported only on VMware ESXi 6.0 and not on any other versions of VMware ESXi operating systems.
• From the Support site: a. Go to Dell.com/Support/Home. b. Under Select a product section, click Software & Security. c. In the Software & Security group box, click the required link from the following: – Enterprise Systems Management – Remote Enterprise Systems Management – Serviceability Tools – Dell Client Command Suite – Connections Client Systems Management d. • To view a document, click the required product version.
2 Preinstallation setup Ensure that you assess the following before installing the iDRAC Service Module: • Dell’s 12th generation of PowerEdge or later servers. For the list of supported platforms, see Supported platforms. • Minimum firmware version — For iDRAC7 – 1.57.57 or later and for iDRAC8 – 2.00.00.00 or later. NOTE: If you install iDRAC Service Module 2.0 or later on iDRAC7 1.5x.5x, you cannot use the new features provided by iDRAC Service Module 2.0 or later versions.
• Microsoft Windows Server 2016 • Microsoft Windows Nano • Red Hat Enterprise Linux 6.8 • Red Hat Enterprise Linux 7.3 • SUSE Linux Enterprise Server 11 SP4 • SUSE Linux Enterprise Server 12 SP2 • VMware ESXi 5.5 U3 • VMware ESXi 6.0 U2 • Citrix XenServer 7.0 • CentOS 6.5* • CentOS 6.7* • CentOS 7* • CentOS 7.1* • CentOS 7.3* * — iDRAC Service Module can be installed on any of the listed CentOS versions. Dell provides only limited support for CentOS.
• 14 TCP/IPv4 connection.
3 Installing the iDRAC Service Module on Microsoft Windows operating systems The iDRAC Service Module installer installs all the features on the supported operating system and enables all the features by default. Installing the iDRAC Service Module on Microsoft Windows operating systems The iDRAC Service Module installer for the supported operating systems is available on the Systems Management Tools and Documentation DVD. You can also download the iDRAC Service Module installer from dell.com/support/home.
5. Provide a unique port number to be used by iDRAC access via Host OS feature. NOTE: Provide a port number between the range 1024 to 65535. NOTE: If you do not provide a port number, port number 1266 or a previously configured port (if any) is assigned by default. The Ready to Install the Program is displayed. 6. Click Install to continue with the installation. You can also click Back to change the preferences.
• SupportAssist Collection • Lifecycle Controller Log replication into operating system • Prepare to remove NVMe SSD device • Remote iDRAC hard reset NOTE: You must install the HAPI driver to use the remote iDRAC hard reset feature on Nano operating system. Following are the steps to install iDRAC Service Module on nano operating system: 1. Open a PowerShell console as an administrator and navigate to the iDRAC Service Module folder. 2.
NOTE: You may have to restart the system in the following scenarios: • If you switch between Typical (Windows Logs/System) and Custom options. • If you switch from one custom folder to another folder. The Ready to install screen is displayed. 6. Provide a unique port number to be used by iDRAC access via Host OS feature. NOTE: Provide a port number between the range 1024 to 65535.
NOTE: You can view the iDRAC Service Module logs in the Application group of the Windows Logs folder in the Windows Event Viewer.
4 Installing iDRAC Service Module on supported Linux operating system The complete iDRAC Service Module is packaged in a single Red Hat Package Manager (rpm). The package, accompanied by a shell script can install, uninstall, or enable/disable the features available. As the Installer on Linux is a single rpm install, there is no granular install support. You can enable/disable the features through the scripted installs only.
ping Iputils chkconfig RedHat Enterprise Linux • chkconfig SUSE Linux Enterprise Server • install_initd aaa_base RedHat Enterprise Linux • redhat-lsb-core SUSE Linux Enterprise Server • insserv /etc/init.d/ipmi OpenIPMI Systemctl systemd Installing The iDRAC Service Module on Linux operating system 1. 2. The available features that can be installed are displayed on the screen. The available options are: • [1] Watchdog Instrumentation Service. • [2] Lifecycle Log Replication.
Table 7. Silent installation Parameter Description -h Help: Displays the help -I Install: Installs and enables the selected features -x Express: Installs and enables all available features.
5 Installing the iDRAC Service Module on VMware ESXi VMware ESXi is factory-installed on some systems. For a list of these systems, see the latest Systems Software Support Matrix at dell.com/support/home. The iDRAC Service module is available as a .zip file for installing on systems running VMware ESXi operating system. The .zip file follows the naming convention ISM-Dell-Web-2.5.0-.VIB-i.zip, where is the supported ESXi version.
Using the VMware vSphere Management Assistant The vSphere Management Assistant (vMA) allows administrators and developers to run scripts and agents to manage ESXi systems. For more information on vMA, see http://vmware.com/support/developer/vima/. 1. Log on to vMA as an administrator and provide the password when prompted. 2. Copy and unzip the ISM-Dell-Web-2.5.0-.VIB-i.zip file to a directory on the vMA. 3.
16. Reboot the host. NOTE: For more information on VMWare Update Manager, see the VMWare official website. NOTE: You can install iDRAC Service Module from the VUM repository https://vmwaredepot.dell.com/. Using the Power CLI To install the iDRAC Service Module using Power CLI: 1. Install the supported PowerCLI of ESXi on the supported Microsoft Windows operating system. 2. Copy the ISM-Dell-Web-2.5.0-.VIB-i.zip file to the ESXi host. 3. Navigate to the bin directory. 4.
6 Installing the iDRAC Service Module on Citrix XenServer The iDRAC Service Module is installed on Citrix XenServer using the Supplemental Pack. The Supplemental Pack for Citrix XenServer can be installed in two ways: • On a running system • During the installation Installing the iDRAC Service Module on Citrix XenServer on a running system To install the Supplemental Pack for Citrix XenServer 6.x on a running system: 1.
3. After the base XenServer image is installed (5–10 minutes depending on the speed of the system), you are prompted to insert the Supplemental Pack CD. Eject the XenServer installation CD from the optical drive, insert the Supplemental Pack CD and click OK. The message iSM Supplemental Pack was found is displayed. To confirm installation, click Use and click OK.
7 Configuring the iDRAC Service Module You can configure the iDRAC Service Module using the: • iDRAC web interface • RACADM CLI command • WSMAN command Configuring The iDRAC Service Module From iDRAC Web Interface To use the iDRAC Service Module from the iDRAC Web interface, go to Overview → Server → Service Module. Configuring the iDRAC Service Module from RACADM The iDRAC Service Module can be accessed and configured through RACADM CLI commands.
To use the iDRAC Service Module from RACADM, see the objects in the Service Module group in the RACADM Command Line Reference Guide for iDRAC8 and CMC available at dell.com/support/home. Configuring the iDRAC Service Module from WSMAN The iDRAC Service Module can be accessed and configured through WSMAN using the command To configure the iDRAC Service Module use winrm i ApplyAttributes http://schemas.dmtf.
8 Frequently asked questions This section lists some frequently asked questions about the iDRAC Service Module. Do I need to uninstall Open Manage Server Administrator before installing or running the iDRAC Service Module? No. Before you install or run the iDRAC Service Module, ensure that you have stopped the features of Server Administrator that the iDRAC Service Module provide. NOTE: Uninstalling the Server Administrator is not required.
I see the messageThe iDRAC Service Module is unable to communicate with iDRAC using the OS to iDRAC Pass-through channel in the OS log, even when the OS to iDRAC Pass-through over USBNIC is configured properly. Why do I get this message? iDRAC Service Module uses the OS to iDRAC Pass-through over USBNIC to establish communication with iDRAC. Sometimes, the communication is not established though the USBNIC interface is configured with correct IP endpoints.
Table 9. Frequently asked question Operating System Location Microsoft Windows Event viewer → Windows Logs → . All the iDRAC Service Module LifeCycle logs are replicated under the source name iDRAC Service Module. Microsoft Windows Nano OS You can view the replicated LifeCycle logs using the WMI or Windows PowerShell query:Get-CimInstance –Namespace root/cimv2 –className win32_NTLogEvent.
I chose custom install option from the Graphical User Interface during iDRAC Service Module installation and disabled a feature, but I am not able to enable the feature using any of the other interfaces. How do I enable the feature again? On systems running Microsoft Windows operating system, a feature that is enabled using the installer and disabled using any interface other than the installer, can only be enabled using the same interface or the installer in Graphical User Interface mode.
9 Linux installer packages The installer packages for the supported Linux OS are provided here: Table 10. Linux installer packages Supported Linux Operating System Installer Packages Red Hat Enterprise Linux 6 SYSMGMT\iSM\linux\RHEL6\x86_64\dcism-2.5.0.el6.x86_64.rpm Red Hat Enterprise Linux 7 SYSMGMT\iSM\linux\RHEL7\x86_64\dcism-2.5.0.el7.x86_64.rpm SUSE Linux Enterprise Server 11 SYSMGMT\iSM\linux\SLES11\x86_64\dcism-2.5.0.sles11.x86_64.