
Troubleshooting

Improving Oracle OLTP database performance with Dell Fluid Cache for DAS
24
Appendix C.1. Fluid Cache based solution configuration
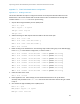
Appendix C.1.1 Enabling Fluid Cache
This section describes the steps to configure Fluid Cache on the Express Flash PCIe SSDs and on the
backend store. This section assumes that the Fluid Cache for DAS v1.0.0 software has already been
installed and the fluid-cache service is up and running.
1. Stop the Oracle High Availability Service (OHAS) stack
1.1. $> su – grid
1.2. $> sqlplus / as sysasm
1.3. SQL> crsctl stop has
1.4. SQL> exit
2. Add the following two Dell Express Flash PCIe SSDs to the Fluid Cache pool
2.1. $> fldc --list --ssd
2.2. $> fldc --add --ssd=/dev/rssda1 –y
2.3. $> fldc --add --ssd=/dev/rssdb1 -y
2.4. $> fldc --status
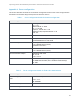
3. Enable caching on the backend store. The following steps enable caching only on the VDs belonging
to the DATA_DG of the baseline configuration, as listed in Table 7
3.1. $> fldc --enable --disk=/dev/sdc1 --mode=wb [creates
/dev/fldc0]
3.2. $> fldc --enable --disk=/dev/sdd1 --mode=wb [creates
/dev/fldc1]
3.3. $> fldc --enable --disk=/dev/sdf1 --mode=wb [creates
/dev/fldc2]
3.4. $> fldc --enable --disk=/dev/sdg1 --mode=wb [creates
/dev/fldc3]
3.5. $> fldc --enable --disk=/dev/sdi1 --mode=wb [creates
/dev/fldc4]
3.6. $> fldc --enable --disk=/dev/sdj1 --mode=wb [creates
/dev/fldc5]
3.7. $> fldc --enable --disk=/dev/sdl1 --mode=wb [creates
/dev/fldc6]
3.8. $> fldc --enable --disk=/dev/sdm1 --mode=wb [creates
/dev/fldc7]
4. Check the status of the cache
4.1. $> fldc --status
5. Follow Appendix C.2.2. Udev settings for Fluid Cache based solution to set up the Oracle
ownership and permission in the /etc/udev rules file for the Fluid Cache devices that got created
in step 3.
6. Start the Oracle High Availability Service (OHAS) stack
6.1. $> su – grid
6.2. grid@$> sqlplus / as sysasm
6.3. SQL> crsctl start has