
Users Guide


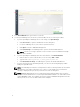
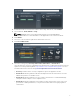

2. In the Enter VM Name box, type a name for your VM.
3. To load your ISO image file to be used for your Guest OS, follow one of these procedures:
a. If you are uploading the ISO image file for local storage, click Upload Image.
1. Click Choose File to open the standard file selection dialog box.
2. Locate the ISO image file on your local file system and select it.
3. Click Open to return to EVO:RAIL Management.
4. Click Upload Image. The ISO image that is copied to the Virtual SAN datastore.
NOTE: If the file is too large to upload, see the resolution section of VMware Knowledge
Base Article 2109915.
b. If you are uploading the ISO image file from a network drive, click Mount NFS/CIFS.
1. Click the protocol of the network drive you are accessing: NFS or CIFS
2. Type the URL format:[protocol]:/[host]/path/to/file.iso.
3. Click Mount Remote Image. The ISO image is copied to the Virtual SAN datastore.
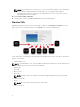
c. If you are using a previously uploaded guest OS, you can reuse an existing image by double-
clicking the guest OS name.
NOTE: The ISO image file must have a unique name from those already loaded onto the Virtual
SAN datastore. If the name is identical to one or more, you are unable to proceed after the
message is displayed until you refresh your browser to clear the dialog box.
NOTE: EVO:RAIL Management does not support importing existing prebuilt copies of VMs in
OVA/OVF format. Workaround is to use the vSphere Web Client interface to create VMs from an
existing OVA/OVF format. The template can then be viewed in EVO:RAIL Management as a VM,
which you can use to clone to make a VM from the template.
6