Dell Engineered Solutions for VMware EVO:RAIL Version 1.
Notes, cautions, and warnings NOTE: A NOTE indicates important information that helps you make better use of your computer. CAUTION: A CAUTION indicates either potential damage to hardware or loss of data and tells you how to avoid the problem. WARNING: A WARNING indicates a potential for property damage, personal injury, or death. Copyright © 2015 Dell Inc. All rights reserved. This product is protected by U.S. and international copyright and intellectual property laws.
Contents 1 EVO:RAIL Management........................................................................................ 5 Access EVO:RAIL Management.............................................................................................................5 Create VMs.............................................................................................................................................5 Monitor VMs..........................................................................................
Documentation matrix........................................................................................................................
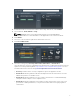
EVO:RAIL Management 1 After your initial EVO:RAIL Appliance is deployed and configured, EVO:RAIL Management is where you perform your day-to-day tasks such as: • Create virtual machines (VMs) • Monitor virtual machines (VMs) • Monitor the status of an EVO:RAIL cluster, appliances, and nodes • Add EVO:RAIL appliances • Enter appliance licenses • Select localization setting • Update EVO:RAIL software components Access EVO:RAIL Management To access EVO:RAIL Management: • From your EVO:RAIL wor
2. In the Enter VM Name box, type a name for your VM. 3. To load your ISO image file to be used for your Guest OS, follow one of these procedures: a. If you are uploading the ISO image file for local storage, click Upload Image. 1. Click Choose File to open the standard file selection dialog box. 2. Locate the ISO image file on your local file system and select it. 3. Click Open to return to EVO:RAIL Management. 4. Click Upload Image. The ISO image that is copied to the Virtual SAN datastore.
4. Confirm Guest OS Version that was loaded from the drop-down menu, click Continue. 5. Select a VM size: Small, Medium or Large. NOTE: EVO:RAIL has a set of predefined VM sizes based on standard VMware recommendations for each Guest OS. See the Appendix A section in this document. 6. Click VM Size. 7. Select one or more network segments the VM should connect to. 8. Click Select VM Networks. 9. Select the security policy: No Policy, Risk Profile 3, Risk Profile 2, or Risk Profile 1.
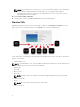
NOTE: By selecting a more secure policy, you lose some VM functionality, such as automated tools, inability to shrink VM disks, persistent mode only, no logging and performance information, blocked device interactions, and limited remote console connections. See the hardening guides for more details. 10. Click Create and Start a New VM. 11. After the VM is created, the EVO:RAIL Management interface is displayed. Monitor VMs EVO:RAIL Management allows users to view all VMs in a grid.
Monitor appliance health EVO:RAIL Management simplifies live compute management with health monitors for CPU, memory, storage, and VM usage for an entire EVO:RAIL cluster, individual appliances, and individual nodes. • Click Health in the left pane. Status is displayed on the appliance health page for the nodes, HDD, SSD, ESXi device, and NIC. If everything is normal, a green checkmark is displayed. In case of an issue, a yellow color triangle is displayed.
Add EVO:RAIL Appliances to an EVO:RAIL cluster EVO:RAIL Management revolutionizes the scale-out feature. Increasing compute, network, and storage resources is as easy as turning on a new appliance to join an existing EVO:RAIL cluster. Prerequisites Dell recommends that all VMware components (ESXi, vCenter Server, and EVO:RAIL) are of the same version on all EVO:RAIL appliances in an EVO:RAIL cluster. See Appendix A in the EVO:RAIL Customer Release Notes for supported configurations.
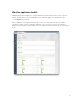
Ongoing configuration The ongoing configuration tasks in EVO:RAIL Management include licensing, localization, and updates. All these can be found when you click Config in the left pane. Activating EVO:RAIL licenses To license your EVO:RAIL Appliance, 1. Get your Partner Activation Code (PAC) from Dell. 2. Go to https://www.vmware.com/oem/code.do?Name=DELL-AC and type your PAC(s). 3. Click Config in the left pane. 4. Under the Licensing tab, type your license key(s): 5. Click License Appliance. a.
6. If the license is part of the vSphere Loyalty Program in EVO:RAIL Release 1.2, do the following: a. Go to https://my.vmware.com/web/vmware/login to group the required set of licenses into a single license key. 1. Create a folder within MyVMware with the licenses called EVORAIL. 2. Send a service request, to the VMware license team with the license keys you need combined into a single license key. b. Type the single license key obtained above, and then click License Appliance. c.
• All files must be uploaded from www.my.vmware.com into a directory accessible from your EVO:RAIL Management workstation or laptop. See the Release Notes for updated files list. To update an appliance software version: 1. Click Config in the left pane. 2. Under the Updates tab, click Upload, and browse through to the directory with the components you are updating: • .rpm • .zip • .
EVO:RAIL Maintenance 2 EVO:RAIL has provided many facilitated maintenance procedures. This section describes the EVO:RAIL maintenance procedures such as: • • • • Access vSphere Web Client Logging and Events Hardware Replacement Appliance Shutdown Access vSphere WebClient EVO:RAIL Management allows you to access the vSphere Web Client to perform more complicated tasks than those found in the streamlined EVO:RAIL interface. 1.
username is admin. If you ssh to Log Insight, the username is root. The password, in either case, is the one you specified for vCenter Server. See VMware vRealize Log Insight Documentation. If you configured an existing third-party syslog server, follow the instructions supplied with that product. Support Logs EVO:RAIL Management combines diagnostic information for vCenter Server, ESXi, and EVO:RAIL into one log bundle. This log bundle can be uploaded to technical support as part of a support request (SR).
3 Appendix A – VM size by guest OS Table 1.
Table 5. VM size by guest OS Guest OS EVO:RAIL Size vDisk vCPU Core vMEM Microsoft Windows 7 (64-bit) Small 32 GB 1 1 1 GB Medium 40 GB 2 1 4 GB Large 60 GB 2 1 8 GB Guest OS EVO:RAIL Size vDisk vCPU Core vMEM Microsoft Windows XP Small 16 GB 1 1 1 GB Medium 32 GB 2 1 2 GB Large 60 GB 2 1 4 GB Table 6.
Appendix B — Security profile details 4 The policies that match the VMware Security Hardening Guide for vSphere 5.5 Update 1 (http:// www.vmware.com/security/hardening-guides) are found in the VM advanced settings (key/value) for each of the three security risk profiles. Risk Profile 1 Guidelines that should only be implemented in the highest security environments, for example, topsecret government or military-sensitive data. isolation.tools.autoInstall.disable = true isolation.tools.diskShrink.
log.rotateSize = 100000 tools.setInfo.sizeLimit = 1048576 isolation.device.connectable.disable = true isolation.device.edit.disable = true Risk Profile 3 Guidelines that should be implemented in all environments. isolation.tools.diskShrink.disable = true isolation.tools.diskWiper.disable = true RemoteDisplay.maxConnections = 2 log.keepOld = 10 log.rotateSize = 100000 tools.setInfo.sizeLimit = 1048576 isolation.device.connectable.disable = true isolation.device.edit.
Appendix C: EVO:RAIL appliance shutdown or restart 5 The following are manual procedures for: Appliance shutdown and appliance restart. For these procedures, there are two categories of VMs: Service: Includes VMware vCenter Server Appliance, VMware vCenter Log Insight, and any Dell Solution VMs. Client: Included of all other VMs. Shutdown EVO:RAIL appliance The following manual procedure is for graceful appliance shutdown: 1. From the RAIL Management menu, click VMS in the left pane. 2.
6. 7. Migrate all the Service VMs (VMware vCenter Server Appliance, VMware vCenter Log Insight, and any Dell Solution VMs) by using the following steps: a. From the Inventory Lists menu, select Virtual Machines. b. Right-click the VM and select Migrate. c. For Select Migration Type, select Change host, and then click Next. d. For Select Destination Resource, select Marvin-Virtual-SAN-Cluster-, select the Allow host selection within this cluster check box, and then click Next. e.
8. 22 Disable High Availably by using the following steps: a. Return to vCenter Home page. b. From the Inventory Lists menu, select Clusters. c. Select MARVIN-Virtual-SAN-Cluster- in either the left or center panes. d. Select Manage, and then Settings in the center pane. e. Under Services, select vSphere HA. f. If the center pane says vSphere HA is Turned ON, click Edit. g. Clear the Turn ON vSphere HA check box. h. Click OK.
9. Enable automatic start for all Service virtual machines (VMware vCenter Server Appliance, VMware vCenter Log Insight, and any Dell Solution VMs) with the following steps: a. Return to the vCenter Home page. b. From the Inventory Lists menu, select Hosts. c. Select the first ESXi host, such as esxi-node01.vm.vmworld.local. d. Select Manage, and then Settings in the center pane. e. Under Virtual Machines , select VM Startup/Shutdown. f. Click Edit in the center pane. g.
10. Turn off all Service VMs (VMware vCenter Server Appliance, VMware vCenter Log Insight, and any Dell Solution VMs) by using the following steps: 24 a. Return to the vCenter Home page. b. From the Inventory Lists menu, select Virtual Machines. c. Right-click the Service VM and select Shut Down Guest OS. d. To turn off the services, click Yes. e. Repeat until all Service VMs are turned off.
11. Turn off all nodes. The vSphere Web Client is no longer accessible. Therefore, your options are: a. Press the power button on each EVO:RAIL node, b. Use out-of-band management if ACPI is available, c. Use the vSphere C# Client to connect to each node and use the shutdown command. EVO:RAIL appliance restart The appliance is restarted in the reverse order: 1. Turn on the appliance. NOTE: It may take up to 15 minutes for all services to be fully restored and for EVO:RAIL Management to be accessible.
Figure 1. EVO:RAIL appliance restart 5. Exit the Maintenance Mode on the ESXi by using the following steps: a. Go to the vCenter Home page. b. From the Inventory Lists menu, select Hosts. c. Right-click the ESXi host and select Exit Maintenance Mode. 6. From EVO:RAIL Management, click VMS in the left pane. 7. For each client VM, click Power On.
Appendix D: Document change history 6 This appendix was added to document revision 1.1.0-3: • In the EVO_RAIL: Appliance Restart procedure, a step was added to enable high availability.
7 Getting help Contacting Dell Dell provides several online and telephone-based support and service options. If you do not have an active Internet connection, you can find contact information on your purchase invoice, packing slip, bill, or Dell product catalog. Availability varies by country and product, and some services may not be available in your area. To contact Dell for sales, technical support, or customer-service issues: 1. Go to Dell.com/support. 2.
To... Refer to... Configure and log in to iDRAC, set up managed and management system, know the iDRAC features and troubleshoot using iDRAC Integrated Dell Remote Access Controller User's Guide at Dell.com/idracmanuals Know about the RACADM subcommands and supported RACADM interfaces RACADM Command Line Reference Guide for iDRAC at Dell.