
Deployment Guide


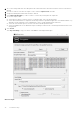


Table Of Contents
- Dell Encryption Personal Installation Guide v11.1
- Contents
- Overview
- Requirements
- Download the Software
- Installation
- Advanced Authentication and Encryption Personal Setup Wizards
- Configure Console Settings
- Uninstall the Master Installer
- Uninstall Using the Child Installers
- Data Security Uninstaller
- Policies and Template Descriptions
- Policies
- Template Descriptions
- Aggressive Protection for All Fixed Drives and External Drives
- PCI Regulation Targeted
- Data Breach Regulation Targeted
- HIPAA Regulation Targeted
- Basic Protection for All Fixed Drives and External Drives (Default)
- Basic Protection for All Fixed Drives
- Basic Protection for System Drive Only
- Basic Protection for External Drives
- Encryption Disabled
- Extract Child Installers
- Troubleshooting
- Glossary

2. Go to Scan Settings and enter the folder path in the Search Path field. If this field is used, the selection in the menu is
ignored.
3. If you do not want to write WSScan output to a file, clear the Output to File check box.
4. Change the default path and file name in Path, if desired.
5. Select Add to Existing File if you do not want to overwrite any existing WSScan output files.
6. Choose the output format:
● Select Report Format for a report style list of scanned output. This is the default format.
● Select Value Delimited File for output that can be imported into a spreadsheet application. The default delimiter is "|",
although it can be changed to up to 9 alphanumeric, space, or keyboard punctuation characters.
● Select the Quoted Values option to enclose each value in double quotation marks.
●
Select Fixed Width File for non-delimited output containing a continuous line of fixed-length information about each
encrypted file.
7. Click Search.
Click Stop Searching to stop your search. Click Clear to clear displayed messages.
WSScan Output
68
Troubleshooting