
Deployment Guide


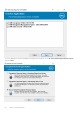
Table Of Contents
- Dell Encryption Personal Installation Guide v11.1
- Contents
- Overview
- Requirements
- Download the Software
- Installation
- Advanced Authentication and Encryption Personal Setup Wizards
- Configure Console Settings
- Uninstall the Master Installer
- Uninstall Using the Child Installers
- Data Security Uninstaller
- Policies and Template Descriptions
- Policies
- Template Descriptions
- Aggressive Protection for All Fixed Drives and External Drives
- PCI Regulation Targeted
- Data Breach Regulation Targeted
- HIPAA Regulation Targeted
- Basic Protection for All Fixed Drives and External Drives (Default)
- Basic Protection for All Fixed Drives
- Basic Protection for System Drive Only
- Basic Protection for External Drives
- Encryption Disabled
- Extract Child Installers
- Troubleshooting
- Glossary
● Do not install Encryption Removal Agent
This option uninstalls the Encryption client but does not decrypt files. This option should be used only for troubleshooting
purposes, as directed by Dell ProSupport.
Click Next.
5. In Backup File, enter the path to the network drive or removable media location of the backup file or click ... to browse to
the location. The format of the file is LSARecovery_[hostname].exe.
Enter your Encryption Administrator Password. This is the password from Setup Wizard when the software was installed.
Click Next.
6. At Dell Decryption Agent Service Logon As select Local System Account and click Finish.
7. Click Remove at the Remove the Program screen.
8. Click Finish at the Configuration Complete screen.
9. Restart your computer and log on to Windows.
Decryption is now in progress.
The decryption process could take several hours, depending on the number of drives being decrypted and the amount of data on
those drives. To check the decryption process, see Check Encryption Removal Agent Status.
Uninstall from the Command-Line
● Command line switches and parameters are case-sensitive.
● Be sure to enclose a value that contains one or more special characters, such as a blank space in the command line, in
escaped quotation marks. Command line parameters are case-sensitive.
● Use these installers to uninstall the clients using a scripted installation, batch files, or any other push technology available to
your organization.
● Log files
Windows creates unique child installer uninstallation log files for the logged in user at %temp%, located at C:
\Users\<UserName>\AppData\Local\Temp.
If you decide to add separate a log file when you run the installer, ensure that the log file has a unique name, as child
installer log files do not append. The standard .msi command can be used be create a log file by using /l C:\<any
directory>\<any log file name>.log. Dell does not recommend using "/l*v" (verbose logging) in a command line
uninstallation, as the username/password is recorded in the log file.
● All child installers use the same basic .msi switches and display options, except where noted, for command line
uninstallations. The switches must be specified first. The /v switch is required and takes an argument. Other parameters go
inside an argument that is passed to the /v switch.
Display options can be specified at the end of the argument passed to the /v switch to achieve the expected behavior. Do
not use both /q and /qn in the same command line. Only use ! and - after /qb.
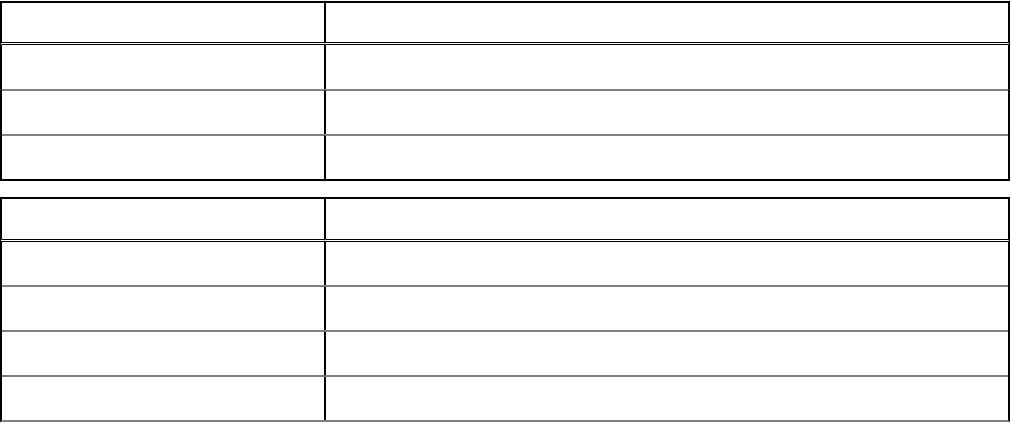
Switch
Meaning
/v Pass variables to the .msi inside the setup.exe
/s Silent mode
/x Uninstall mode
Option Meaning
/q No Progress dialog, restarts itself after process completion
/qb Progress dialog with Cancel button, prompts for restart
/qb- Progress dialog with Cancel button, restarts itself after process completion
/qb! Progress dialog without Cancel button, prompts for restart
Uninstall Using the Child Installers 35