
Install Guide


3. Check if the Virtual hard disk field under IDE Controller: IDE Controller 0 > Hard Drive the Virtual hard disk referring to
the OMIMSSC —v7.2 file else, click Browse and navigate to the location where the VHD file is unzipped and select the
OMIMSSC —v7.2 file and click Apply.
4. Check if Network Adapter > Virtual Switch is connected to a physical NIC card, else configure the NIC card, and select
the appropriate NIC card from the Virtual Switch drop-down menu and click Apply.
5. From the Hyper-V Manager menu, right-click the Appliance VM and perform the following tasks:
a. Click Connect, and then click Start.
If the newly created virtual machine with the selected virtual hard disk of Appliance fails to boot with any kernel panic
exception, edit the virtual machine settings, and enable the dynamic memory option for this virtual machine.
Deploy and configure the OMIMSSC appliance VM on
VMware ESXi
Ensure that you extract the .ova file from .zip file in a local drive.
To deploy a virtual machine on VMware ESXi using .ova file, perform the following steps:
1. Open a web browser. Provide the ESXi host IP address and click Enter.
The VMware ESXI login page is displayed.
2. Enter the User name and Password and then click Log in.
3. From the navigation pane, select Virtual Machines.
4. Select Create or Register VM to create a new virtual machine.
The New virtual machine wizard is displayed.
5. In the Select creation type, select Deploy a virtual machine from an OVF or OVA file option and click Next.
6. In Select OVF and VMDK files, enter a name for the virtual machine that you want to create.
7. Select Click to select files or drag/drop, to go to the location where you have downloaded the .ova file.
8. Select the file OMIMSSC_xx.ova and, click Open.
9. Click Next.
10. Select the storage or datastore where you want to store the configuration and virtual disk files and then click Next.
11. In the Deployment options wizard, select the wanted network mappings and the disk provisioning is selected as Thin by
default, and then click Next.
The Ready to complete wizard is displayed.
12. Click Finish.
13. The creation of VM starts, and you can view the status of VM in the Recent task pane of VMware console.
14. Ensure the synchronization of time between an ESXi host and the SCOM Management Server.
15. Enable the Synchronize guest time with host option on the VM hosted on ESXi:
a. Select the VM, and click Edit options.
b. Select VM options tab.
c. Select VMware Tools > Time > Synchronize guest time with host.
Configure OMIMSSC appliance VM and log in as an
admin user
Perform the following tasks once OMIMSSC starts:
NOTE: It is recommended that you wait for five minutes before you log in as an Admin so that all services are initiated.
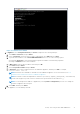
1. In localhost login: Type admin.
2. In Enter new Admin password: Type a password.
NOTE:
Dell EMC recommends to configure and use strong passwords to authenticate appliance admin user and the Dell
EMC OpenManage Integration Dashboard console login page.
3. In Please confirm new Admin password: retype the password, and press Enter to continue.
The terminal console wizard is displayed.
16
Install, and configure Dell EMC OMIMSSC