
Install Guide

9. Set the Number of virtual processors count value to 4, since by default the processor count is set to 1.
To set the processor count:
a. Right-click Appliance, and select Settings.
b. In Settings, select Processor, and set Number of virtual processors to 4.
Configuring and Verifying the OMIMSSC appliance Virtual
Machine
To verify that the Appliance VM is configured appropriately, select and then right-click the Appliance VM, click Settings, and then
perform the following tasks:
1. Check if the allocation of memory for the appliance is as per the requirement mentioned in the Common system requirements for Dell
EMC OMIMSSC. Else provide the memory in Startup RAM, and click Apply.
2. Check if the processor count is as per the requirement mentioned in the Common system requirements for Dell EMC OMIMSSC. Else
provide the number of processor counts in Number of Virtual processors count under Processors.
3. Check if the Virtual hard disk field under IDE Controller: IDE Controller 0 > Hard Drive the Virtual hard disk referring to the
OMIMSSC —v7.1.1 file else, click Browse and navigate to the location where the VHD file is unzipped and select the OMIMSSC —
v7.1.1 file and click Apply.
4. Check if Network Adapter > Virtual Switch is connected to a physical NIC card, else configure the NIC card, and select the
appropriate NIC card from the Virtual Switch drop-down menu and click Apply.
5. From the Hyper-V Manager menu, right-click the Appliance VM and perform the following tasks:
a. Click Connect, and then click Start.
If the newly created virtual machine with the selected virtual hard disk of Appliance fails to boot with any kernel panic exception,
edit the virtual machine settings, and enable the dynamic memory option for this virtual machine.
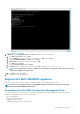
Log in as an Admin user
Perform the following tasks once OMIMSSC starts:
NOTE: It is recommended that you wait for five minutes before you log in as an Admin so that all services are initiated.
1. In localhost login: Type admin.
2. In Enter new Admin password: Type a password.
3. In Please confirm new Admin password: retype the password, and press Enter to continue.
The Black console wizard is displayed.
16
Install OMIMSSC appliance