
Users Guide
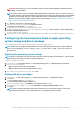


• <Create configuration file>
• <Import configuration file>
• Edit <syscfg.ini>
After creating the .ini file using any of above options, click Apply in the Task Sequence Editor window. The task sequence for Set
BIOS Config (ini file) is created.
CAUTION: When you update or save a new file in the package, it is not automatically updated on all of its distribution
points. To make sure that the new file is available to systems that need it, you must update the distribution points from
the Software Distribution→ Packages→ Dell PowerEdge Deployment→ Dell PowerEdge Deployment ToolKit Integration
<version> node.
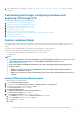
<Create configuration file>
On selecting the <Create configuration file> option, the Create button is displayed.
1. Click Create.
2. Do one of the following in the Configuration File Editor:
• Click Import File to import an existing .ini file from a directory.
• Create an online .ini file in the Configuration File Editor field and click OK. This prompts you to save the .ini file you created to
a local drive or network share of your choice.
3. If you select the Save these changes to the existing file in the toolkit package when I click OK option, your configuration is
exported to a file when you click OK.
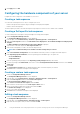
<Import configuration file>
On selecting the <Import configuration file> option, the Import button is displayed. Click Import to import an existing .ini file.
Edit <syscfg.ini>
This is a sample BIOS.ini file.
NOTE:
For information about the .ini file format, see the “Sample File Formats” section in the latest
Dell OpenManage
Deployment Toolkit Command Line Interface Reference Guide
available at Dell.com/support/manuals.
1. Click View to see the existing syscfg.ini file.
2. In the Configuration File Editor window, edit the syscfg.ini file, select the Save these changes to the existing file in the
toolkit package when I click OK option and click OK.
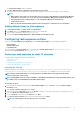
Edit <raidcfg.ini>
This is a sample raidcfg.ini file.
NOTE:
For information about the ini file format, see the “Sample File Formats” section in the latest
Dell OpenManage
Deployment Toolkit Command Line Interface Reference Guide
available at Dell.com/support/manuals.
1. Click View to see the existing raidcfg.ini file.
2. In the Configuration File Editor window, edit the raidcfg.ini file, select the Save these changes to the existing file in the
toolkit package when I click OK option and then click OK.
After creating the .ini file using any of the preceding options listed, click Apply in the Task Sequence Editor window. The task
sequence for Set RAID Config (ini file) is created.
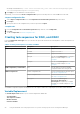
Configuring system BIOS using XML input
To configure your system BIOS using XML input:
1. Right-click the task sequence and click Edit.
2. In the left side of the Task Sequence Editor, under Configure Hardware > Step 1, click Set BIOS Config (xml file) > Action
Settings tab.
3. From the Configuration action type drop-down list, select BIOS Config (xml file).
4. From the Configuration file / Command line parameters drop-down list, select syscfg_xml.xml.
The View button is enabled.
5. Click View to open the XML file in the Configuration File Editor. Make modifications as per the required configurations and save
the file.
For information about the ini file format in:
• Dell’s 12th generation systems, see “Sample File Formats” in the Dell OpenManage Deployment Toolkit Command Line Interface
Reference Guide
Using the Dell EMC Server Deployment Pack on systems running System Center Configuration Manager
17