Dell EMC Server Deployment Pack Version 4.1 for Microsoft System Center Configuration Manager User's Guide August 2021 Rev.
Notes, cautions, and warnings NOTE: A NOTE indicates important information that helps you make better use of your product. CAUTION: A CAUTION indicates either potential damage to hardware or loss of data and tells you how to avoid the problem. WARNING: A WARNING indicates a potential for property damage, personal injury, or death. © 2019 - 2021 Dell Inc. or its subsidiaries. All rights reserved. Dell, EMC, and other trademarks are trademarks of Dell Inc. or its subsidiaries.
Contents Chapter 1: Introduction................................................................................................................. 4 What's new in this release.................................................................................................................................................4 Dell EMC Server Deployment Pack features overview..............................................................................................
1 Introduction This document describes the activities that you can perform with the Dell EMC Server Deployment Pack (DSDP) Version 4.1 for Microsoft System Center Configuration Manager (SCCM) or Microsoft Endpoint Configuration Manager(MECM). This release, of DSDP v4.1(revision A02), is the final release for Microsoft System Center Configuration Manager (Microsoft Endpoint Configuration Manager) product with the associated functionalities.
○ R750xs ● Support for PowerEdge RAID Controllers (PERC), series 9 and 10 for Dell EMC systems are: ○ PERC H745 ○ PERC H345 ○ PERC H840 ○ HBA345 ○ HBA330 MMZ ○ PERC H745P MX ● The set and get iDRAC configuration using .INI file (dependent on RACADM deprecated feature) is not supported with iDRAC version 4.40.40.00 or later. Use XML input file to configure iDRAC. NOTE: No additional upgrade to the DSDP is required to support the latest iDRAC 9-based PowerEdge servers. Use the provided DTK v6.
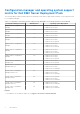
Configuration manager and operating system support matrix for Dell EMC Server Deployment Pack The following table provides information about the operating systems that are supported by Dell EMC Server Deployment Pack for Configuration Manager: Table 1. Compatible operating systems supported by Dell EMC Server Deployment Pack for WinPE Configuration Manager Version WinPE Version Operating system Deployment Update 2103 for Configuration Manager 10.
Distributed Configuration Manager setups on multiple primary site servers You can install DSDP on multiple primary site servers. While installing DSDP on the primary site servers, ensure that the versions of DTK and OpenManage used in the CAS and all primary site servers are the same. Following are the limitations of the installation.
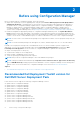
2 Before using Configuration Manager Before you begin using the Configuration manager, ensure the following: ● Import the DTK packages if you are upgrading DSDP using the option Remove Dell Deployment ToolKit (DTK) utilities and Windows PE drivers or installing DSDP for the first time.
● System Center Configuration Manager 2012 For more compatibility level of information, see Dell EMC Server Deployment Pack Version 4.1 for Microsoft System Center Configuration Manager Installation Guide.
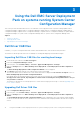
3 Using the Dell EMC Server Deployment Pack on systems running System Center Configuration Manager This section provides information about how to use Dell EMC Server Deployment Pack on systems running Update 2103 for Configuration Manager, Update 2010 for Configuration Manager, Update 2006 for Configuration Manager, Update 2002 for Configuration Manager, Update 1910 for Configuration Manager, or Update 1906 for Configuration Manager, or Update 1810 for Configuration Manager, or System Center Configuration M
4. Click Browse, navigate and then select the CAB file that you have downloaded, then click Next. The selected CAB file version, Windows PE version, and architecture are displayed in CAB Selection for Import section. 5. In Boot Image Selection, select any one of the following options: NOTE: Make sure that you import a 64-bit CAB file before selecting x64 boot images in any of the following options: Use Boot Image from WAIK/ADK tools This option is used to create both x64 and x86 Dell boot images.
Creating a boot image for deploying PowerEdge servers 1. Launch Configuration Manager Console. 2. In the left pane, select Software Library > Overview > Operating Systems > Boot Images. 3. Right-click Boot Images and select Dell PowerEdge Server Deployment > Create Dell Server Boot Image. The Dell PowerEdge Boot Image Creation Wizard is displayed. 4.
Distributing content and updating distribution points 1. Launch Configuration Manager Console. 2. In the left pane, select Software Library > Overview > Application Management > Packages > Dell PowerEdge Deployment. 3. Right-click PowerEdge Deployment Toolkit Integration and click Distribute Content. The Distribute Content Wizard is displayed. 4. Right-click PowerEdge Deployment Toolkit Integration and click Update Distribution Points. A message box prompting for a confirmation is displayed. 5.
Adding Dell driver packages 1. In the left side of the Task Sequence Editor, under Deploy Operating System, click Apply Driver Package. 2. Click Browse. The Select a Driver Package window is displayed. 3. Click Dell PowerEdge Driver Packages . A list of driver packages available in the Dell EMC Server Deployment Pack is displayed. 4. Select a package for a PowerEdge server, such as Dell R720-Microsoft Windows 2008x86 OMx.x version. 5. Click Apply.
Upgrading a DTK package 1. Launch Configuration Manager Console. 2. In the left pane, select Software Library > Overview > Application Management > Packages. 3. Right-click Packages and select Dell PowerEdge Server Deployment > Launch Deployment Toolkit Configuration Wizard. The PowerEdge Deployment ToolKit Configuration Wizard screen is displayed. If there is an existing DTK package on the server, then the DTK version, Windows PE version, and architecture is displayed under DTK present on system. 4.
1. Launch Configuration Manager Console. 2. In the left pane, select Software Library > Overview > Operating Systems > Task Sequences . 3. Right-click the desired Task Sequence and then, click Edit. The Task Sequence Editor window is displayed. 4. Click Deploy Operating System. 5. Click Options > Add Condition > Task Sequence VariableOptions. The Task Sequence Variable window is displayed. 6. In the Task Sequence Variable window, enter the following: a. b. c. d.
The Configuration Manager Console screen is displayed. 2. In the left pane, select Software Library > Overview > Operating Systems > Task Sequences. 3. Right-click Task Sequences, and then click Create Task Sequence. The Create Task Sequence Wizard is displayed. 4. Select Create a new custom task sequence, and click Next. 5. Enter a name for the task sequence in the Task sequence name text box. 6. Browse for the Dell boot image that you had created, and click Next.
Preparing the .CSV file Update the sample CSV file located at C:\Program Files\Microsoft Configuration Manager\OSD\Lib\Packages\Deployment\Dell\PowerEdge\NetworkSetting\Samples\MACIPMap.csv by adding a row for each of the targets. NOTE: Ensure that the MAC address for each target matches the MAC address of the target’s NIC port that is connected and active on the network.
Using the bootable media for OS deployment The operating system deployment is unattended unless the tasks in the task sequence require it. For example if the Windows serial number is not provided in the task sequence, the Windows operating system waits for it during the deployment process. NOTE: You can use the same bootable media for all servers entered in the .CSV file, provided you select the appropriate driver packages in the task sequence on the site server. Configuring system BIOS 1.
On selecting the option, the Import button is displayed. Click Import to import an existing .ini file. Edit This is a sample BIOS.ini file. NOTE: For information about the .ini file format, see the “Sample File Formats” section in the latest Dell OpenManage Deployment Toolkit Command Line Interface Reference Guide available at Dell.com/support/manuals. 1. Click View to see the existing syscfg.ini file. 2.
Configuring iDRAC7, iDRAC8, and iDRAC9 using XML input To configure iDRAC7, iDRAC8, and iDRAC9 using XML input: 1. Right-click the task sequence, and click Edit. 2. In the left side of the Task Sequence Editor, under Configure Hardware > Step 1, click set iDRAC7 Config (xml file) > Action Settings tab. ● For iDRAC8, click Configure Hardware > Step 1, click set iDRAC8 Config (xml file) > Action Settings. ● For iDRAC9, click Configure Hardware > Step 1, click set iDRAC9 Config (xml file) > Action Settings. 3.
b. In Server Hardware, select Set BIOS config. c. Select the appropriate boot image, credentials, and other inputs. d. Click Create and Save the Task Sequence. 2. Edit the task sequence and from the Action drop-down list, select Get. a. b. c. d. e. Right-click on the task sequence and click Edit. Delete the step Build the Reference Machine as deploying OS is not required. Click Set BIOS Config (ini file). Change the action to Get. In Configuration File/Command line parameters, provide a filename.
1. From the Configuration file / Command line parameters drop-down list, select . 2. Click View. 3. To edit the sample.xml, see . Creating task sequences for RAID, and iDRAC From the Configuration action type menu, you can select the options that are listed in the following table to create task sequences for RAID, and iDRAC: Table 2. Creating Task Sequences for RAID, and iDRAC Option Suboptions Description RAID Configuration (.ini file) 5i-raid0.
Use a null/blank value Uses a variable that has not been initialized or has a blank value. This allows the clients to continue processing the action even if the variable is undefined or blank. Fail the task Fails an action that cannot retrieve a valid variable value. This allows you to view what is wrong with an action instead of trying to debug a failed command line or an incorrectly configured system. 2.
4 Troubleshooting NOTE: Before you run the sample commands provided in the troubleshooting section, see the DTK documentation and if required recreate the commands based on machine configuration.
● In Task Sequence Variable, type SiteServer. ● In Value, type . For example: ss1.abc.com ● Click Apply and then click OK. 5. Distribute and Update the PowerEdge Custom Reboot Script and PowerEdge Deployment Toolkit Integration packages. NOTE: During upgrade, the boot image is removed, you must create a boot image, link the boot image to the task sequence, and then inject the drivers into the boot image.
5 Command line options DSDP supports the command line options supported in Dell Deployment Toolkit. For more information about the command line options, usage guidelines, and syntax, see Dell OpenManage Deployment Toolkit Command Line Interface Reference Guide.
Table 4. RAIDCFG Command Mandatory Options and Arguments Optional Parameters Valid Parameters Arguments Description -vd -vd=id - ac=svdn - vdn= c=id or vdisk vdisk= id action= setvdname vdname= controllerid= id NA NA Sets the name of the specified virtual disk on the specified controller. When using this command in DSDP, remove raidcfg and run the command.
6 Other Dell documents you might need In addition to this guide and the online help, you must see the following documents to get details on specific Dell OpenManage products. These documents are available at Dell.com/support/manuals. ● The Dell EMC Server Deployment Pack Version 4.1 for Microsoft System Center Configuration Manager Installation Guide provides information about installing DSDP 4.1 on your system.
○ For Dell EMC Enterprise Systems Management and Dell EMC Remote Enterprise Systems Management—https:// www.dell.com/esmmanuals ○ For Dell EMC Virtualization Solutions—www.dell.com/virtualizationsolutions ○ For Dell EMC OpenManage—https://www.dell.com/openmanagemanuals ○ For iDRAC—https://www.dell.com/idracmanuals ○ For Dell EMC OpenManage Connections Enterprise Systems Management—https://www.dell.com/ OMConnectionsEnterpriseSystemsManagement ○ For Dell EMC Serviceability Tools—https://www.dell.