
Users Guide
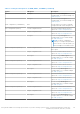
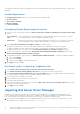
Table Of Contents
- Dell EMC Server Deployment Pack Version 4.0 for Microsoft System Center Configuration Manager User's Guide
- Contents
- Introduction
- Before using Configuration Manager
- Using the Dell EMC Server Deployment Pack on systems running System Center Configuration Manager, 2012 SP2, 2012 R2 SP1, 2012 R2, 2012 SP1, or 2012
- Dell Driver CAB files
- Importing Dell Driver CAB files for creating boot image
- Upgrading Dell Driver CAB files
- Customizing boot image and deploying OS through Dell Driver CAB files
- Creating a boot image for deploying PowerEdge servers
- Enabling command prompt for debugging boot images
- Distributing content and updating distribution points
- Configuring the task sequence steps to apply operating system image and driver package
- Deploying a task sequence
- Dell Deployment ToolKit
- Importing a DTK package for hardware configuration and OS deployment
- Upgrading a DTK package
- Customizing boot image, configuring hardware and deploying OS through DTK
- System Lockdown Mode
- Configuring the hardware components of your server
- Configuring task sequence actions
- Using the Array Builder
- Creating task sequences for RAID, DRAC, and iDRAC
- Importing Dell Server Driver Packages
- Dell Driver CAB files
- Troubleshooting
- Command line options
- Other Dell documents you might need
The hardware component sequences are displayed in the Task Sequence Editor after configuring the system BIOS, RAID, DRAC,
and iDRAC.
Variable Replacement
The Variable Replacement tab allows you to use and configure task variables like:
● System Variables
● Task Sequence Variables
● Machine Variables
● Collection Variables
Configuring Variable Replacement tab options
1. Select one of the following options under the Action to take when a variable is unintialized or the value is null or blank
section:
Use a null/blank
value
Uses a variable that has not been initialized or has a blank value. This allows the clients to continue
processing the action even if the variable is undefined or blank.
Fail the task Fails an action that cannot retrieve a valid variable value. This allows you to view what is wrong with
an action instead of trying to debug a failed command line or an incorrectly configured system.
2. Select Search all text input files for variables to replace to do the following:
● Enable client-side scripts to search for and replace variables in the command line or within files specified.
● Replace variables with values found in the task sequence environment or the Windows system environment.
For optimum performance of the action clear the Search all text input files for variables to replace check box.
3. To replace any instances of a password in the Actions with the password provided and confirmed dialog box, select
Replace %PASSWORD% variables with this password.
4. To set additional variables on the system, select Manually define additional variables . To define the additional variables:
a. Type a variable Name.
b. Type the variable Value.
c. Select the variable Type from the drop-down menu.
5. Click Apply and then click OK.
Retrieving log files or capturing configuration files
1. Select Retrieve the task sequence log file from the client after this action runs.
2. Select Enable extended / debug logging by this action to get extensive information in the log files.
3. Select Retain network folder settings from a prior step, if available to copy any available network folder settings from
the previous step or to configure the network folder settings proceed to step 4.
4. Enter a valid network/local path to save the file.
5. Enter the domain and account name to access the path.
6. Enter and confirm the password.
7. If you have specified a network path in step 4, then select Map a drive letter to the network share above and then select
a drive letter from the drop-down menu.
8. Click Apply and then click OK.
Importing Dell Server Driver Packages
Dell EMC Server Deployment Pack provides a wizard to create driver packages in Configuration Manager, based on the
server-operating system combination from the drivers available in the Dell Systems Management Tools and Documentation
DVD. These packages are used in the task sequences that are used for operating system deployment.
1. Insert the Dell Systems Management Tools and Documentation DVD version 6.2 (or later) in your system drive. You can
download the latest ISO image of the DVD from Dell.com/support .
26
Using the Dell EMC Server Deployment Pack on systems running System Center Configuration Manager, 2012 SP2,
2012 R2 SP1, 2012 R2, 2012 SP1, or 2012