
Users Guide
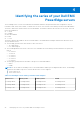
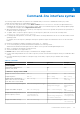
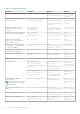
Table Of Contents
- Dell EMC Repository Manager Version 3.3.2 User’s Guide
- Contents
- Introduction
- Installing and maintaining DRM
- Using Dell EMC Repository Manager
- Identifying the series of your Dell EMC PowerEdge servers
- Command-line interface syntax
- Command-line interface
- Frequently asked questions

Steps
1. Click on the Dell EMC Repository Manager drop-down list and click Jobs.
The Jobs window is displayed. The created or scheduled jobs are displayed.
2. Select the job you want to delete and click Delete.
A warning message is displayed to confirm the deletion.
3. Click Delete to delete the job.
Jobs queue details
The details such as, Job Name, Status, Next Execution Date/Time, Last Execution Date/Time, Affected Repositories,
and Log are displayed. The Show Log option is displayed for certain jobs. This option provides more details about the job.
For specific details about any failure in the job, go to service logs. For more information, see /var/dell/drm/log/
drmservice-0.log file in Linux operating system and /programdata/dell/drm/log/drmservice-0.log file in
Microsoft Windows operating system.
NOTE: A progress bar displays the status of a job that is executing.
Creating deployment tools
About this task
This section describes about creating customized deployment tools.
Steps
1. On the DRM home page, select the repositories or bundles for which you want to create the deployment tools. Dell EMC
System Update (DSU) is used in orchestrating the deployment.
2. Click Export.
The Export Deployment Tools window is displayed.
3. The repositories that you select is displayed in the Selected Repositories section. Select the required Deployment Tool
Type and click Create. The available options are:
● Smart Bootable ISO- Support Linux bundles only. You have the option to force an update by selecting Enable Force
Update option. If you want custom scripts, select the Replace Default Script checkbox.
● SUU ISO- Supports SUU as an ISO image file. You also have the option to save the SUU to Directory.
● Smart Deployment Script- You can choose the Script Type for Microsoft Windows or Linux operating systems. You
can also specify the script to execute before or after the deployment script is executed by selecting Pre-Script or
Post-Script or select a custom script. You also have the option to force an update by selecting Enable Force Update.
If you want to use custom scripts, select the Replace Default script checkbox.
● Share- Local storage or network share. You also have the option to export only the catalog by selecting Export only
catalog.
4. Select the required preference and click Export.
Next steps
NOTE: DSU v1.6 or later is required to use the Enable Force Update option.
NOTE: When you select a lower version of a repository, you have an option to delete all the higher versions of the
repository on the Export Deployment Tools window.
NOTE: If a plug-in update is available, a message is displayed. You can configure and set the plug-in preferences. For more
information on configuring plug-in preferences, see Configuring plug-in preferences.
22 Using Dell EMC Repository Manager