
Users Guide
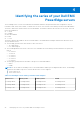
Table Of Contents
- Dell EMC Repository Manager Version 3.3.2 User’s Guide
- Contents
- Introduction
- Installing and maintaining DRM
- Using Dell EMC Repository Manager
- Identifying the series of your Dell EMC PowerEdge servers
- Command-line interface syntax
- Command-line interface
- Frequently asked questions

NOTE: For windows DUPs (.exe) the signature file is embedded.
To import components to a repository:
1. On the DRM home page, select the repository and bundle where you want to import components. Click Import tab.
2. Browse the location of the repository that you intend to import the components and click Import.
NOTE: To import components from a network shared location, you must log in to the shared location with provide
appropriate credentials and select the components to import.
Component is successfully imported to the specified repository.
NOTE: You also have the option to verify the signature of the DUPs, if not done before importing.
NOTE: Importing components results in an increment of the repository version.
NOTE: You can import only one DUP through Graphical User Interface (GUI). And, you can import multiple DUPs through
the Command Line Interface (CLI).
Working with jobs
About this task
This section describes the process to work with scheduled jobs in DRM.
Steps
1. Click on the Dell EMC Repository Manager drop-down menu.
2. On the View section, click Jobs.
The Jobs page is displayed.
Next steps
You can Edit and Delete the jobs that you create.
Editing jobs
About this task
This section describes the process of editing the jobs on the jobs page.
NOTE: Edit jobs are applicable only for Refresh jobs.
Steps
1. Click the Dell EMC Repository Manager drop-down list and click Jobs.
The Jobs screen is displayed. The created or scheduled jobs are displayed.
2. Select the job that you want to edit. Click Edit.
3. Edit the preferences, and click Save.
Deleting jobs
About this task
This section describes the process of deleting the jobs on the jobs page.
Using Dell EMC Repository Manager
21