Dell EMC Repository Manager Version 3.
Notes, cautions, and warnings NOTE: A NOTE indicates important information that helps you make better use of your product. CAUTION: A CAUTION indicates either potential damage to hardware or loss of data and tells you how to avoid the problem. WARNING: A WARNING indicates a potential for property damage, personal injury, or death. © 2018 - 2020 Dell Inc. or its subsidiaries. All rights reserved. Dell, EMC, and other trademarks are trademarks of Dell Inc. or its subsidiaries.
Contents 1 Overview..................................................................................................................................... 4 New in this release.................................................................................................................................................................4 Enhancements..................................................................................................................................................................
1 Overview The Dell EMC Repository Manager (DRM) ensures that the Dell systems are up-to-date with the latest BIOS, driver, firmware, and software. DRM allows you to: • • • Create repositories of customized component(s) and updates. Create groups of related updates for systems running the Microsoft Windows and Linux operating system. Generate comparison reports. Update baselines of custom repositories and generate deployment tools.
Prerequisites for installing DRM This section lists the specific prerequisites to be considered before installing DRM. Hardware requirements Table 1. Hardware requirements Requirement Details Processor 1 GHz Pentium processor or equivalent RAM 4 GB Hard Disk 1 GB of available space Display 1024 x 768 high color, 32-bit Optical Drive (Optional) CD/DVD writer Software requirements DRM works on a wide range of Operating Systems for Windows and Linux.
• • Enterprise Systems Management • Public Sector Solutions • Utilities • Mainframe • Serviceability Tools • Virtualization Solutions • Operating Systems • Support 4. To view a document, click the required product and then click the required version. Using search engines: • Type the name and version of the document in the search box. Other documents you may need In addition to this guide, you can access the following guides available at the support site. .
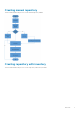
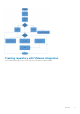
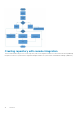
Creating manual repository This flowchart describes the process to create a manual repository in DRM. Creating repository with inventory This flowchart describes the process to create a repository with inventory in DRM.
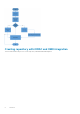
Creating repository with iDRAC and OME integration This flowchart describes the process to create a repository with iDRAC and OME integration.
Creating repository with VMware integration This flowchart describes the process to create a repository with VMware integration in DRM.
Creating repository with console integration This flowchart describes the process to create a repository with console integration in DRM. You can use this method for OpenManage Integration for Microsoft System Center Configuration Manager and Microsoft System Center Virtual Machine Manager (OMIMSSC).
Creating deployment tools This chapter describes the process to export the repository as deployment tool type. Creating deployment tool_Smart bootable ISO This section describes the process to export a repository as Smart Bootable ISO.
Best practice for creating bootable CD or USB keys for updates You can create bootable USB keys for updates, using any third party or free tool. You can start your managed system by the bootable CD or USB storage. After the system starts, it automatically runs the selected updates. After the update is complete, you can remove the CD or USB storage, and reboot the system to your host operating system. NOTE: Rufus and UNetBootin are third-party software. Install and use these software at your own risk.
2. Run the Dell Repository Manager and generate the bootable ISO. 3. Start Rufus and select the Disk or ISO image option. 4. Click Select adjacent to the Boot Selection and navigate to the ISO created by Dell Repository Manager. 5. Ensure to choose MBR Partition Type and BIOS target system with VFAT file system. 6. Click OK to start the USB writing. 7. After the USB key writing is complete, insert the USB key into a USB port on the system you want to upgrade. 8. Press . The boot menu is displayed. 9.
Creating deployment tool_Smart deployment script This section describes the process to export a repository as Smart deployment script. Creating deployment to shared location This section describes the process to export a repository to a common shared location. Configuring settings This section describes the process to configure the settings or application preferences.
Configuring network settings This section describes the process to configure network settings in DRM. Configuring email configuration This section describes the process to configure email settings in DRM.
Creating store settings This section describes the process to configure data store settings in DRM. Configuring plugin settings This section describes the process to configure plugin settings in DRM.
Configuring catalog settings This section describes the process to configure catalog settings in DRM. Comparing repository This section describes the process to compare a repository against latest catalog loaded in DRM.
Overview
A Frequently asked questions This section lists some frequently asked questions about DRM. Why is DRM not recognized? After installing DRM on Microsoft Windows operating system, when you try to run any DRM commands, the following error message is displayed: drm is not recognized as an internal or external command, operable program or batch file. Rerun the DRM service file DRM_Service.bat as an Administrator from the installer location. Example of an installer location: C:\Program Files\Dell\Dell EMC Reposi
Where is the Dell EMC Repository Manager runtime log located? DRM creates the log file at runtime in the following location: • • Windows: C:\ProgramData\Dell\drm\drmservice-o.log Linux: /var/dell/drm/log/drmservice-o.log You can save or email the logs through Save and Mail Logs option in the Dell EMC drop-down menu. Can DRM be run through a Proxy Server? Yes, install DRM inside the firewall and connect to a catalog located outside the firewall (downloads.dell.
other option to discover the URL apart from updating it manually? From DRM version 3.0 onwards, the autodiscovery of Microsoft Exchange Web Server URL is not supported. Update the URL manually. I get a message “GLX version 1.2 or higher is required” when I try to open a Linux terminal window. This message is observed in SUSE Linux 11 and 12. This is a warning message and does not affect the functionality of the product.
I have installed the latest version of DRM on my system, and I am trying to downgrade to one of the previous versions. However, I am not able to proceed further. What do I do now? Reverting to the previous version of DRM is not supported in the current version of the DRM installer . To install an earlier version of DRM, manually uninstall the latest version and then run the installer of the required version. NOTE: DRM 2.0 and DRM 3.x.x can co-exist on the same system.