
Users Guide


Configuring settings
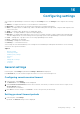
You configure the OpenManage Power Center settings in the Settings screen. The Settings screen comprises the following
tabs:
● General — Configure the timeout for console and device communication.
● Monitoring — Configure the power/thermal units and energy consumption parameters.
● Alerts — Configure alerts for SNMP traps, enable or disable sending alerts through emails, configure email recipients, and
event severity-level.
● SMTP — Configure SMTP parameters for sending alert emails.
● Database — Configure database compression and purging policy.
● Directory — Configure Lightweight Directory Access Protocol (LDAP) settings to support authentication through LDAP.
This tab is displayed only on systems running the Linux operating systems where OpenManage Power Center is installed.
● Users — Manage user or group accounts for accessing OpenManage Power Center.
● Roles — Managing roles and rights.
● Licensing — Manage the issued licenses.
● Inventory — Track chassis inventory.
Some settings are activated immediately; some settings are activated during the subsequent time duration. See the following
sections for more specific information.
Topics:
• General settings
• Monitoring settings
• Database policy settings
• Directory
• Alerts
• Editing SMTP settings
• Licensing
• Inventory
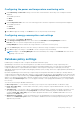
General settings
In the left pane, click Settings. By default the Settings > General tab is displayed.
In the General tab, you can view and configure the timeout of console sessions and protocols.
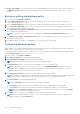
Configuring console session timeout
1. In the left pane, click Settings.
The General tab of the Settings screen is displayed.
2. Under Console Session Timeout, enter the time, in minutes, after which you want the console session to expire, in the
Session Timout text box.
The default time is 20 minutes.
3. Click Save to save the changes or click Reset to revert to the previously saved settings.
Setting protocol timeout periods
1. In the left pane, click Settings.
By default, the General settings screen is displayed.
16
Configuring settings 101