
Users Guide
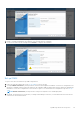
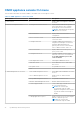
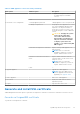
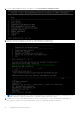
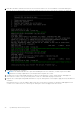
Table Of Contents
- OpenManage Network Integration for SmartFabric Services User Guide Release 2.1
- Contents
- About this guide
- Change history
- Overview of OMNI, SFS, VxRail, and PowerEdge MX
- OpenManage Network Integration
- OMNI vCenter integration
- Access the OMNI stand-alone portal
- Access the OMNI Fabric Management Portal
- OMNI Appliance Management user interface
- SmartFabric management with OMNI
- OMNI feature support matrix
- View SmartFabric instance overview
- View fabric topology
- Manage switches in a fabric
- SmartFabric bulk configuration
- Configure server interface profile
- Configure and manage uplinks
- Configure networks and routing configuration
- Configure global settings for SmartFabric
- View fabric events and compliance status
- OMNI automation support for PowerEdge MX SmartFabric
- OMNI automation support for NSX-T
- Lifecycle management
- Troubleshooting
- Troubleshooting tools
- Unable to add SmartFabric instance in OMNI
- Missing networks on server interfaces
- Unable to launch OMNI UI
- OMNI plug-in does not show service instance
- Unable to register the vCenter in OMNI
- OMNI is unable to communicate with other devices
- Timestamp not synchronized in OMNI
- Reset OMNI VM password

OMNI appliance console CLI menu
This information describes the menus available to the admin SSH user through the console.
Table 8. OMNI appliance console CLI menu
Menu option Submenu option Description
1. Show version — Display OMNI virtual appliance and plug-
in version.
2. Interface configuration menu 0. Config Docker Private network Display default OMNI docker private
network information. Also configure
docker private network information.
NOTE: OMNI default docker private
subnet is 172.16.0.1/25.
1. Show interfaces Display OMNI network interface
configuration.
2. Show connection status Display OMNI network interface
connection status.
3. Configure interfaces Configure OMNI network interfaces
using Network Manager user interface
including OMNI Management IP,
gateway, DNS entries, search domains,
routes, OMNI hostname, and so on.
4. Show NTP status Display OMNI network time protocol
(NTP) server status.
5. Configure NTP server Configure OMNI NTP server. Enter
remote NTP server IP or hostname. It
is recommended that you use the
server hostname.
6. Unconfigure NTP server Unconfigure OMNI NTP server.
7. Start NTP server Start OMNI NTP service, and enable
NTP service.
8. Stop NTP server Stop OMNI NTP service.
9. Exit —
3. OMNI management service menu 1. Start OMNI management service Start OMNI web and database essential
services.
2. View OMNI management service Display status of OMNI essential
services.
3. Stop OMNI management service Stop OMNI essential services.
4. Restart OMNI management service Restart OMNI essential services.
5. Create support bundle Create OMNI support bundle archive and
save to download location.
NOTE: Dell Technologies
recommends using the OMNI
appliance management user interface
to generate and download support
bundle.
6. Change application log level Display current log-levels, and configure
DEBUG or ERROR log-levels.
NOTE: Dell Technologies
recommends using the OMNI
36 OpenManage Network Integration