
Users Guide
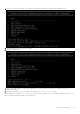
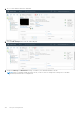
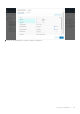
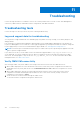
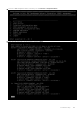

Table Of Contents
- OpenManage Network Integration for SmartFabric Services User Guide Release 2.1
- Contents
- About this guide
- Change history
- Overview of OMNI, SFS, VxRail, and PowerEdge MX
- OpenManage Network Integration
- OMNI vCenter integration
- Access the OMNI stand-alone portal
- Access the OMNI Fabric Management Portal
- OMNI Appliance Management user interface
- SmartFabric management with OMNI
- OMNI feature support matrix
- View SmartFabric instance overview
- View fabric topology
- Manage switches in a fabric
- SmartFabric bulk configuration
- Configure server interface profile
- Configure and manage uplinks
- Configure networks and routing configuration
- Configure global settings for SmartFabric
- View fabric events and compliance status
- OMNI automation support for PowerEdge MX SmartFabric
- OMNI automation support for NSX-T
- Lifecycle management
- Troubleshooting
- Troubleshooting tools
- Unable to add SmartFabric instance in OMNI
- Missing networks on server interfaces
- Unable to launch OMNI UI
- OMNI plug-in does not show service instance
- Unable to register the vCenter in OMNI
- OMNI is unable to communicate with other devices
- Timestamp not synchronized in OMNI
- Reset OMNI VM password

3. Enter the SCP server IP address or hostname, username, and the path to the upgrade .zip file and password.
4. Verify all information, then enter Y to continue.
5. Verify the OMNI version.
6. After you upgrade OMNI, close the active OMNI browser. Open a new browser and log in to OMNI to see the new or
upgraded UI changes.
7. Unregister and register the vCenter again using OMNI UI, see Register vCenter with OMNI.
Before upgrading to OMNI from 1.3 to 2.0 or a later version using this upgrade workflow, change the hardware profiles for the
VM. To change the hardware details, follow these steps:
Lifecycle management
151