
Deployment Guide


• Self-signed SSH and TLS certificate regeneration
• Third-party SSH and TLS certificate installation
• SmartFabric password for the fabric
• Reboot and logout
• Export support bundle
• Display connectivity status with vCenter Server
• Display connectivity status with SmartFabric
• Supports up to 10 vCenter Server instances
• Supports up to 16 SmartFabric domains
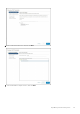
This information describes how to log into the VM console.
1. After the new VM powered on, open the VM console.
2. Enter admin for both the default username and password.
3. If this is a first-time login, change the password.
After the passwords are successfully updated, self-signed certificates are created. You can change the certificates later with menu
options.
NOTE: The sudo password is the same as the password set for the admin user.
NOTE: Root user is disabled by default. To set the password to enable root user, use the SmartFabric menu. You can
only access root user through the console.
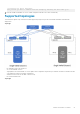
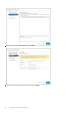
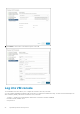
SmartFabric vCenter setup
This information describes how to set up the appliance with the required network interface configurations, and registration with vCenter
and SmartFabric. The latest version supports up to 10 vCenters and 16 SmartFabric domains.
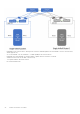
As part of the initial setup, interface profiles can first be configured using an SSH client to configure the vCenter and SmartFabric
registration. Using SSH, you can copy and paste into the window to lessen the chances of entering the wrong password.
1. Select 0. Full Setup.
2. Select Edit a connection, then click OK.
OpenManage Network Integration
29